-
EJBCA Cloud AWS
- AWS Launch Guide
-
Quick Start Guide
- Create Crypto Tokens
- Create Root CA Certificate Profile
- Create Issuing CA Certificate Profile
- Create Certificate Authorities
- Create User and Workstation Profiles
- Create End Entity Profiles
- Request Certificate
- Create Another Administrator Account
- Import Certificate to Mozilla Firefox
- Configure Health Checks
- Create CRL Updater Service
- AWS Backup Guide
- AWS Restore and Upgrade Guide
- AWS TLS Certificate Generation Guide
- AWS RA Configuration and Administration Guide
- AWS VA Configuration and Administration Guide
- AWS Cluster Configuration Guide
-
AWS CloudHSM Integration Guide
- Multiple Crypto Tokens with AWS CloudHSM
- 1 - Create CloudHSM Cluster
- 2 - Use OpenSSL to Validate the HSM
- 3 - Initialize the CloudHSM
- 4 - Assigning the Security Group to the EJBCA Instance
- 5 - Configure the cloudhsm-client
- 6 - PKCS11 PIN
- 7 - Activate the Cluster
- 8 - Create a CloudHSM Crypto User
- 9 - Create a Keystore in the HSM with clientToolBox
- 10 - Test with EJBCA ClientToolbox
- 11 - Create a CryptoToken in EJBCA
- Appendix A - Restoring an HSM Backup to a New Instance
- Appendix B - Troubleshooting HSM Issues
-
AWS Certificate Manager Integration Guide
- Provisioning an EJBCA Instance and setting up CloudHSM
- Create Root CA Keys
- Create CloudHSM Crypto Token for Root CA
- Create the Root and Issuing CA Certificate Profiles
- Create End Entity Sub CA Profile
- Create Root CA that uses the CloudHSM Crypto Token
- Create AWS ACM Certificate Authority CSR
- Add ACM PCA End Entity
- Generate the ACM PCA Certificate for AWS
- Fulfill the Pending ACM PCA Certificate Request
- AWS S3 Publisher Configuration Guide
- How to Create Support Package
-
EJBCA Cloud Azure
- Azure Launch Guide
- Azure Backup Guide
- Azure Restore and Upgrade Guide
- Azure TLS Certificate Generation Guide
- Azure RA Configuration and Administration Guide
- Azure VA Configuration and Administration Guide
- Azure Cluster Configuration Guide
- Azure Key Vault Integration Guide
- How to Create Azure Support Package
- EJBCA Cloud Release Notes
Copying Backup Files to Other Systems
Using either the command line interface (CLI) or a Secure Copy Protocol (SCP) utility, copy the file to your local system. You can copy the file directly from one instance to another if your VPC allows it. In this example, we will bring the file down locally and then SCP it to the new instance.
Copy File to Local Workstation
- Copy the file using the CLI:
# scp -i ~/Documents/C2\ Comp/PrimeKey/EC2\ Creds/c2-ssh/c2-ssh.pem ec2-user@ec2-34-229-187-81.compute-1.amazonaws.com:/home/ec2-user/ejbca_db-ip-172-16-0-128.ec2.internal-1509663778.tar.gz ~/Downloads/ejbca_db-ip-172-16-0-128.ec2.internal-1509663778.tar.gz
- Copy the file using a SCP utility (in this case Cyberduck):
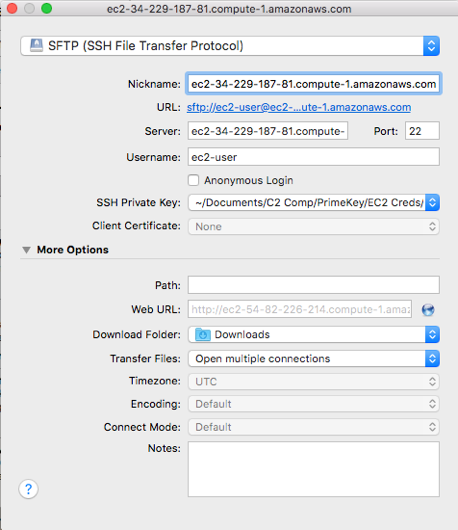
- Specify details to connect to your instance, for example hostname, username, and SSH key:
- Connect to the instance and download the file to the local system:
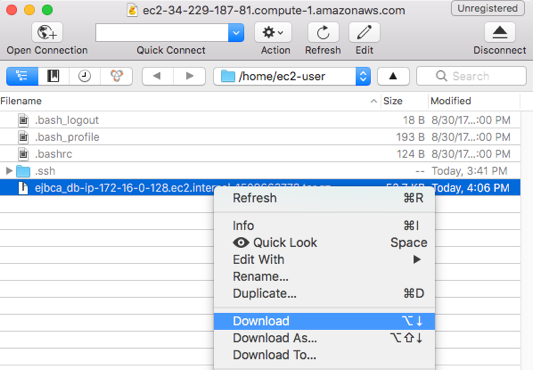
- Wait for the download to complete.
- Specify details to connect to your instance, for example hostname, username, and SSH key:
Copy Backup File to Another Instance
- SCP the backup file to another instance using the following CLI command:
# scp -i ~/Documents/C2\ Comp/PrimeKey/EC2\ Creds/c2-ssh/c2-ssh.pem ~/Downloads/ejbca_db-ip-172-16-0-128.ec2.internal-1509663778.tar.gz ec2-user@ec2-52-23-217-245.compute-1.amazonaws.com:/home/ec2-user/
- Once the backup file is copied, SSH into the new host and verify that the file was copied correctly.