Get started with EJBCA Community container on AWS
Learn how to get started with EJBCA Community edition container on the AWS Marketplace.
In this guide, you will learn to:
- Pull EJBCA Community container
- Start EJBCA Community container
- Generate administrator certificate
- Import certificate into browser
- Access EJBCA
Prerequisites
Before you begin, you need Docker running in the background. To download and install Docker, refer to docker.com.
You also need to configure a profile for the AWS CLI to use when connecting to AWS. You can accomplish this by calling the aws configure command, which will prompt you for the necessary values, including your user's Access Key ID and Secret Access Key. For more information, refer to the AWS Documentation on Set up the AWS Command Line Interface (AWS CLI).
Step 1 - Log into the AWS container registry
Before you pull a container image from AWS Marketplace, you must first log in to the registry of AWS Marketplace. The Amazon Elastic Container Registry (Amazon ECR) is an AWS managed container image registry service.
To log into the AWS container registry, use the following command:
$ aws ecr get-login-password --region us-east-1 | docker login --username AWS --password-stdin 709825985650.dkr.ecr.us-east-1.amazonaws.comCODE
Step 2 - Pull EJBCA Community container
Once you have successfully logged in, you can download the container image straight from the command line using the docker tool pull command.
To pull the EJBCA Community container image, use the following command:
$ docker pull 709825985650.dkr.ecr.us-east-1.amazonaws.com/keyfactor/ejbca-ce:7.11.0CODE
Step 3 - Start EJBCA Community container
The following describes how to start the container with client certificate authenticated access and using parameters such as exposing ports to the localhost.
Start the container with the container hostname set to "localhost":
$ docker run -it --rm -p 80:8080 -p 443:8443 -h localhost -e TLS_SETUP_ENABLED="true" 709825985650.dkr.ecr.us-east-1.amazonaws.com/keyfactor/ejbca-ce:7.11.0CODE- The end of the output is similar to the following, displaying the URL, username, and password to use to enroll for the initial SuperAdmin client certificate:
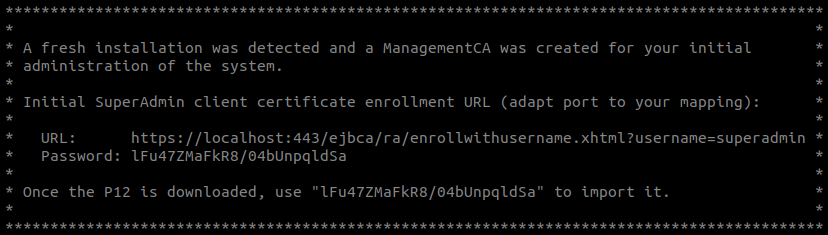
EJBCA is now up and running and has generated a Management CA (used to manage internal PKI in EJBCA) as well as an initial super administrator with full rights.
Step 4 - Generate administrator certificate
To access the EJBCA CA UI, the SuperAdmin credentials need to be retrieved from the server and installed in your browser. We recommend using Mozilla Firefox as it has self-enrollment capabilities and its own keystore separate from the operating system.
The P12 (PKCS#12 file) referred to in the console output above is a key pair that will be generated by the EJBCA server when accessing the provided URL. The P12 format contains the private key, a certificate signed by the Management CA containing the public key, and is encrypted and password protected. It is with these credentials you will be able to generate additional administrators and users, CAs, and profiles, and therefore you mustn't lose these credentials.
To generate the super admin credentials:
- To generate the P12, copy the URL from the console output and paste it into your browser.
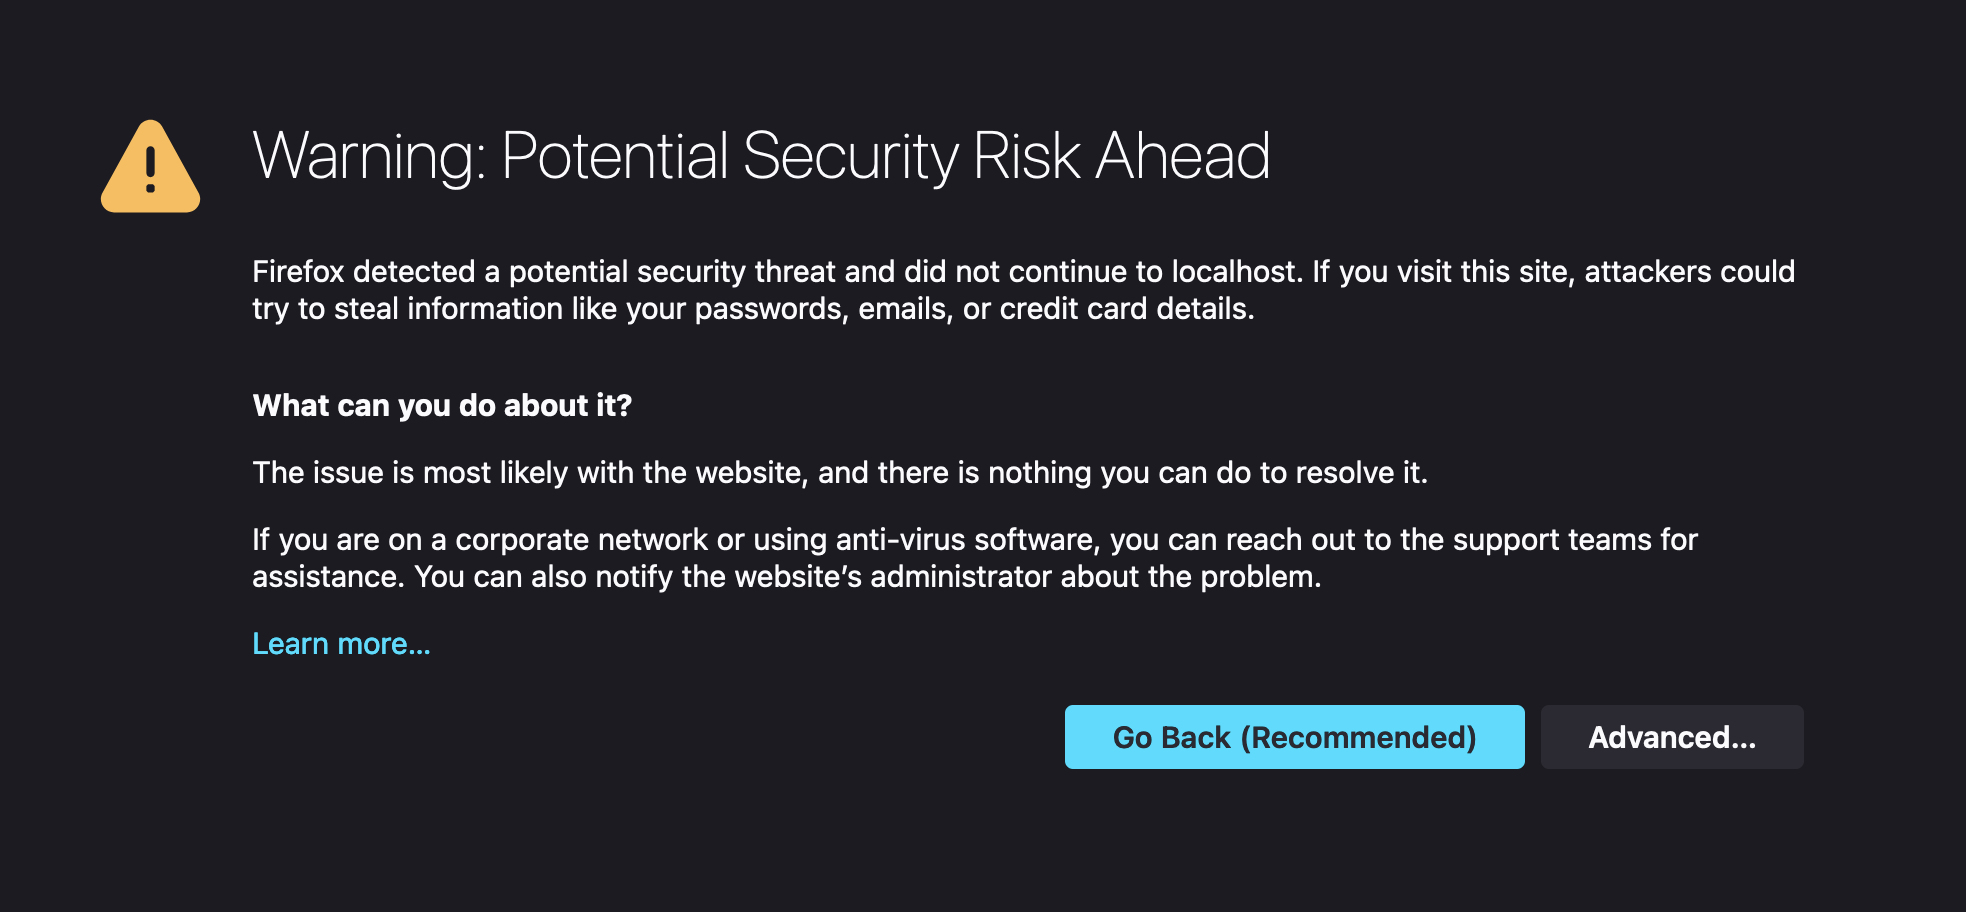
- A browser warning is shown as you have not added the Management CA to the list of trusted roots in your certificate store (nor will you need to for this example). Accept this warning by clicking Advanced and then clicking through the warning.
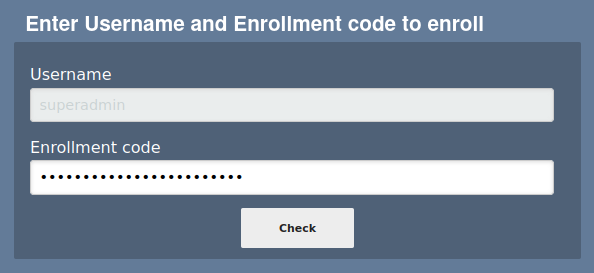
- On the EJBCA RA Web Enrollment page, enter the username "superadmin" (case sensitive) and the password from the console output and click OK.
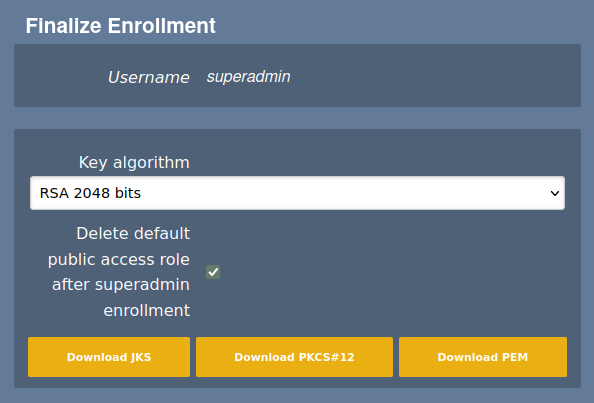
On the Finalize Enrollment page, select a key algorithm and length in the Key algorithm list, for example RSA 2048 bits, and click Enroll to generate a file named superadmin.p12 and download the file.
Step 5 - Import certificate into browser
To access the EJBCA CA UI, import the downloaded SuperAdmin certificate into your web browser.
The procedure for importing a certificate may vary. This example describes how to import a certificate to Mozilla Firefox.
To import the certificate in Mozilla Firefox:
- On the Firefox menu, select Preferences.
- Click Privacy & Security.
- In the Security section, click View Certificates.
- On the Your Certificates tab, select Import.
- Browse to the downloaded P12 keystore (
superadmin.p12file) to import and select the file. - Enter the password provided in the console output, and click Sign in.
- On the Mozilla Firefox tab Your Certificates, verify that the certificate was imported, and then click OK.
Step 6 - Access EJBCA
Next, point your browser to https://localhost/ejbca/adminweb/ to access EJBCA using the imported certificate.
EJBCA CA UI opens displaying the administration page.

Next steps
In this guide, you learned how to start an EJBCA Community container with client certificate authenticated access and download and install the administrator certificate to access EJBCA.
To learn how to create basic profiles and issue a client authentication certificate in EJBCA, you can follow the tutorial Issue Client Authentication Certificate using EJBCA.
To find out more about EJBCA use cases, see Solution Areas.
Related Quick Start Guides
-
Page: