Tutorial - Issue Matter IoT-compliant certificates with EJBCA
Learn how to set up a Matter IoT-compliant PKI and issue certificates for your devices.
As a product vendor in the Matter IoT ecosystem, manufacturing Matter-compliant devices, you need a PKI to issue device certificates. In the Matter IoT specification, certificates are used to implement unique identities to ensure that only authenticated and certified devices are allowed to join the network. The Matter specification is available on the Connectivity Standards Alliance website and a Matter-compliant PKI must follow the Matter PKI Certificate Policy.
A Matter PKI consists of three levels:
- Root CA - Product Attestation Authority (PAA): Root CA that signs the certificates of the Product Attestation Intermediate (PAI).
- Sub CA - Product Attestation Intermediate (PAI): Sub CA that issues Device Attestation Certificates (DACs).
- End Entity - Device Attestation Certificate (DAC): Matter standardized certificates issued for the IoT devices.
While this tutorial demonstrates how you can use EJBCA to issue Matter IoT-compliant certificates for your smart home products, there are other operational aspects to running a PKI compliant with the Certificate Policy that must be considered for production environments.
In this tutorial, you will learn how to create the PKI and issue the certificates:
- Create a PAA as a standalone Root CA (meant to be off-line/air-gapped)
- Create a PAI on a separate system and create a Certificate Signing Request (CSR) to send to the PAA Root CA
- Upload the CSR to the PAA and issue a PAI certificate
- Activate the PAI by importing the issued certificate
- Create DAC profiles on the PAI issuing CA
- Generate a CSR and simulate a CSR from a DAC (using OpenSSL)
- Upload the CSR to the PAI and issue a DAC certificate
- Verify the DAC certificate and display the certificate contents
Prerequisites
Before you begin, you need the following:
- Docker running in the background. To download and install, refer to the Docker documentation.
- Additionally, OpenSSL is required for generating a key pair and a CSR. For more information, refer to openssl.org.
The Matter standard and certificate policy may be updated, so always verify any profiles created below with the latest version of Matter specifications and policies.
Step 1 - Create and configure PAA
You will create a separate Root CA, the Product Attestation Authority (PAA), that can sign one or several PAIs. Note that for this tutorial, you will be running everything on the same machine but in a real-life setting you would have the Root CA offline and air-gapped and thus create the PAA as a standalone Root CA on a separate machine.
The following provides steps for starting an EJBCA container for the Root CA (PAA) and creating and configuring the PAA Root CA.
Start EJBCA container
To start EJBCA as a container for the Root CA (PAA), the following demonstrates using an ephemeral instance and TLS_SETUP="simple" for easy access in a non-production environment. To install a persistent and more secure setup, you can follow Start EJBCA Container with Client Certificate Authenticated Access.
The command maps the ports 28080 and 28443 for the local machine to connect to the container, in order to separate it from any other instance. You can use the ports of your choice on your local machine.
To pull and start the EJBCA container for the Root CA (PAA), enter the following in your terminal:
docker pull keyfactor/ejbca-ce docker run -it --rm -p 28080:8080 -p 28443:8443 -h mycahostname -e TLS_SETUP_ENABLED="simple" keyfactor/ejbca-ceCODEUse sudo if you must run docker as root in your environment.
Create PAA crypto token
To create a soft Root CA (PAA) crypto token and keys, follow these steps:
Open a browser to the PAA by navigating to the URL from the console output, such as https://mycahostname:28443/ejbca/adminweb/
- Click through the security warning and accept the risk and continue.
In the EJBCA menu, under CA Functions, click Crypto Tokens.
- Click Create new and specify the following on the New Crypto Token page:
- Name: Name the Root CA crypto token PAA.
- Type: Select Soft.
- Authentication Code: Enter a password to be used to activate the crypto token if the container is restarted. Remember this password.
- Name: Name the Root CA crypto token PAA.
- Click Save to create the PAA crypto token.
- Next, to generate three keys for the PAA that comply with the Matter standard:
- For the signKey, select ECDSA P-256, and then click Generate new key pair to create the keys.
- Repeat to create a testKey using ECDSA P-256, and then click Generate new key pair.
Last, repeat to create the default encryptKey using ECDSA P-256, and then click Generate new key pair.
You have now created the PAA crypto token and keys. The signKey will be used for the digital signatures and the testkey and encryptkey are used internally by EJBCA.
Create PAA certificate profile
To create a certificate profile for creating the PAA in a later step, follow these steps:
- In EJBCA, under CA Functions, click Certificate Profiles.
- Click Clone next to the default profile template ROOTCA to use that as a basis for creating your new PAA profile.
- Name the new certificate profile PAA, and click Create from template.
- To edit the profile values to fit your needs, find the newly created PAA displayed in the list and click Edit.
- On the Edit page, update the following to use elliptic curve keys instead of RSA keys:
- For Available Key Algorithms, select ECDSA.
- For Available ECDSA Curves, select P-256.
- For Signature Algorithm, select SHA256WithECDSA.
- For Validity, specify 10y.
- Clear Subject Alternative Name.
- Clear Issuer Alternative Name.
- Clear LDAP DN Order.
- Click Save to store the PAA certificate profile.
The newly created PAA profile is displayed in the list of certificate profiles.
Create PAA
When creating the PAA in the following steps, use the Mater-specific DN field Vendor ID number FFF1 as used in the example provided in the Matter standards specification.
To create the Root CA PAA, follow these steps:
- Click Certification Authorities under CA Functions.
- In the Add CA field, enter the name “PAA” and click Create.
- On the Create CA page, update the following:
- In the Crypto Token list, select the crypto token PAA (created earlier in Create PAA crypto token).
- For Signing Algorithm, SHA256WithECDSA is selected according to the profile.
- Under CA Certificate Data, specify the following:
- Subject DN: Enter "CN=My PAA, VID=FFF1".
- Signed By: Verify that Self Signed is selected.
- Certificate Profile: Verify that the PAA profile (created earlier in Create PAA certificate profile) is selected.
- Validity: Specify 10y.
- LDAP DN order: Clear Use.
- In the Crypto Token list, select the crypto token PAA (created earlier in Create PAA crypto token).
- Click Create to create the PAA.
The created PAA is active and displayed in the list of CAs. Next, continue to download the certificate for the PAA in the next step.
Download PAA certificate
To download the certificate for the PAA, follow these steps:
- In EJBCA, click RA Web to access the EJBCA RA UI.
- Click CA Certificates and CRLs in the menu bar.
- On the CA Certificates and CRLs page, for the PAA, click PEM in the Certificate column.
- The PEM file for the PAA certificate is downloaded as a MyPAA.pem file.
The downloaded PAA certificate MyPAA.pem file will be used later when importing the CA certificate.
Next, continue with configuring EJBCA and preparing for creating the Sub CA PAA.
Create PAI certificate profile
To configure the PAA with a Sub CA profile to issue PAI certificates, follow these steps:
- Go back to the EJBCA Admin UI and click Certificate Profiles under CA Functions.
- Click Clone next to the PAA profile to use that as a basis for creating your new PAI profile.
- Name the new certificate profile PAI, and click Create from template.
- To edit the profile values to fit your needs, find the newly created PAI displayed in the list and click Edit.
- On the Edit page, update the following to use elliptic curve keys instead of RSA keys:
- For Type, select Sub CA instead of Root CA.
- For Validity, specify 10y.
- For Type, select Sub CA instead of Root CA.
- Click Save to store the PAI certificate profile.
The newly created PAI profile is displayed in the list of certificate profiles.
Create PAI end entity profile
To create a Sub CA end entity on the PAA to prepare for issuing a PAI certificate, follow these steps:
- In EJBCA, under RA Functions, click End Entity Profiles.
- In the Add Profile field, add a name for the new profile, in this example PAI, and click Add profile.
- Select the newly created PAI profile, and click Edit End Entity Profile to update the profile.
- Edit the profile and update the following:
- Clear End Entity E-mail to not save any email addresses.
- Under Subject DN Attributes:
- Add Matter VID, select Required and clear Modifiable and specify the example Vendor ID number FFF1 as used as example in the Matter standards specification. Thus, this profile is now defined to be used only by the vendor with the ID FFF1.
- Add Matter PID and additionally select Required so that is set to both Required and Modifiable.
- Add Matter VID, select Required and clear Modifiable and specify the example Vendor ID number FFF1 as used as example in the Matter standards specification. Thus, this profile is now defined to be used only by the vendor with the ID FFF1.
- For Default Certificate Profile, select the PAI profile (created earlier in Create PAI certificate profile)).
- For Available Certificate Profiles, select the PAI profile (created earlier in Create PAI certificate profile).
- For Default CA, select the PAA (created earlier in Create PAA).
- For Available CAs, select the PAA (created earlier in Create PAA).
- For Available Tokens, select User Generated.
- Click Save to store the end entity profile.
The newly created PAI profile is displayed in the list of end entity profiles.
Add PAI end entity
To create an end entity for the PAI, follow these steps:
- In EJBCA, under RA Functions, click Add End Entity and specify the following:
- For End Entity Profile, select the PAI end entity profile (created earlier in Create PAI end entity profile).
- For Username, specify a username such as mypai. The Username is the name that will go into the database and is often the same as the Common Name.
- Password, specify a one-time enrollment code.
- Confirm Password: As above.
- For CN, Common name, specify a name, such as MyPAI.
- For Matter VID, verify that FFF1 is used as specified in the end entity profile.
- For Matter PID, specify the example Product ID number 8000 as used as example in the Matter standards specification.
- For End Entity Profile, select the PAI end entity profile (created earlier in Create PAI end entity profile).
- To add the end entity, click Add.
The end entity user credentials will be used in a later step when signing the PAI certificate.
You now have created a PAA as a standalone Root CA and configured it with Sub CA profiles to enable issuing a PAI certificate.
Step 2 - Create and configure PAI
Next, you will create a separate PAI. The PAI is a Sub CA to the PAA and signs one or several DACs.
The following provides steps for starting a second EJBCA container for the Sub CA (PAI) and creating and configuring the PAI Sub CA.
Start EJBCA container
To start a second EJBCA container for the Sub CA (PAI) make sure to use different ports than the ones used when starting the first EJBCA container for the Root CA (PAI) in Step 1 - Create and configure PAA. The example command below will map the ports 38080 and 38443 for the local machine to connect to the container.
The following example uses an ephemeral instance and TLS_SETUP="simple" for the easiest access. To install a persistent and more secure setup, you can follow Start EJBCA Container with Client Certificate Authenticated Access.
To pull and start a second EJBCA container for the Sub CA (PAI), enter the following in a new terminal window:
docker pull keyfactor/ejbca-ce docker run -it --rm -p 38080:8080 -p 38443:8443 -h mycahostname -e TLS_SETUP_ENABLED="simple" keyfactor/ejbca-ceCODEUse sudo if you must run docker as root in your environment.
Import CA certificate
To import the PAA RooT CA certificate, follow these steps:
Open a browser to the PAI by navigating to the URL from the console output, such as https://mycahostname:38443/ejbca/adminweb/
- Click through the security warning and accept the risk and continue.
- In the EJBCA menu, under Certification Authorities, click Import CA Certificate.
- To import the PAA certificate downloaded in a previous step, do the following:
- For The name this CA will be given, specify PAA.
- Click Browse to upload the PAA certificate MyPAA.pem file previously downloaded.
- Click Import CA Certificate.
- For The name this CA will be given, specify PAA.
The PAA is displayed in the Certification Authorities list as an external CA.
Create PAI crypto token
To create a soft Sub CA (PAI) crypto token and keys, follow these steps:
In the EJBCA menu, under CA Functions, click Crypto Tokens.
- Click Create new and specify the following on the New Crypto Token page:
- Name: Name the Sub CA crypto token PAI.
- Type: Verify that Soft is selected.
- Authentication Code: Enter a password to be used to activate the crypto token if the container is restarted. Remember this password.
- Name: Name the Sub CA crypto token PAI.
- Click Save to create the PAI crypto token.
- Next, to generate three keys for the PAI that comply with the Matter standard:
- For the signKey, select ECDSA P-256, and then click Generate new key pair to create the keys.
- Repeat to create a testKey using ECDSA P-256, and then click Generate new key pair.
Last, repeat to create the default encryptKey using ECDSA P-256, and then click Generate new key pair.
You have now created the PAI crypto token and keys.
Create PAI
When creating the PAI in the following steps, use the Mater-specific DN fields Vendor ID (VID) number FFF1 and Product ID (PID) number 8000 as used in the examples provided in the Matter standards specification.
To create the Sub CA PAI, follow these steps:
- Click Certification Authorities under CA Functions.
- In the Add CA field, enter a name such as “PAI” and click Create.
- On the Create CA page, update the following:
- In the Crypto Token list, select the crypto token PAI (created earlier in Create PAI crypto token).
- Under CA Certificate Data, specify the following:
- Subject DN: Enter "CN=My PAI, VID=FFF1, PID=8000".
- Signed By: Select External CA to enable the Root CA PAA to sign the PAI certificate.
- LDAP DN order: Clear Use.
- To generate a CSR, click Make Certificate Request at the bottom of the page.
- On the Certificate Request Generated page, select the CSR in the text field and copy the string to the clipboard.
- Click Back to Certificate Authorities.
The created PAI is displayed in the list of CAs as waiting for certificate response. Next, continue to get the PAA to sign the PAI Sub CA certificate in the next step.
Sign PAI certificate
Next, to allow the PAA to sign the PAI Sub CA certificate, switch back the PAA still running in the first container you created.
- Switch to the browser tab for the PAA container that you created initially (https://mycahostname:28443/ejbca/adminweb/)
- Click RA Web to access the EJBCA RA UI.
- To enroll, select Enroll > Use Username and specify the following:
- Username: Enter the username mypai as specified earlier in the step Add PAI end entity.
- Enrollment code: Enter the password specified earlier in the step Add PAI end entity.
- Click Check.
- In the text field, paste the CSR that you copied to the clipboard when you made the certificate request in the previous step.
- Click Download PEM to download and save the file MyPAI.pem.
You now have the PAI certificate that has been signed by the PAA Root CA.
Import signed PAI certificate
Next, to import the CA certificate, switch to the PAI instance where the PAI is waiting for a certificate response:
- Switch to the browser tab for the PAI container (https://mycahostname:38443/ejbca/adminweb/).
- Click Certification Authorities under CA Functions.
- Select the PAI waiting for a certificate response, and click Edit CA.
- In the section Externally signed CA creation/renewal, under Step 2 - Import Certificate, click Browse next to Signed CA Certificate to upload the signed certificate file from the PAI, MyPAI.pem.
- Click Receive Certificate Response to import the externally signed CA certificate and activate the PAI.
The PAI is displayed in the Certification Authorities list and is active. You can now continue with the next steps to create and configure Device Attestation Certificates (DACs) for IoT devices.
Step 3 - Create and configure DACs
Follow these steps to create a certificate profile, end entity profile, and end entity for Device Attestation Certificates (DACs) on the PAI.
Create DAC certificate profile
Create profiles in order to sign DAC certificates from the PAI.
To create a DAC certificate profile, follow these steps:
- In EJBCA, under CA Functions, click Certificate Profiles.
- Click Clone next to the ENDUSER template to use that as a basis for creating your new profile.
- Name the new certificate profile DAC and click Create from template.
- To edit the profile values to fit your needs, find the newly created DAC in the list and click Edit.
- On the Edit page, verify that the type is End Entity and update the following:
- For Available Key Algorithms, select ECDSA to only allow elliptic curve keys.
- For Available ECDSA curves, select P-256.
- For Signature Algorithm, select SHA256WithECDSA.
- For Key Usage, verify that Digital Signature is selected and clear other options.
Clear Extended Key Usage.
Clear Subject Alternative Name.
Clear Issuer Alternative Name extension as the CA does not have an alternative name.
Clear LDAP DN order.
For Available CAs, select your Sub CA PAI.
Click Save to store the certificate profile.
The newly created DAC profile is displayed in the list of certificate profiles.
Create DAC end entity profile
To create an end entity profile for the devices, follow these steps:
- In EJBCA, under RA Functions, click End Entity Profiles.
- In the Add Profile field, specify DAC, and click Add profile.
The newly created DAC profile is displayed in the list of end entity profiles. - Select the profile, and click Edit End Entity Profile.
- Edit the profile and update the following:
- Clear End Entity E-mail to not save any email addresses.
- Select Allow merge DN across all interfaces in order to allow the VID and PID to be passed automatically.
- Under Subject DN Attributes, update the following to define this profile for one specific product:
- Add Matter VID, select Required and clear Modifiable and specify the example Vendor ID number FFF1 as used as example in the Matter standards specification. Thus, this profile is now defined to be used only by the vendor with ID FFF1.
- Add Matter PID, select Required and clear Modifiable and specify the example Product ID number 8000 as used as example in the Matter standards specification. Thus, this profile is now defined to be used only by the product with ID 8000.
- Add Matter VID, select Required and clear Modifiable and specify the example Vendor ID number FFF1 as used as example in the Matter standards specification. Thus, this profile is now defined to be used only by the vendor with ID FFF1.
- For Default Certificate Profile, select the DAC profile (created earlier in Create DAC certificate profile).
- For Available Certificate Profiles, select the DAC profile (created earlier in Create DAC certificate profilee).
- For Default CA, select the PAI (created earlier in Create PAI).
- For Available CAs, select the PAI (created earlier in Create PAI).
- For Available Tokens, select User Generated.
- Click Save to store the end entity profile.
The newly created DAC profile is displayed in the list of end entity profiles.
Add DAC end entity
To create an end entity for the first IoT device that you want a certificate for, follow these steps::
- In EJBCA, under RA Functions, click Add End Entity and specify the following:
- In End Entity Profile, verify that DAC is selected.
- In Username, specify a name for the device, such as dac001.
- Password, specify a one-time enrollment code.
- Confirm Password: As above
- For CN, Common name, specify a name such as 001.
- For Matter VID, verify that FFF1 is used as specified in the profile.
- For Matter PID, verify that 8000 is used as specified in the profile.
- In End Entity Profile, verify that DAC is selected.
- To add the end entity, click Add.
The end entity is added and your PKI is aware of your first device.
Step 4 - Issue Device Attestation Certificate
You can now go ahead and issue Device Attestation Certificates (DACs) which are end entities to the PAI.
The following steps demonstrate how to simulate an IoT device using OpenSSL, generate a key pair for the device, and create a Certificate Signing Request (CSR).
To generate a key pair for the device and create a CSR, follow these steps:
Open a new terminal and enter the following to generate a key pair and save it to a file (dac-001-private.pem):
openssl ecparam -genkey -name prime256v1 -noout -out dac-001-private.pemCODECreate a new Certificate Signing Request (CSR) using the
openssl reqcommand, by specifying the newly created keys (dac-001-private.pem) and save it to a file (dac-001-csr.pem).openssl req -new -key dac-001-private.pem -out dac-001-csr.pem -subj "/CN=001"CODENote that the exact Subject DN in the CSR is not important since the device will not be trusted by default by EJBCA. Instead, the Subject DN specified in the profile takes precedence over the Subject DN included in the CSR.
Use cat to view the created CSR:
cat dac-001-csr.pemCODE- Select the displayed certificate request and copy it to the clipboard.
Sign DAC certificate
Next, to allow the PAI to sign the DAC, follow these steps::
- Switch back to the browser tab for the PAI (https://mycahostname:38443/ejbca/adminweb/)
- Click RA Web to access the EJBCA RA UI.
- To enroll, select Enroll > Use Username and specify the following:
- Username: Enter the username dac001 as specified earlier in Add DAC end entity.
- Enrollment code: Enter the password specified earlier in Add DAC end entity.
- Click Check.
- In the text field, paste the CSR that you copied to the clipboard in the previous step.
- Click Download PEM to download and save the file 001.pem.
The PEM file is downloaded and you have now issued your first DAC compliant to the Matter IoT standard.
Inspect DAC certificate
To inspect the issued certificate, open the downloaded PEM file to view the received certificate:
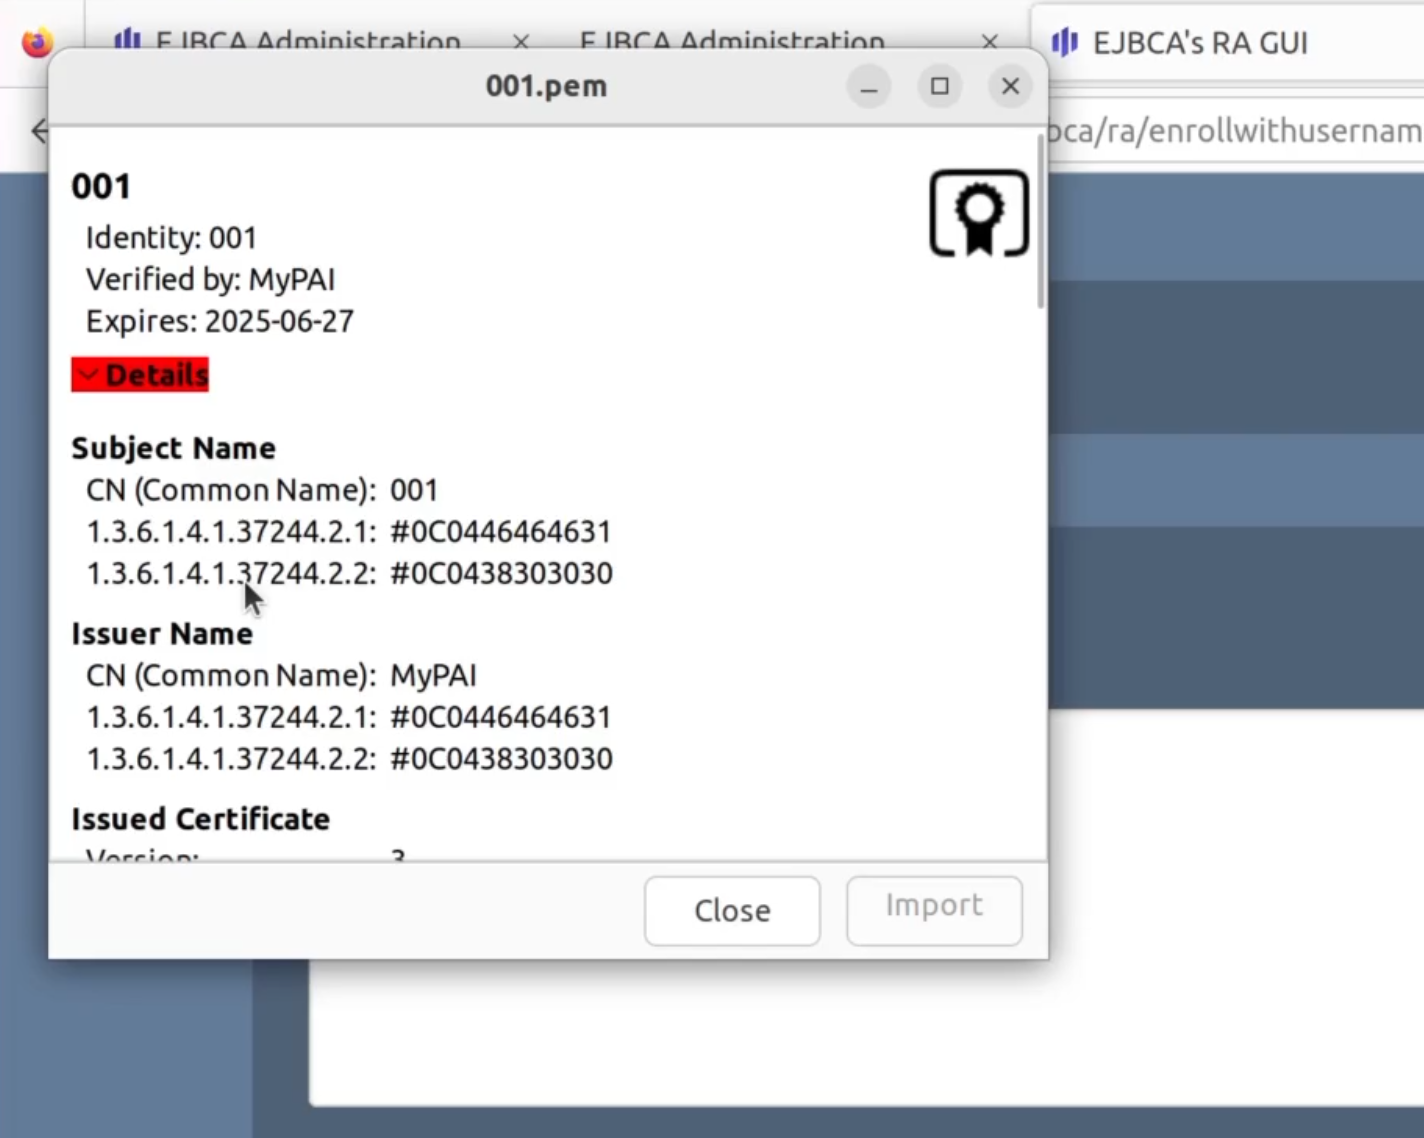
Note that the Matter-specific DN attributes Vendor ID (VID) and Product ID (PID) are listed under the CN (Common name) but the tools for inspecting certificates display the object identifiers since they have not been updated for the Matter standard yet.
Next steps
This tutorial has demonstrated how you can set up a PKI compatible with the Matter IoT standard and issue Device Attestation Certificates (DACs) using EJBCA.
To create a production PKI compliant with the Matter Certificate Policy, other aspects are required such as using a Hardware Security Module (HSM) for the PAA and PAI signing keys.
Next, you can browse our other video tutorials on the Keyfactor Community YouTube channel.
Related Content
-
Page: