TLS Certificate Generation
This section describes how to generate new TLS certificates in SignServer Cloud.
The TLS certificate allows external SSL connections to the server. Setting the correct IP and DNS names will allow the server to respond without browser errors once the ManagementCA is trusted.
Including the public hostname in the TLS certificate (using the -p option) allows remote connections to SignServer via HTTPS as well as the signclient.
HINT If you powered off your AWS instance and want to regenerate your TLS certificates for your new IP, use the -p option. For example, /opt/PrimeKey/support/new_tls_cert.sh -p.
NOTE A total of 6 DNSNames and 3 IPs can be included in the TLS certificate. The local IP (local-ipv4) and hostname (local-hostname) are always included when using the -p option. This leaves 4 DNSName and 1 IP Address spaces remaining. If you do not want the local-hostname and local-ipv4 in your public facing certificate, specify each DNS and IP name you would like using the -d and -i options, omitting the -p.
Using the script without the -p option and with -d <DNSName>, will make the DN of the certificate the first DNSName specified.
Options
Option | Description |
|---|---|
-p | Includes the Public IP (Elastic or Public) assigned to this host. This includes the public and internal IP and DNS entries and reduces the allowed IPs and DNS entries by 2 each. |
-i | Specifies IPAddresses to be used in the SAN certificate generated. A max of 3 can be used unless |
-d | Specifies DNSNames to be used in the SAN certificate generated. A max of 6 can be used unless |
-h | Shows this help text. |
-v | Verbose output. |
Using Elastic or Public IP
SignServer Cloud comes with a script to be able to generate new TLS certificates whenever the public IP is changed. The Public IP can change whenever a node is shut down, if an Elastic IP is not assigned to the instance. A Public IP is the equivalent of a DHCP public address.
As detailed in the hint above, if you want to regenerate or renew the TLS certificate on the node, use the -p option with no other options. It will grab all of the public info and regenerate the certificate.
To generate new certificates using the Elastic or Public IP, do the following:
- Using the SSH key that you selected when procuring the instance, SSH into the SignServer Cloud instance using the username ec2-user:
# ssh -i ssh-key.pem ec2-user@<elastic-ip-fqdn>.compute-1.amazonaws.comCODE - Run the command
sudo suto get elevated privileges:# sudo suCODE - Change to the
/opt/PrimeKey/supportdirectory. - Run the
new_tls_cert.shscript with the-poption.# cd /opt/PrimeKey/support # ./new_tls_cert.sh -pCODE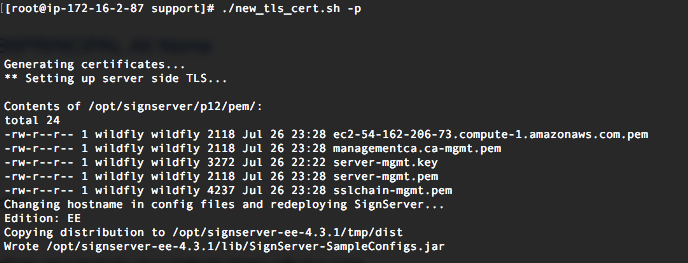
- As a part of this process SignServer automatically redeploys for this since configuration files are updated with the new hostname info. Once complete, the process will ask if Apache should be restarted.

NOTE When using a public IP, this script will need to be run each time the instance is powered down. It will not be affected on reboots. When the instance is powered down, AWS releases the public IP assigned to it back into the pool. For more information, refer to AWS Documentation on Public IPv4 Addresses and External DNS Hostnames.
Using a Custom Domain
To generate new certificates using a custom domain, do the following:
- Using the SSH key that you selected when procuring the instance, SSH into the SignServer Cloud instance using the username ec2-user:
# ssh -i ssh-key.pem ec2-user@<elastic-ip>.compute-1.amazonaws.comCODE - Run the command
sudo suto get elevated privileges:# sudo suCODE - Change to the
/opt/PrimeKey/supportdirectory. - Run the
new_tls_cert.shscript followed by your domain to generate new certificates with the current Public or Elastic IP and your custom DNS value. The following example uses the domainpki.sample.comand the IP address1.2.3.4. When using this method, it is recommended to assign a dedicated elastic IP before running this command, but not required:The following options are used in the command:# cd /opt/PrimeKey/support # ./new_tls_cert.sh -d pki.sample.com -i 1.2.3.4 -p -vCODE-p: To add the nodes public IP information assigned to it by AWS automatically.-d: To add a custom domain to the certificate.-i: To specify a custom IP address.-v: For verbose output to show all of the domains being added to the certificate. - In the output below, with the verbose option, we see that the first and second FQDNs are the public and internal FQDNs from AWS.
- The third FQDN is
pki.sample.comas specified with -d and an IP of1.2.3.4. The same principles apply to the IP addresses as well.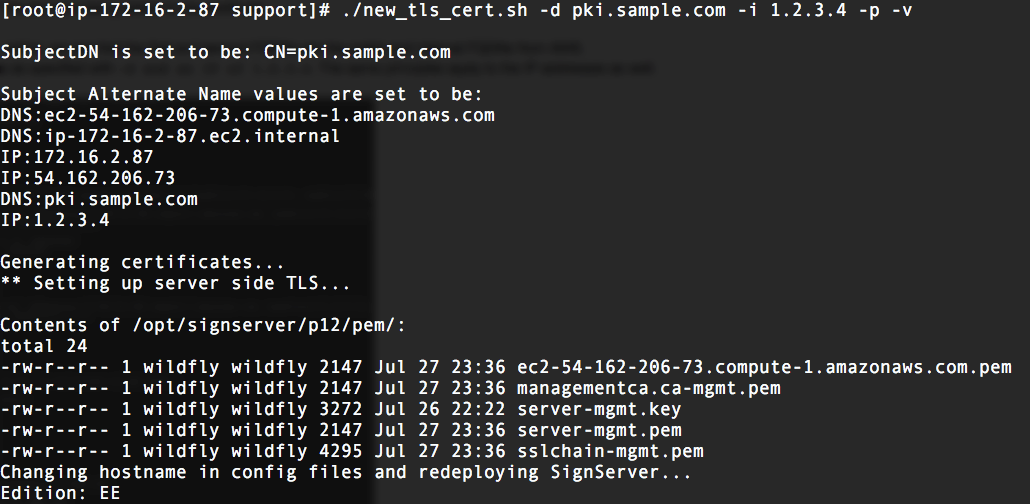
- New certificates will be generated and the current certificates replaced. These will then be rotated into place and the script will prompt to restart Apache.
If using a custom domain name with an Elastic IP, this script should only need to be run once since an Elastic IP should never change. - IMPORTANT Restart your browser. You will receive a "Secure Connection Failed" error message if not.
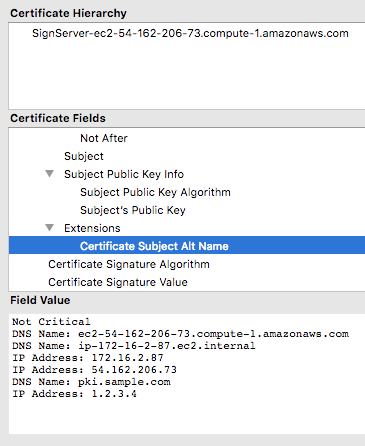
- We can now see the custom information captured in the SAN of the certificate. You may need to restart your browser or clear its cache to load the new certificate.