Peer Connection Configuration
The Peer Connection is configured in the following steps.
Step 1: Create Crypto Token for Peering Key
To create a Crypto Token for the Peering Key, do the following:
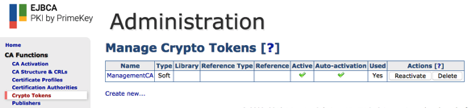
- Create a Crypto Token on the EJBCA instance by selecting Crypto Tokens under CA Functions.
- Click Create New.
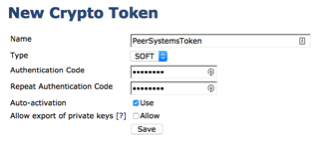
Enter a Name for the Crypto Token, an Authentication Code and enable Auto-activation to ensure that the Crypto Token comes online and is available after a reboot. Click Save.
Enter the key name signserver_peer_systems_key, select RSA 2048, and click Generate new key pair.

Step 2: Create a Certificate Profile for the Peer
To create a Certificate Profile for the Peer, do the following:
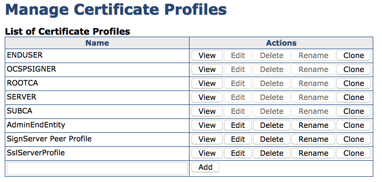
- Select Certificate Profiles under CA Functions.
- In the List of Certificate Profiles enter a name such as SignServer Peer Profile and click Add.
Click Edit on the newly created SignServer Peer Profile. Select the following options in the profile and click Save:
- Available Key Algorithms: RSA
- Available Bit Lengths: 2048
- Validity or end date of the certificate: 10y
- Extended Key Usage: Client Authentication
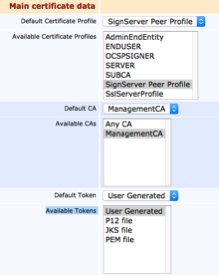
- Under RA Functions, select End Entity Profiles.
- Enter a name for a new profile in the Add Profile Field such as SignServer Peer EE Profile, and click Add.
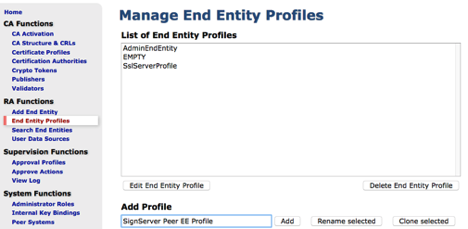
- Select the SignServer Peer EE Profile and click Edit End Entity Profile.
- Within the profile select the following values and then click Save.
- Default Certificate Profile: SignServer Peer EE Profile
- Available Certificate Profiles: SignServer Peer EE Profile
- Default CA: ManagementCA
- Available CAs: ManagementCA
- Default Token: User Generated
- Available Tokens: User Generated
Step 3: Setup the Key Bindings
Setup the key bindings in the following steps:
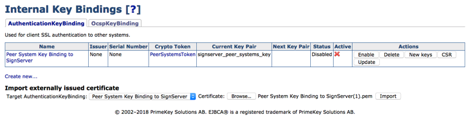
- Click Internal Key Bindings under System Functions.
- On the AuthenticationKeyBinding tab, click Create new and specify the following:
- Name: Peer System Key Binding to SignServer
- Crypto Token: PeerSystemsToken
- Key Pair Alias: signserver_peer_systems_key
- Signature Algorithm: SHA256WithRSA
- Protocol and Cipher Suite: TLSv1.2;TLS_RSA_WITH_AES_256_CBC_SHA256
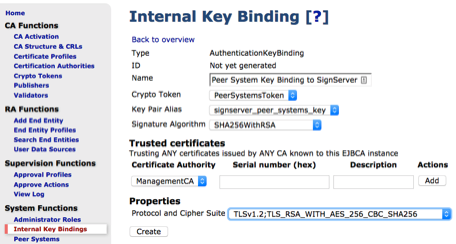
- Click Create and then click Back to overview.
Step 4: Generate a CSR for the KeyBinding
Do the following to generate a CSR for the Key Binding:
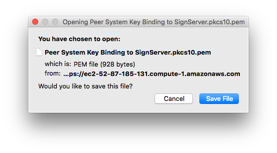
- In the Internal Key Bindings overview, select the CSR action for the Peer System Key Binding to SignServer to download a CSR.

Save this file to a location on your computer.
- Select RA Web in the EJBCA Admin Web menu to access the RA Web.
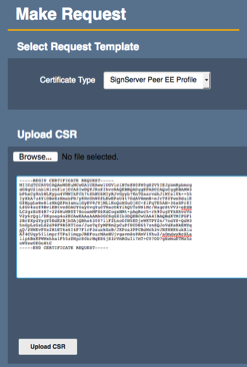
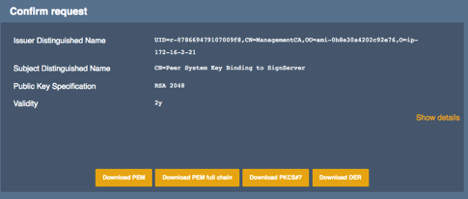
- In the EJBCA RA, click Make New Request.
- In Certificate Type, select the SignServer Peer EE Profile. Then upload the CSR by clicking Browse to select the CSR downloaded in the previous step and click Upload CSR.
- Change the CN, Common Name if desired, and then enter the Username “signserver_peer”.

- Click Download PEM to download the signed certificate and save this file to a location on your computer.
- Go back to the EJBCA Admin Web and select Internal Key Bindings under System Functions.
- Under the Import externally issued certificate header, click Browse, select the PEM file downloaded in the previous step and click Import.
A notification appears at the top that the Operation completed without errors.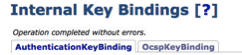
- Click Enable on the Key Binding. A notice appears at the top that the Peer System Key Binding to SignServer status is now ACTIVE and a check-mark indicates its active status.
