Post-Quantum Code Signing How-to
This guide demonstrates code signing based on SignServer using the post-quantum SPHINCS+ or CRYSTALS-Dilithium algorithms through Bouncy Castle and allows you to try out creating post-quantum keys and signatures. The use case is to apply a post-quantum algorithm for code signing in an IoT application.
This implementation is provided for experimental purposes and is not suitable to be used in production.
Introduction
As the time to roll out new Post-Quantum Cryptography (PQC) algorithms gets closer, it is wise to establish a high level of crypto agility in your organization and to try out the new algorithms as final candidate implementations become available from the NIST Post-Quantum Cryptography competition.
SignServer allows you to use the NIST PQC alternate candidates SPHINCS+ and CRYSTALS-Dilithium through Bouncy Castle. These candidate implementations are useful for experimentation and testing but not necessarily suitable for production since the final parameters in the standards will likely differ from what is assumed today. For more information on the PQC finalists and alternate candidates, see our documentation about Post-Quantum Readiness and NIST PQC Competition Algorithms in Bouncy Castle.
By using the CMS Signer and the Keystore Crypto Token with the SPHINCS+ or CRYSTALS-Dilithium algorithms, you can experiment with creating post-quantum keys and signatures, and associated self-signed post-quantum certificates, also using the SPHINCS+ or CRYSTALS-Dilithium algorithms.
With this support in SignServer, it is possible to start experimenting with firmware updates, for example, enabling systems to also update the future validation of firmware updates to require the code to be signed using a post-quantum algorithm, making an IoT device quantum-safe through the use of crypto agility.
Prerequisites
- SPHINCS+ v3.1: SignServer 5.10 or later.
- CRYSTALS-Dilithium: SignServer 6 or later.
For installation instructions, see SignServer Installation.
Part 1 - Signing
Step 1 - Set up a Crypto Token
SignServer workers use a crypto token to talk to the software keystore and you therefore need to set up a worker to hold this crypto token.
To set up a crypto token using a soft keystore, do the following:
- Select the SignServer AdminWeb Workers tab, and click Add.
- Click From Template, select keystore-crypto.properties in the list, and click Next.
- In the configuration text view, specify the following:
- NAME: Specify a name for the worker, for example, CryptoTokenP12PQ.
KEYSTOREPATH: Verify the full path to the keystore file dss10_keystore.p12 (default value is: /opt/signserver/res/test/dss10/dss10_keystore.p12).
KEYSTOREPASSWORD: Uncomment the password for the keystore.
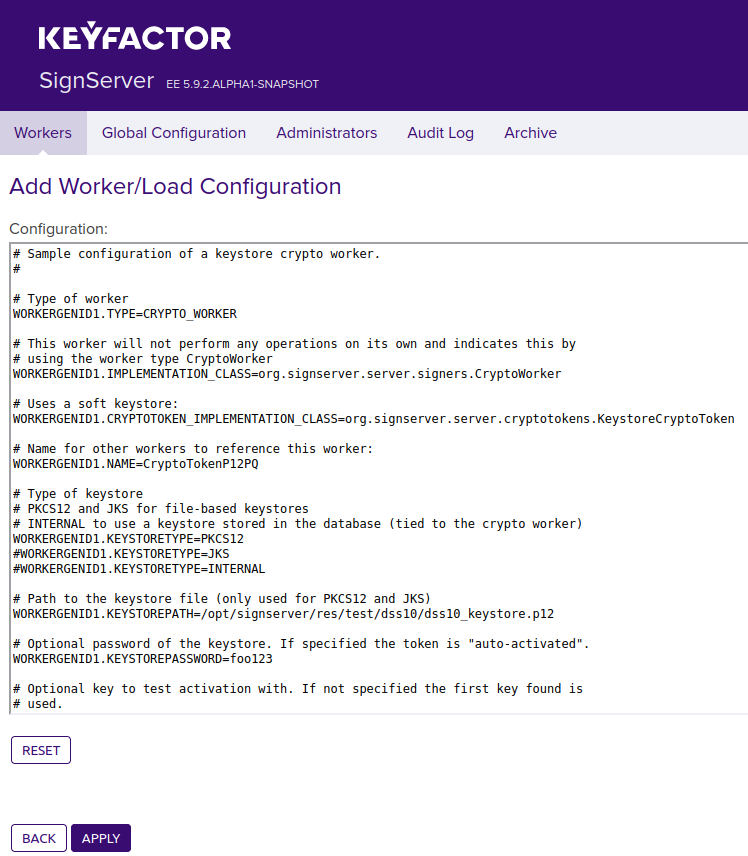
- Click Apply.
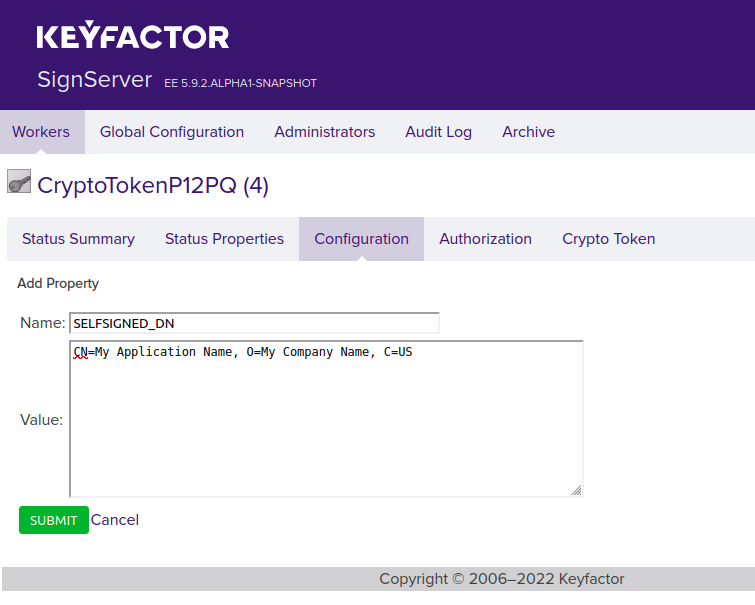
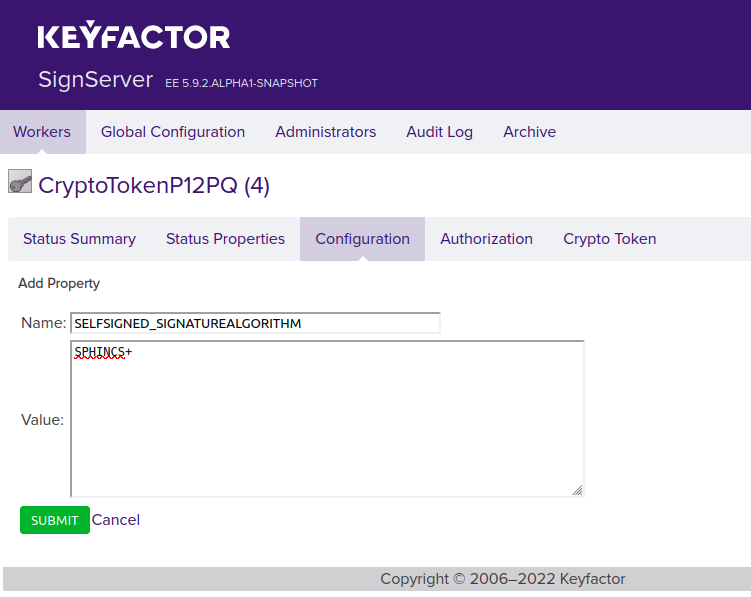
- Set the following crypto token properties to automatically generate a self-signed post-quantum certificate with the specified name and algorithm when generating a key (see General properties):
- SELFSIGNED_DN: Set this to the name that you would like to have in the certificate. Typically, the following format is used: "CN=My Application Name, O=My Company Name, C=US".
- SELFSIGNED_SIGNATUREALGORITHM: Set this to SPHINCS+.
- SELFSIGNED_DN: Set this to the name that you would like to have in the certificate. Typically, the following format is used: "CN=My Application Name, O=My Company Name, C=US".
- Click Submit.
Note the name of the crypto worker (CryptoTokenP12PQ) as you will need it in later steps when setting up the CMS Signer.
Step 2 - Generate Key-pair
SPHINCS+:
To generate a new SPHINCS+ key to use with the signer, follow the steps below:
Select the CryptoTokenP12PQ worker and click the Crypto Token tab.
Click Generate Key to generate a new key pair and specify the following:
Specify a New Key Alias for the new key, for example, PQkey.
To set the Key Algorithm, click the > arrow to change the list of algorithms to a text field and enter SPHINCS+ as the algorithm.
Leave the key specification value as is (for example 1024). This value is not used but the field must be populated.
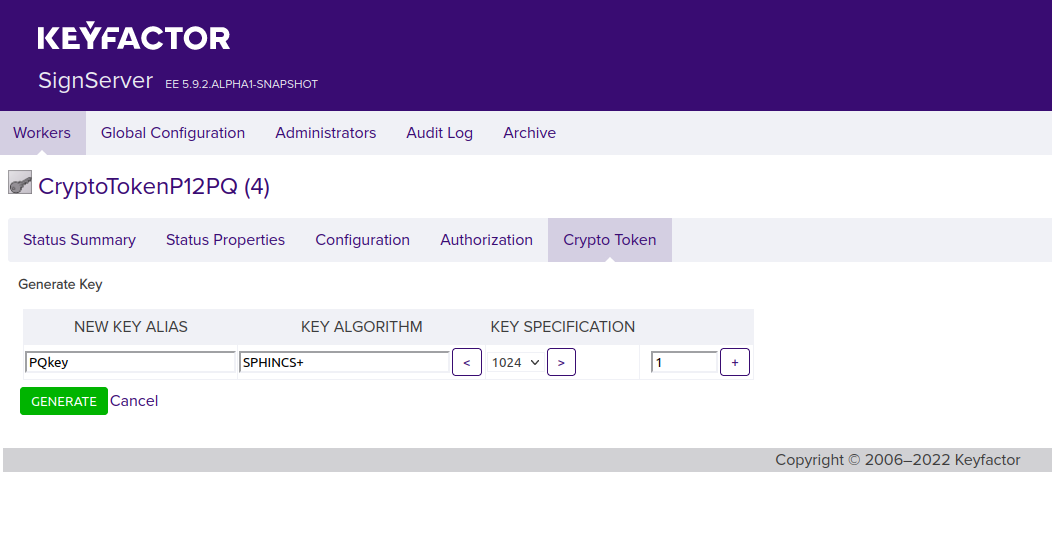
- Click Generate to generate the key pair.
Dilithium:
To generate a new Dilithium key to use with the signer, follow the steps below:
Select the CryptoTokenP12PQ worker and click the Crypto Token tab.
Click Generate Key to generate a new key pair and specify the following:
Specify a New Key Alias for the new key, for example, Dilithium.
To set the Key Algorithm, click the > arrow to change the list of algorithms to a text field and enter Dilithium as the algorithm.
To set the Key Specification, click > arrow to change the list of algorithms to a text field and enter Dilithium2, Dilithium3, or Dilithium5.
Step 3 - Export Certificate
To verify the SPHINCS+ or Dilithium certificate and then export it, do the following:
To find the certificate and verify that it is a SPHINCS+ or Dilithium certificate:
Select the CryptoTokenP12PQ worker and go to the Crypto Token tab.
Click on the newly generated post-quantum key (for example named PQKey or Dilithium).
Click View on the Certificate row.
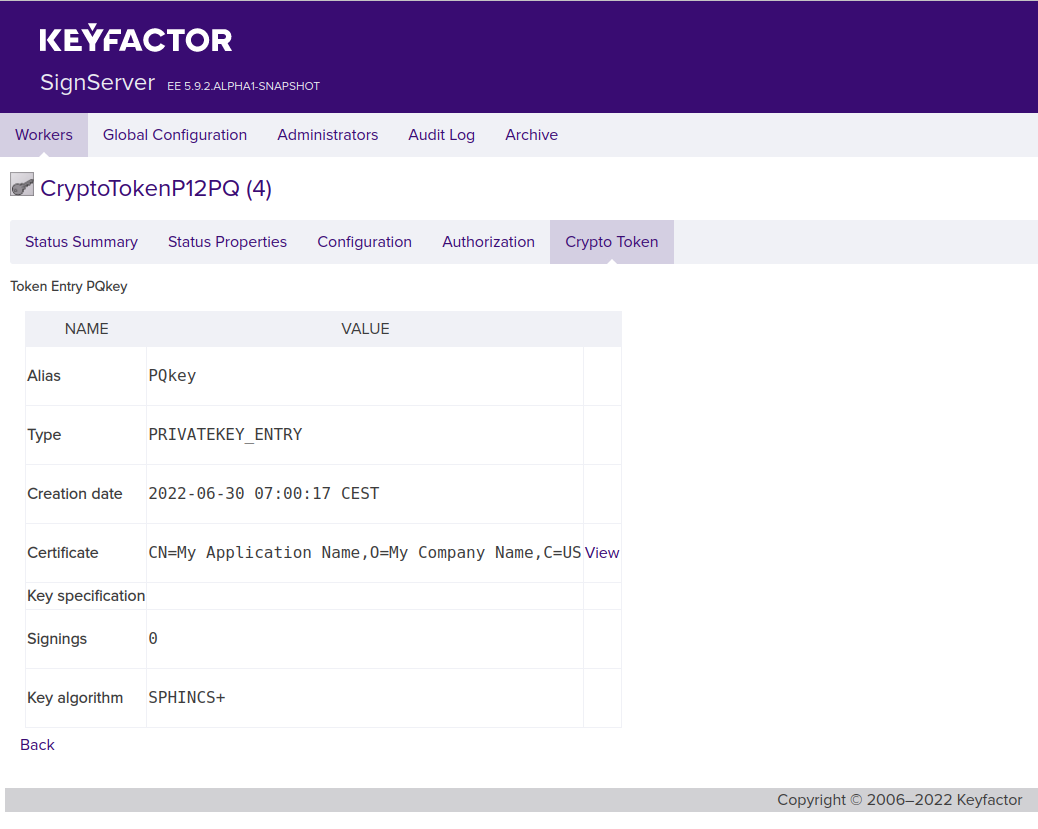
Click the Details tab.

Verify that the Certificate Signature Algorithm is the expected algorithm.
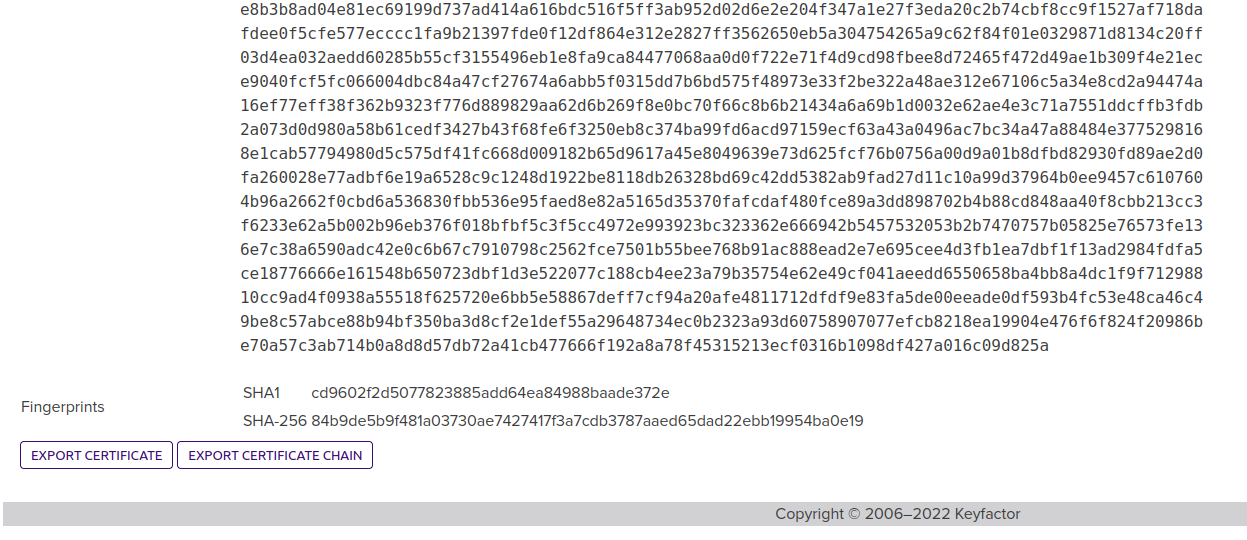
To export the certificate:
On the Details tab, scroll down to the end of the page and click Export Certificate Chain to download the certificate chain as a PEM file.
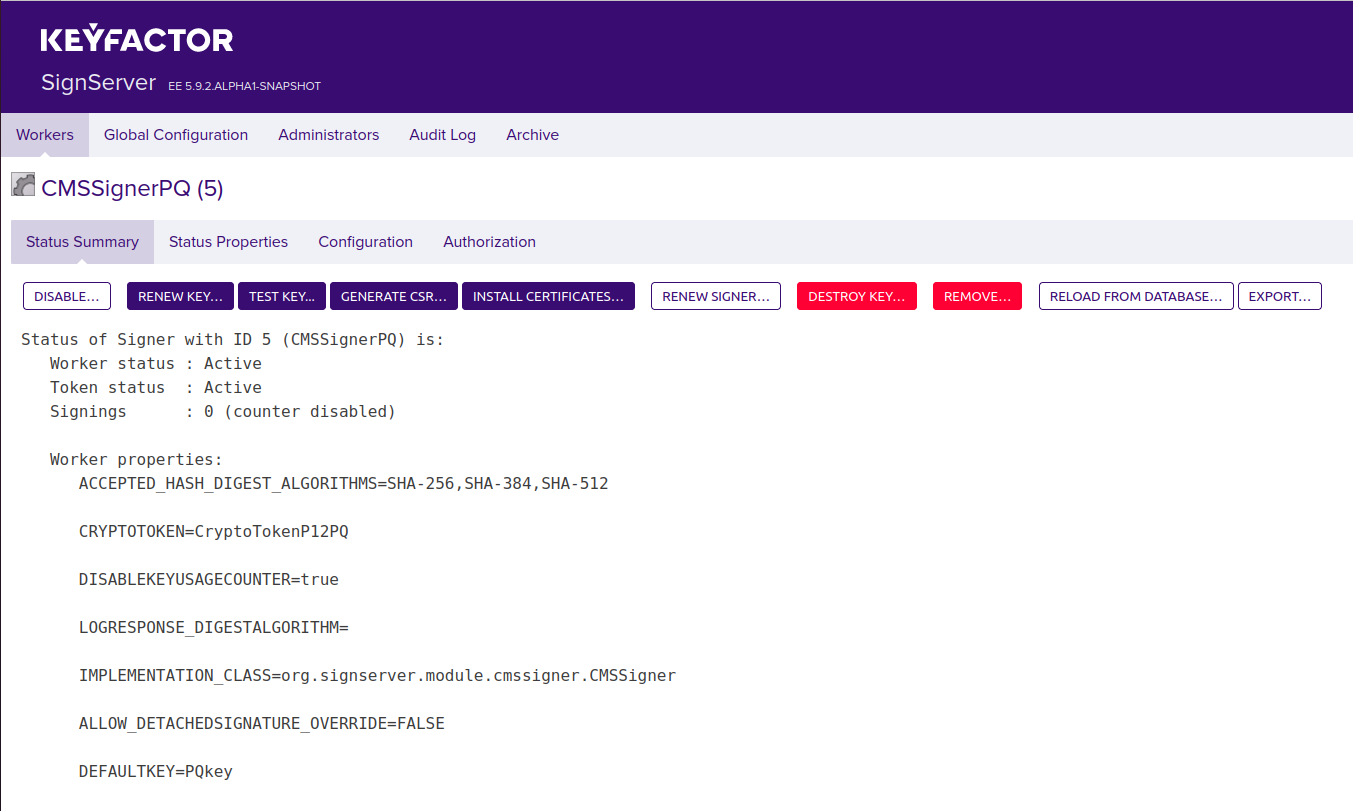
Step 4 - Add CMS Signer
Do the following to add a CMS Signer for detached signatures using the created crypto token:
- Select the SignServer AdminWeb Workers tab, and click Add to add a new worker.
- Choose the method From Template.
- Select cms_signer.properties in the Load from Template list and click Next.
- Change the sample configuration properties according to the following:
- NAME=CMSSignerPQ
- CRYPTOTOKEN=CryptoTokenP12PQ
- DETACHEDSIGNATURE=true
- SIGNATUREALGORITHM=SPHINCS+ or Dilithium
- DEFAULTKEY = specify the name of the new key you just generated (for example PQkey or Dilithium)
- Click Apply to load the configuration and list the worker in the All Workers list.
For a list of all CMS signer-specific properties, see CMS Signer.
Step 5 - Import Certificate
As the certificate used is self-signed, it is not necessary to request a certificate from a Certification Authority (CA). Instead, use the certificate exported from our crypto token in Step 3 - Export Certificate.
On the Workers page, click the CMSSignerPQ worker and then click Install Certificates.
Click Browse to select the downloaded certificate chain file (exported in Step 3 - Export Certificate).
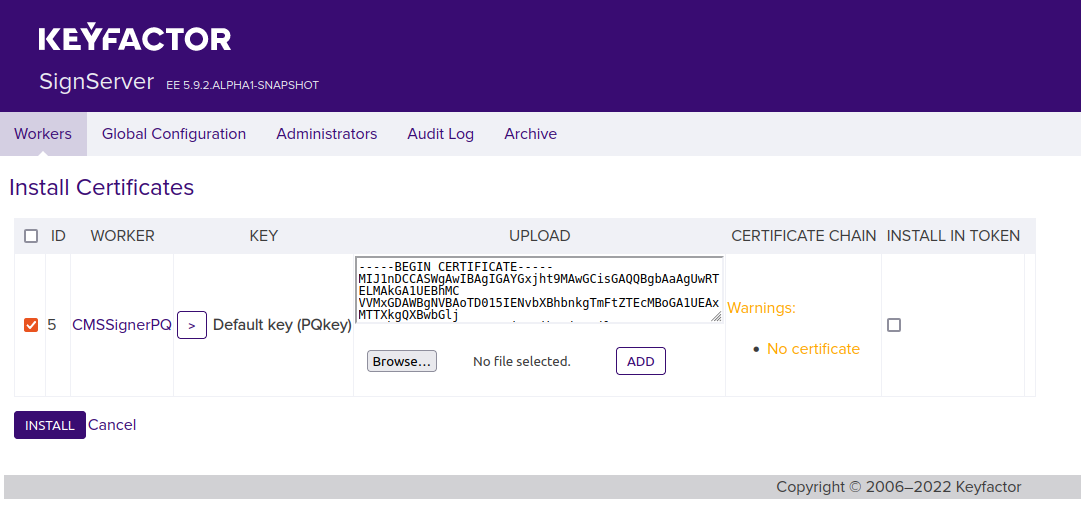
Click Add and verify that you see the certificate DN in the Certificate Chain column.
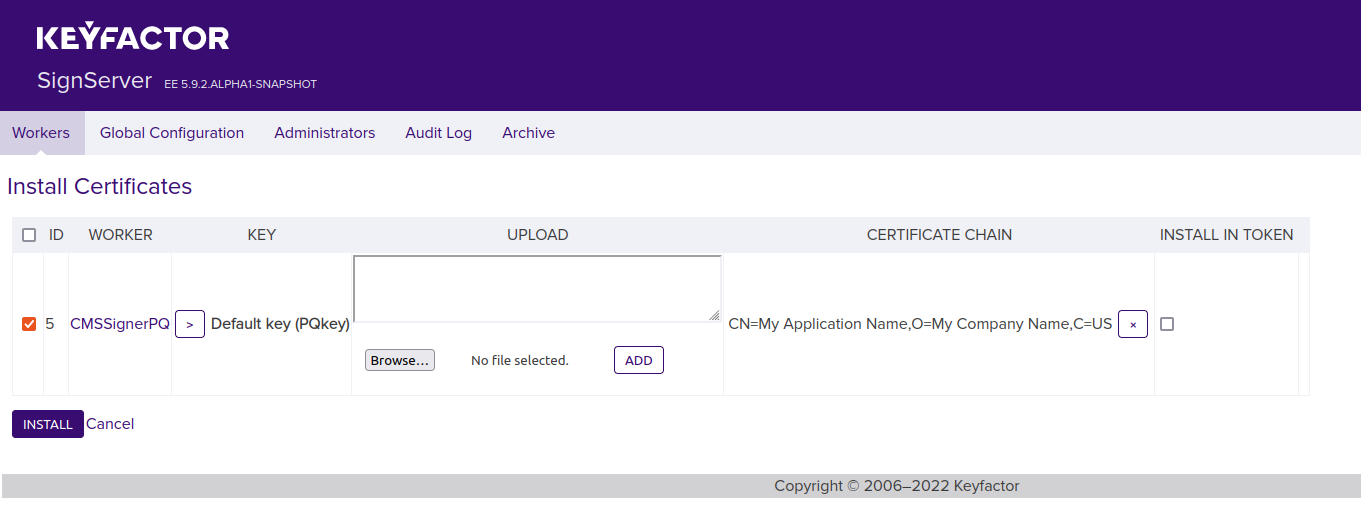
Click Install.
The worker is now listed with the status Active. Confirm that the certificate has the expected name etc.
Step 6 - Sign Firmware File
The following example shows how to sign your firmware file and get back the detached signature using the SignServer Public Web. You can test signing using any of the SignServer client interfaces.
- Click Client Web to go to the SignServer Client Web.
- Under File Upload, specify the Worker name used, in this example CMSSignerPQ.
- Select a file to sign (for example, content.bin).
- Click Submit and store the resulting signed file (for example content.bin.p7s).
Part 2 - Verification
The following steps describe how to set up a trust store and then verify the signature using a provided jar file and Java verifier application.
Step 1 - Set up Trust Store
To set up a trust store, do the following:
Create a folder called
trust-dir.Copy the self-signed certificate exported from the SignServer crypto token into this folder.
Change the file extension from .pem to .crt.
Step 2 - Verify Signature
The following describes how to verify the signature using a PostQuantum Verifier JAR file available on Keyfactor GitHub.
You can optionally download the PostQuantum Verifier code from Keyfactor GitHub and build it to get the JAR file and make your own customizations.
To verify the signature using the provided file, do the following:
Download the PostQuantum-Verifier-jar-with-dependencies.jar file from Keyfactor GitHub.
Use the signature file (for example, content.bin.p7s) and the content file (for example, content.bin), and the path to the trust store folder (created in Step 1 - Set up Trust Store) as input parameters to the verifier.
Use the following syntax to run the VerifierApp:
java -jar <path to PostQuantum-Verifier jar file> cms <path to the p7s signature file> <path to the content file which is signed> <path to the trust store folder> ex : $ java -jar PostQuantum-Verifier-jar-with-dependencies.jar cms content.bin.p7s content.bin trust-dir/CODETo verify the verification result, you can for example check the following:
The output contains
“Verified”which means the signature is verified.The output contains
alg: 1.3.6.1.4.1.22554.2.5which is the OID for PQ SPHINCS+.The following displays an example verification result:
0 [main] DEBUG org.signserver.pq.verifier.VerifierApp - VerifierApp
Added CryptoTokenP12PQ-PQkey-certificate-181b18e1b7d.crt as trust anchor
Verifying signer CN=My Application Name, O=My Company Name, C=US
alg: 1.3.6.1.4.1.22554.2.5
Verified
Valid trusted signature using 1.3.6.1.4.1.22554.2.5 from CN=My Application Name, O=My Company Name, C=US
CODE
You have now completed all the steps and tried out creating post-quantum keys and signatures.
To learn more about what is going on with Post-Quantum Cryptography (PQC) and what it might entail to get ready for PQC, certificate issuance and digital signatures, and crypto agility, see Post-Quantum Readiness. For more information about Bouncy Castle, refer to our Bouncy Castle Documentation and bouncycastle.org.