Step 1: Install Hardware Appliance as Dedicated VA
Installing the Hardware Appliance as dedicated VA requires the following steps.
Renaming the Management CA
Proceed as follows in the CA Hardware Appliance to rename ManagementCA to PeerMgmtCA.
- From the CA Hardware Appliance WebConf, select Platform and select the Applications tab from the sub menu.
- Click the EJBCA Application link under the Management access column in the interface.
- The EJBCA Enterprise opens.
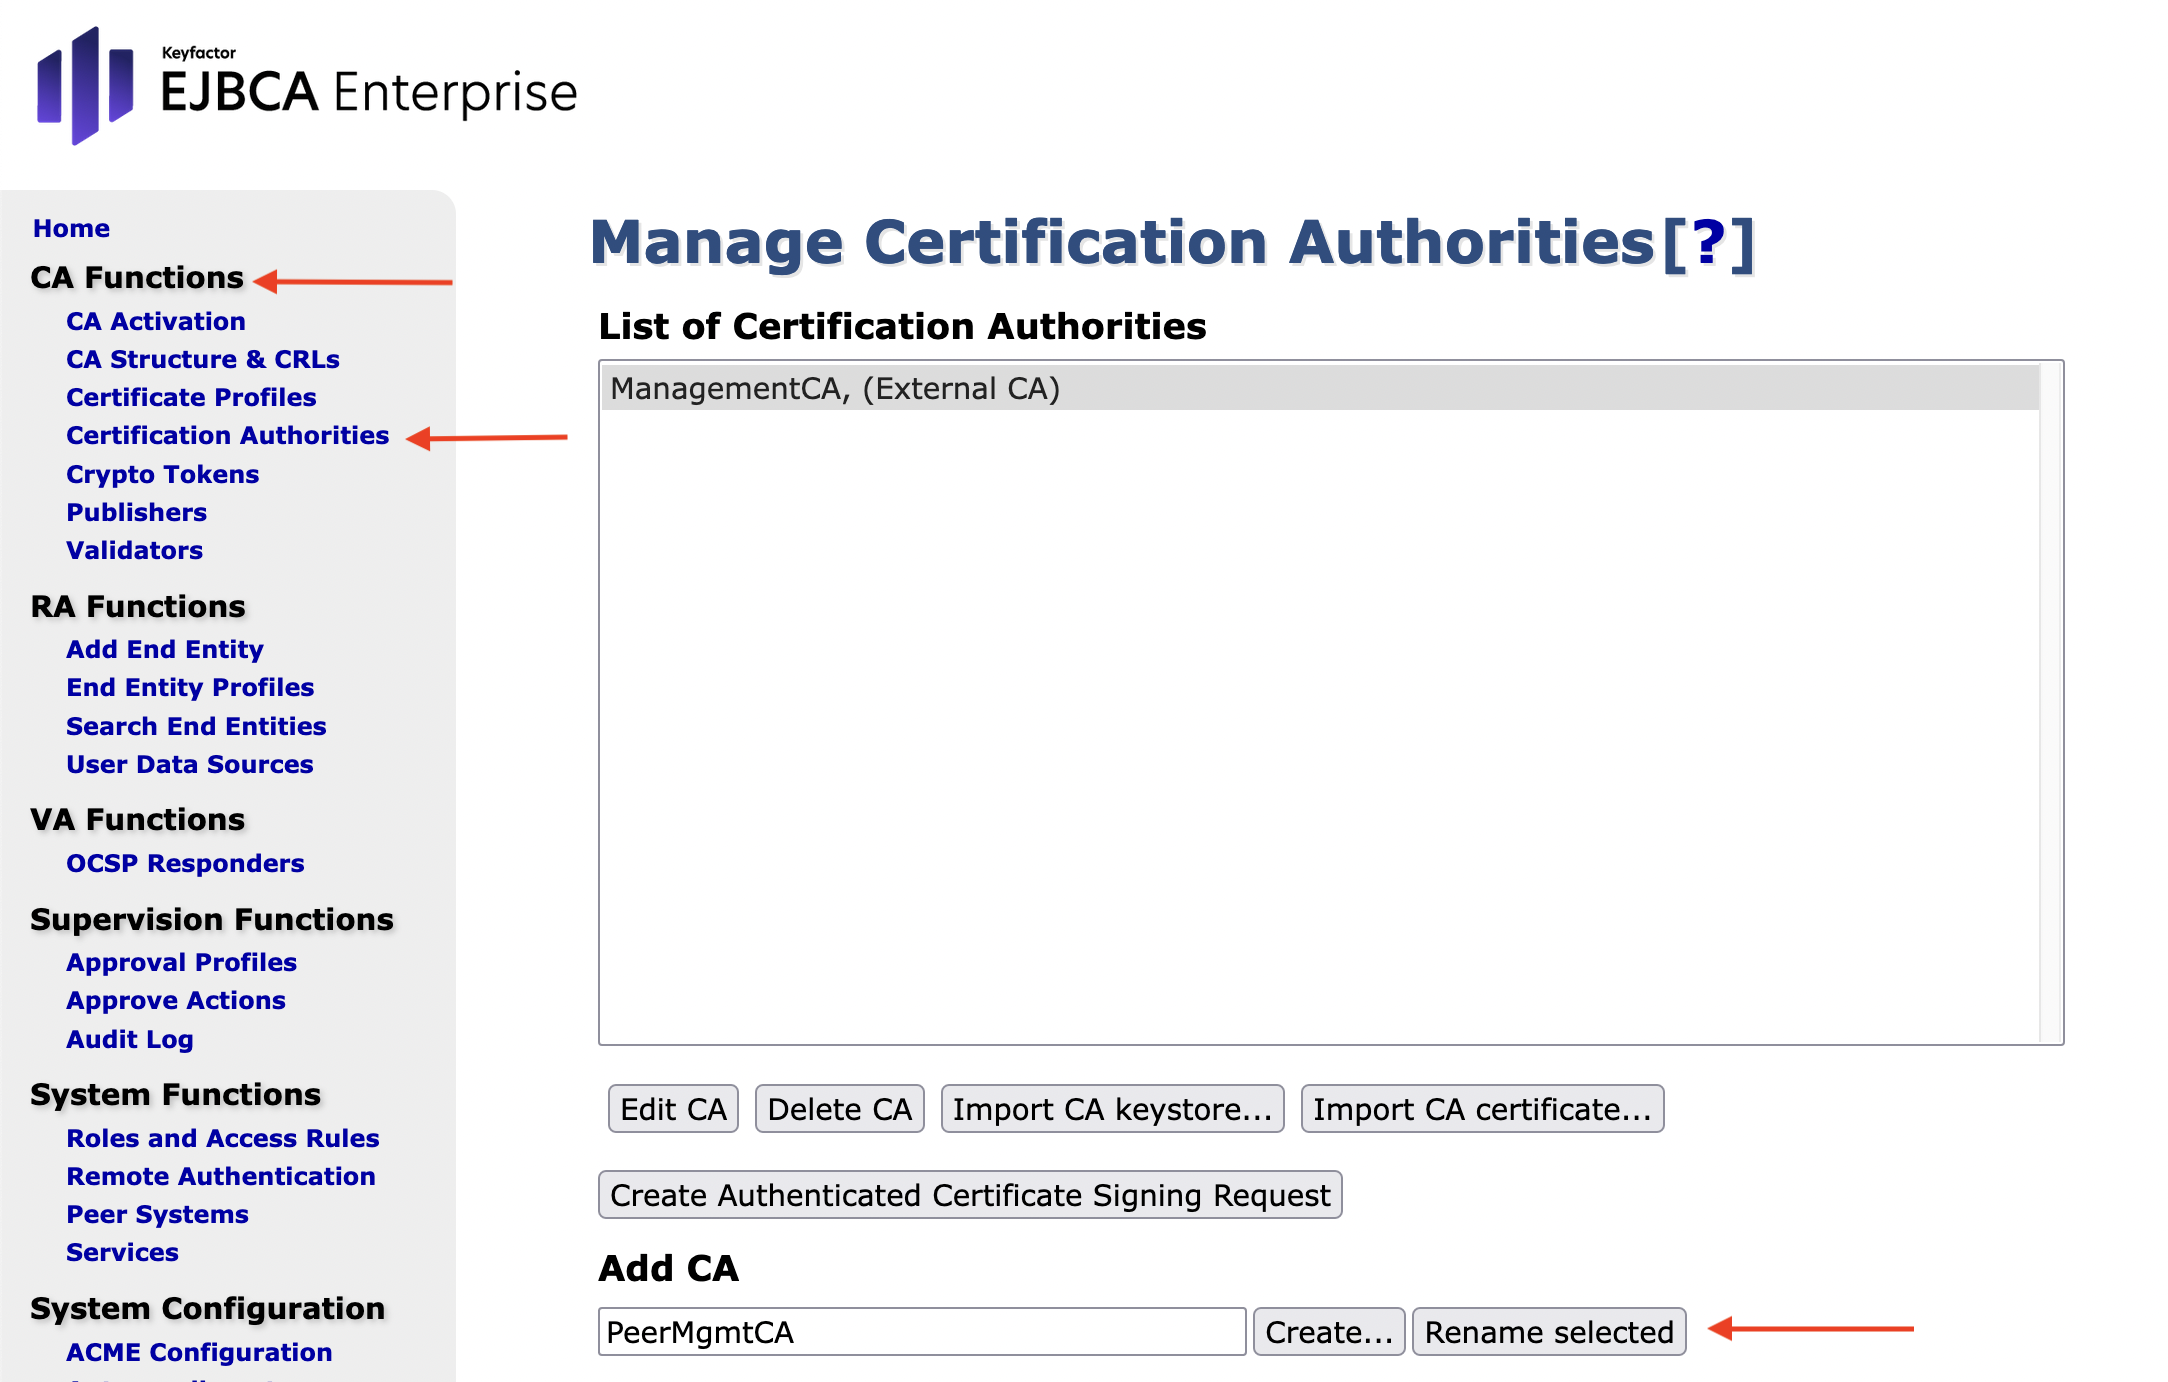
In the sidebar menu, in the CA Functions section, select Certification Authorities.
The Manage Certification Authorities page opens.In the List of Certification Authorities, select ManagementCA.
In the field Add CA, enter PeerMgmtCA and click Rename selected.
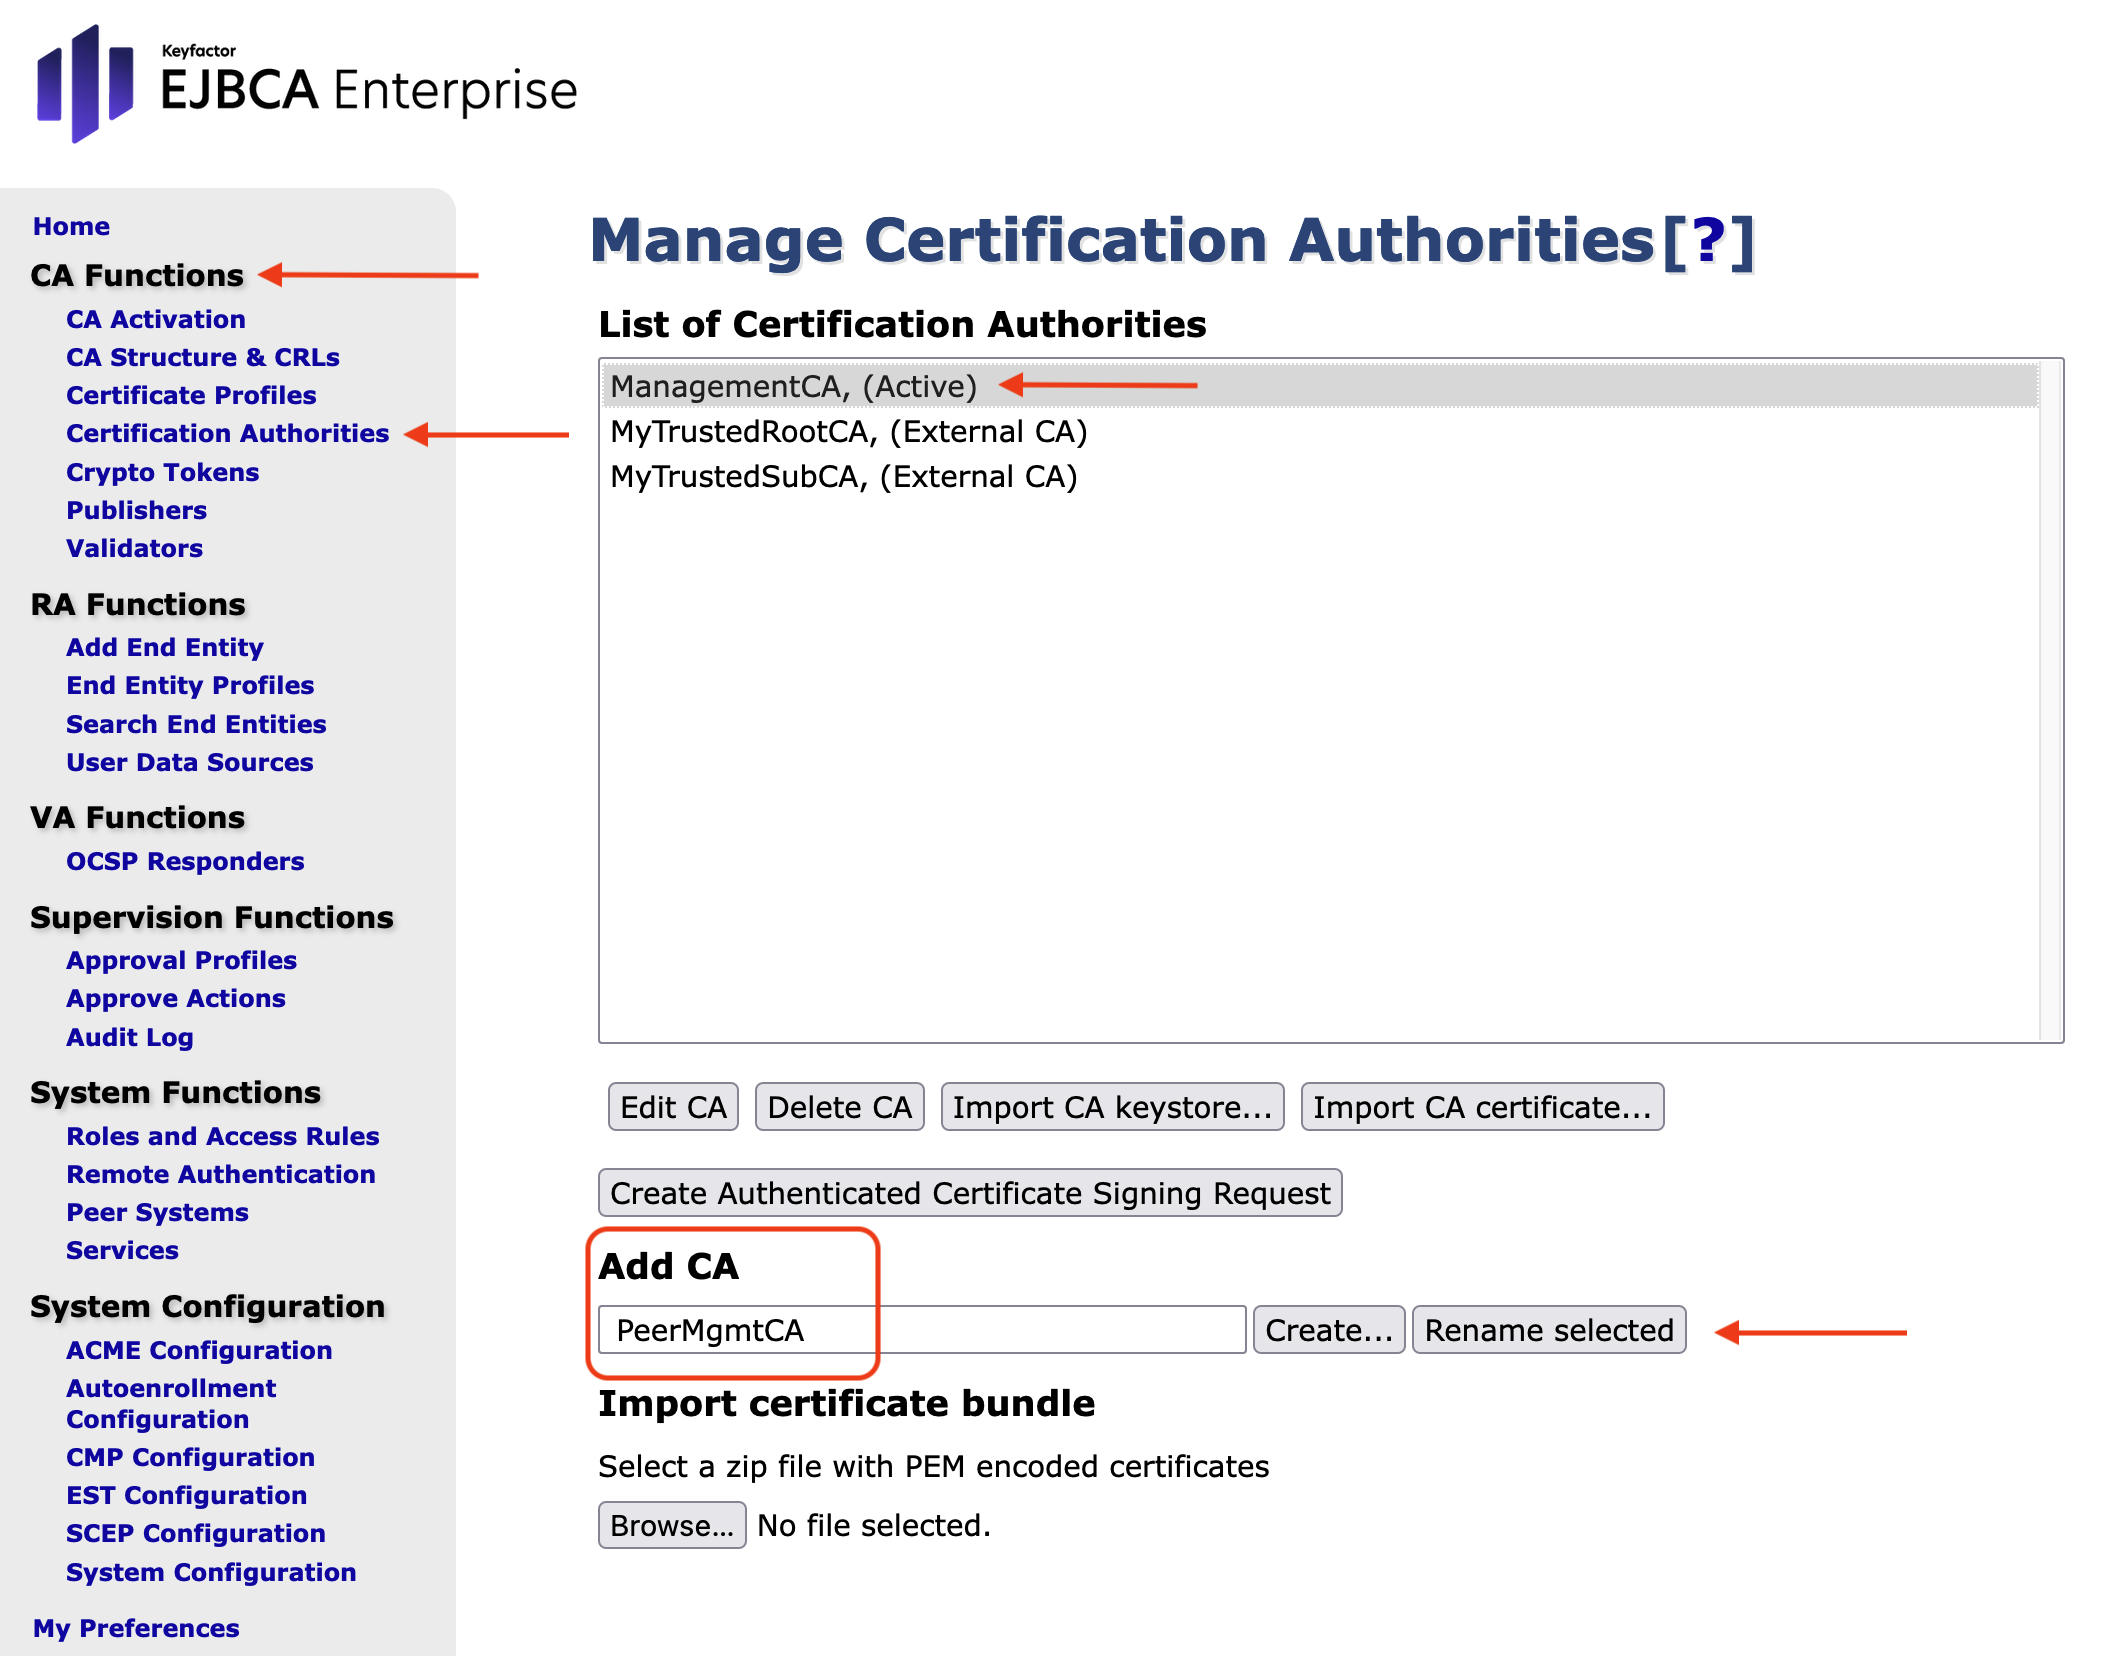
The entry in the List of Certification Authorities has now changed to PeerMgmtCA.
- Select RA Web in the last section of the EJBCA Enterprise sidebar.
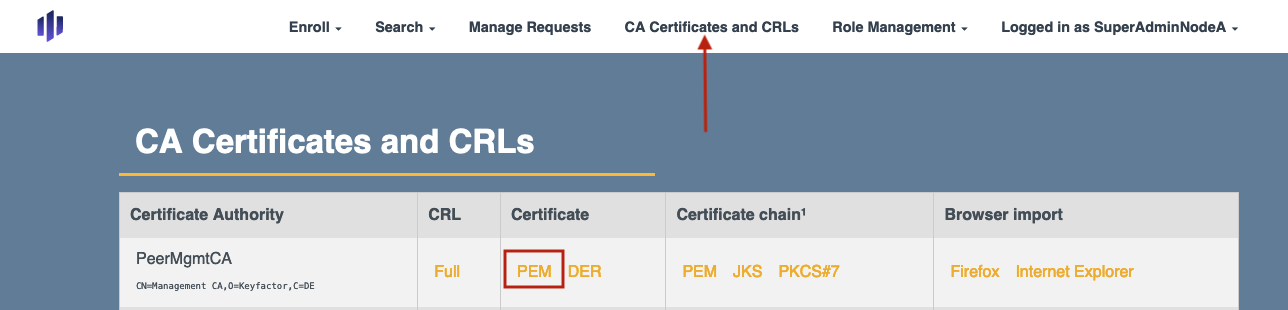
- On the EJBCA RA pages, click CA Certificates and CRLs in the top menu.
In the CA Certificates and CRLs table click the option PEM in the PeerMgmCA row to download the certificate.
You will need this certificate for the installation of the VA Hardware Appliance instance.
Installing the VA Hardware Appliance
To install the VA Hardware Appliance follow steps 1-4 from the initial setup documentation (Initial Set-up).
Next consider the following specific details for the PKI Appliance WebConf Wizard steps.
Network settings:
For the Hostname use a name that defines the functionality of the Hardware Appliance like in the following example: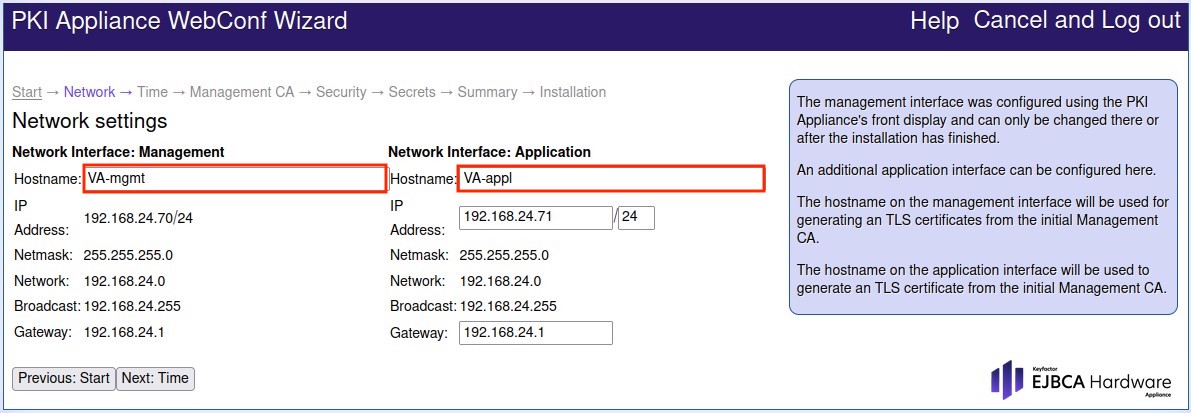
Continue by clicking Next: Time
Date and Time Settings:
a) Set your Time Zone.
b) Enable Use Network Time Protocol:
c) Define the NTP Server 1: and NTP Server 2: Note that the NTP configuration accepts only IPv4 addresses as parameters and not DNS entries.
d) Continue by clicking Next: Management CA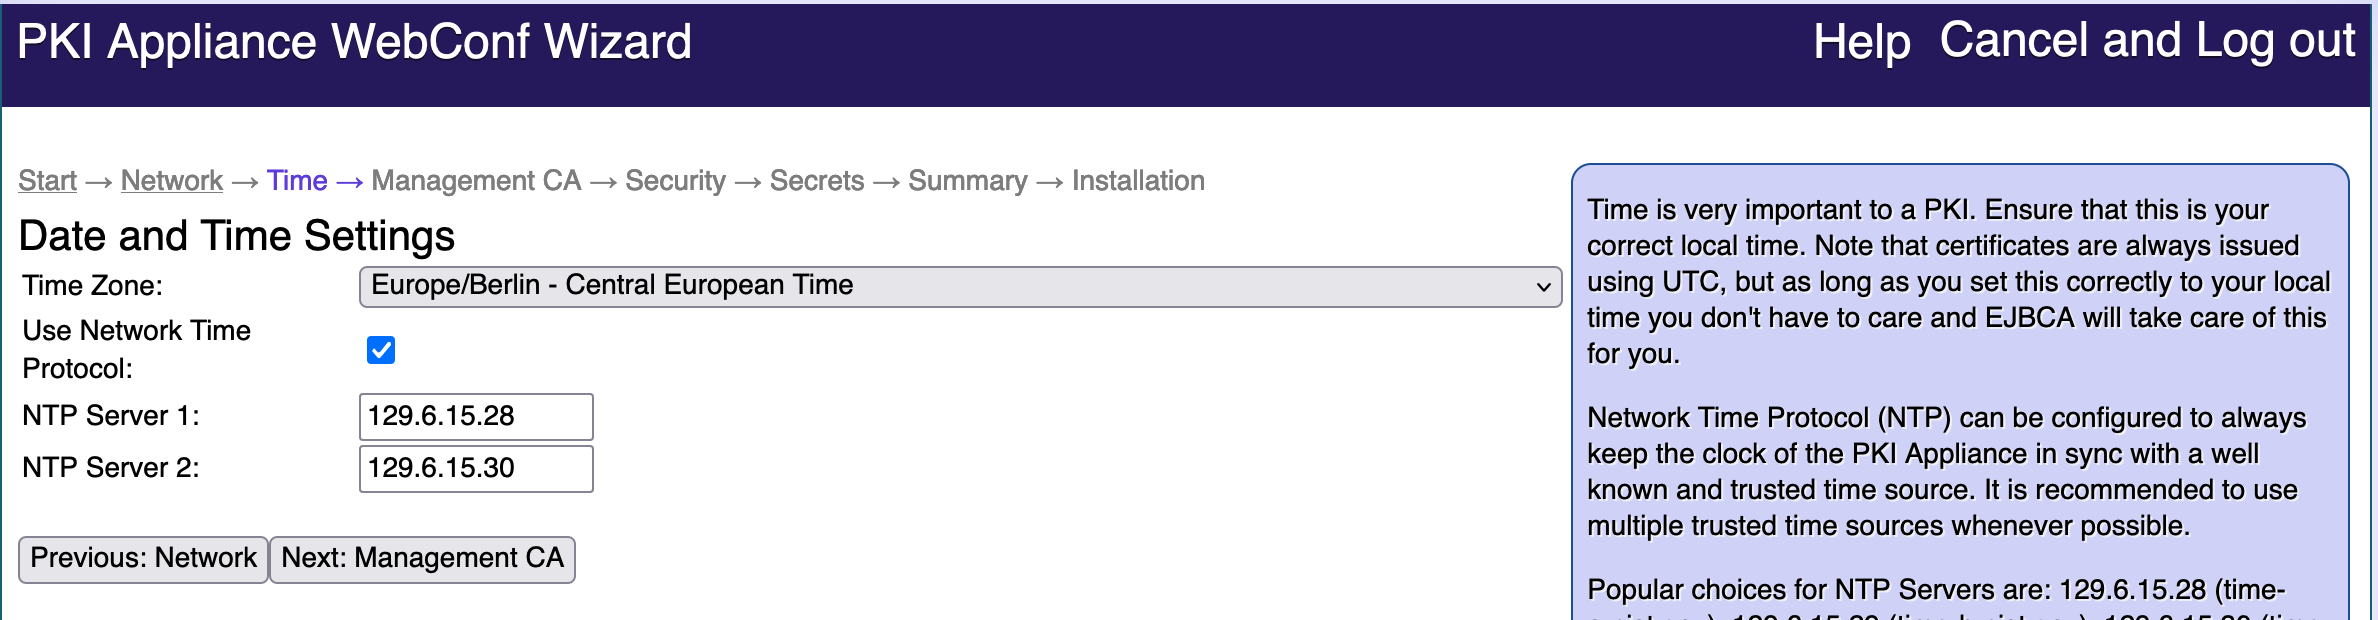
Management CA Settings:
a) Select Use existing Management CA.
b) Click Browse to search for and select the .pem file that you downloaded for the PeerMgmtCA: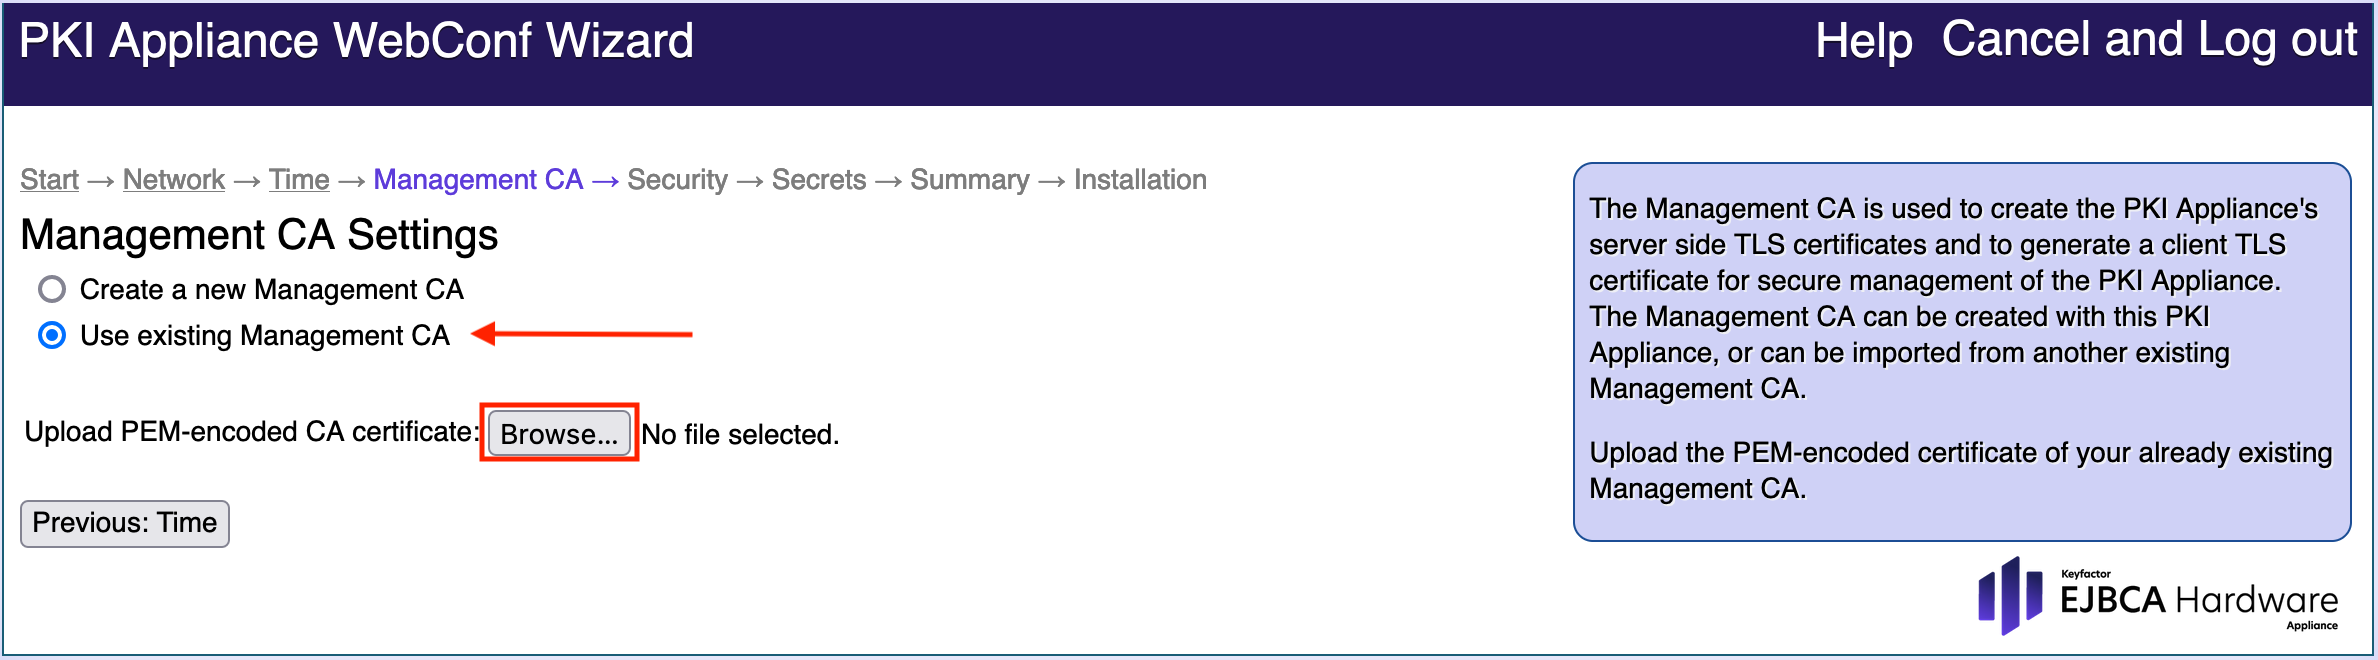
c) Wait for the PEM upload to finish.
d) Check the value in SuperAdmin full Subject DN.
To find this value, go to the CA Hardware Appliance WebConf, select Access and select the Appliance accounts tab from the sub menu. The value is in the MatchValue field.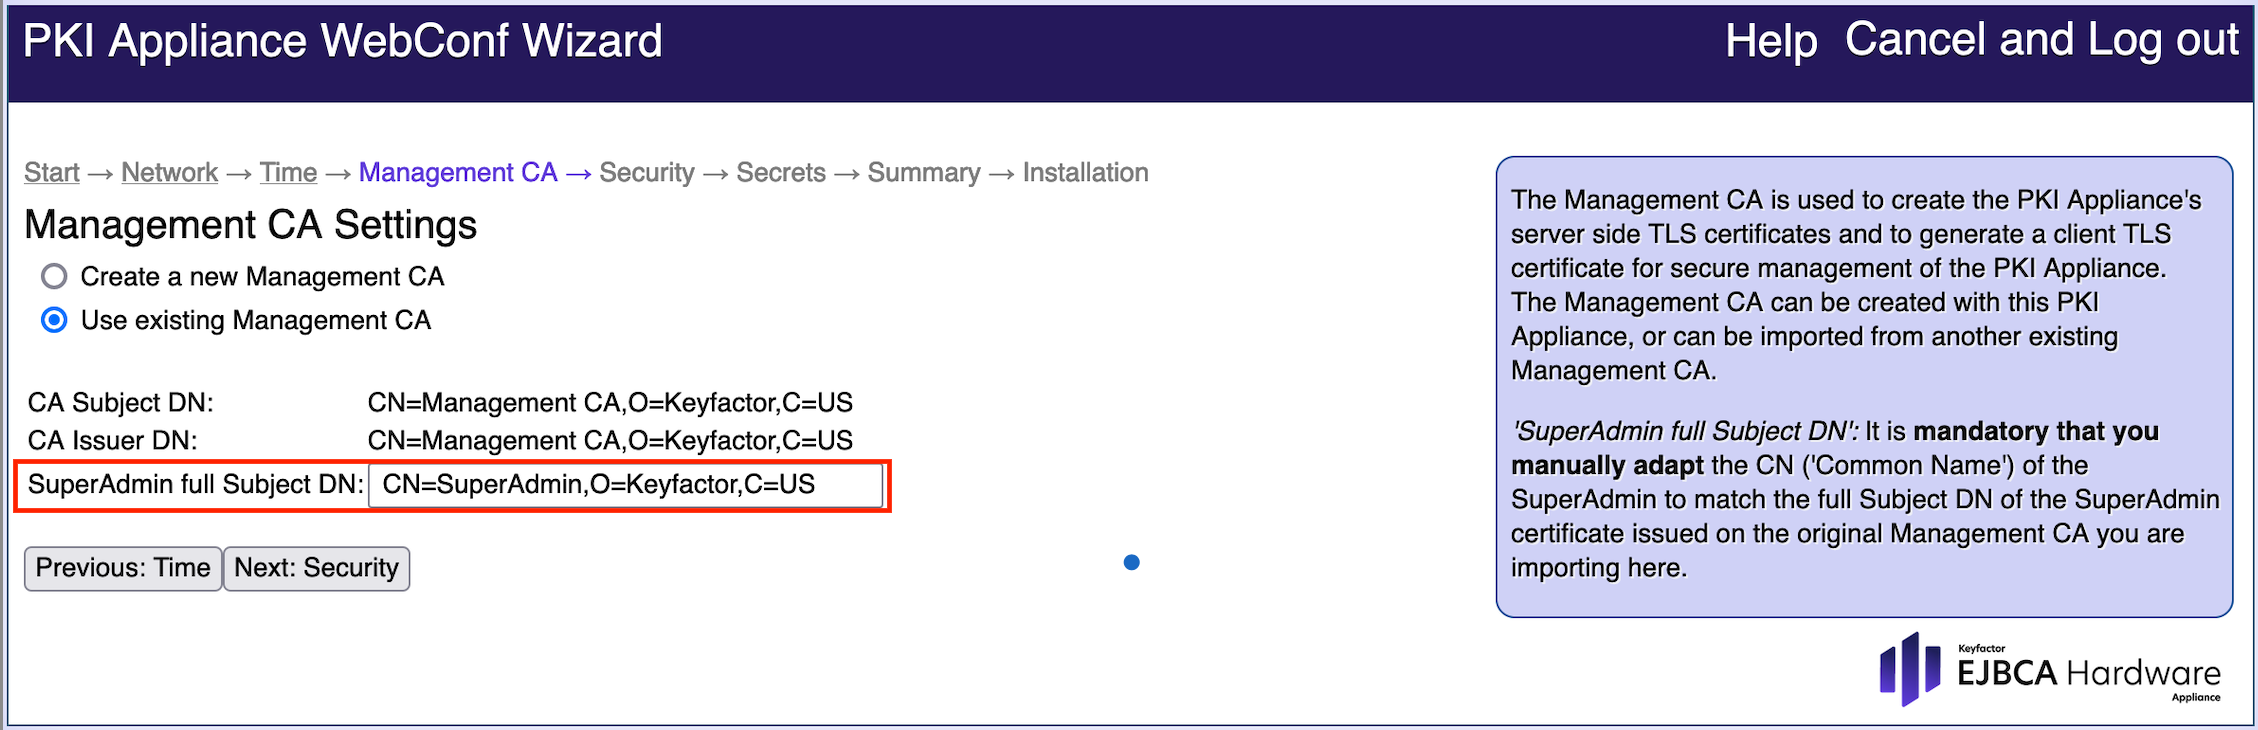
e) Continue by clicking Next: SecurityHardware Security Module Settings:
a) Set your Appliance Security Level
b) Decide if you need any Crypto Token/PKCS#11 Slot or smart card authentication. If so, follow the next steps.
c) Enable: Audit Log Storage
d) Continue by clicking Next: Secrets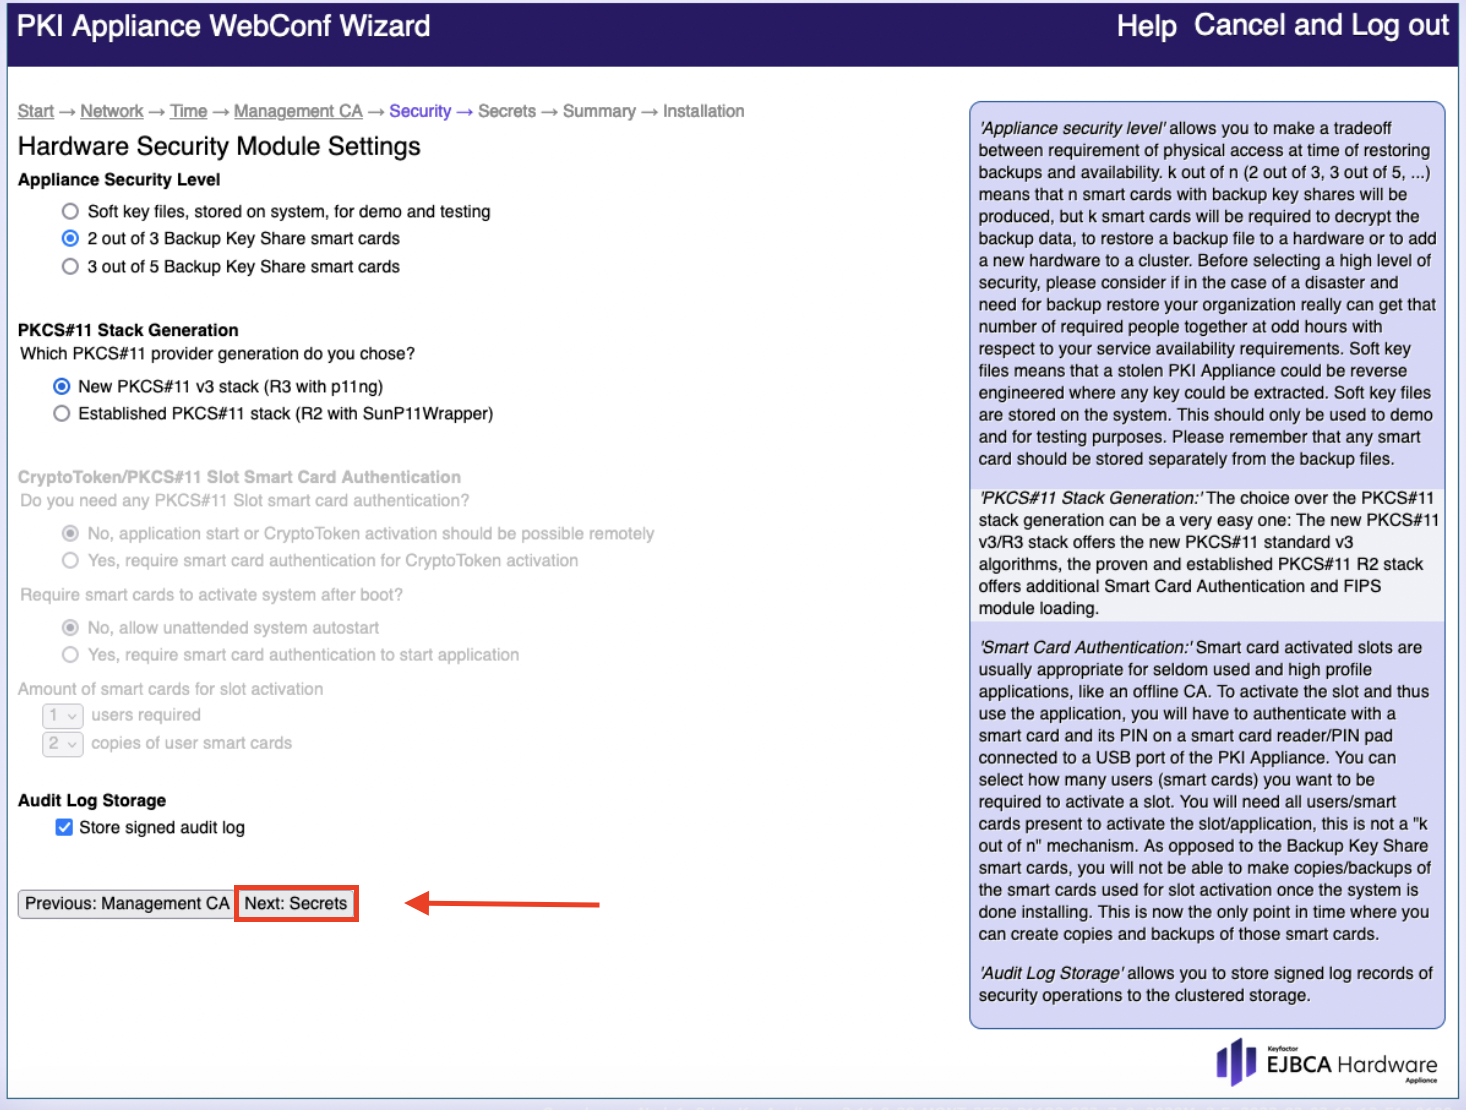
Security Settings:
a) Set the Domain Master Secret and Confirm secret
b) Continue by clicking Next: Summary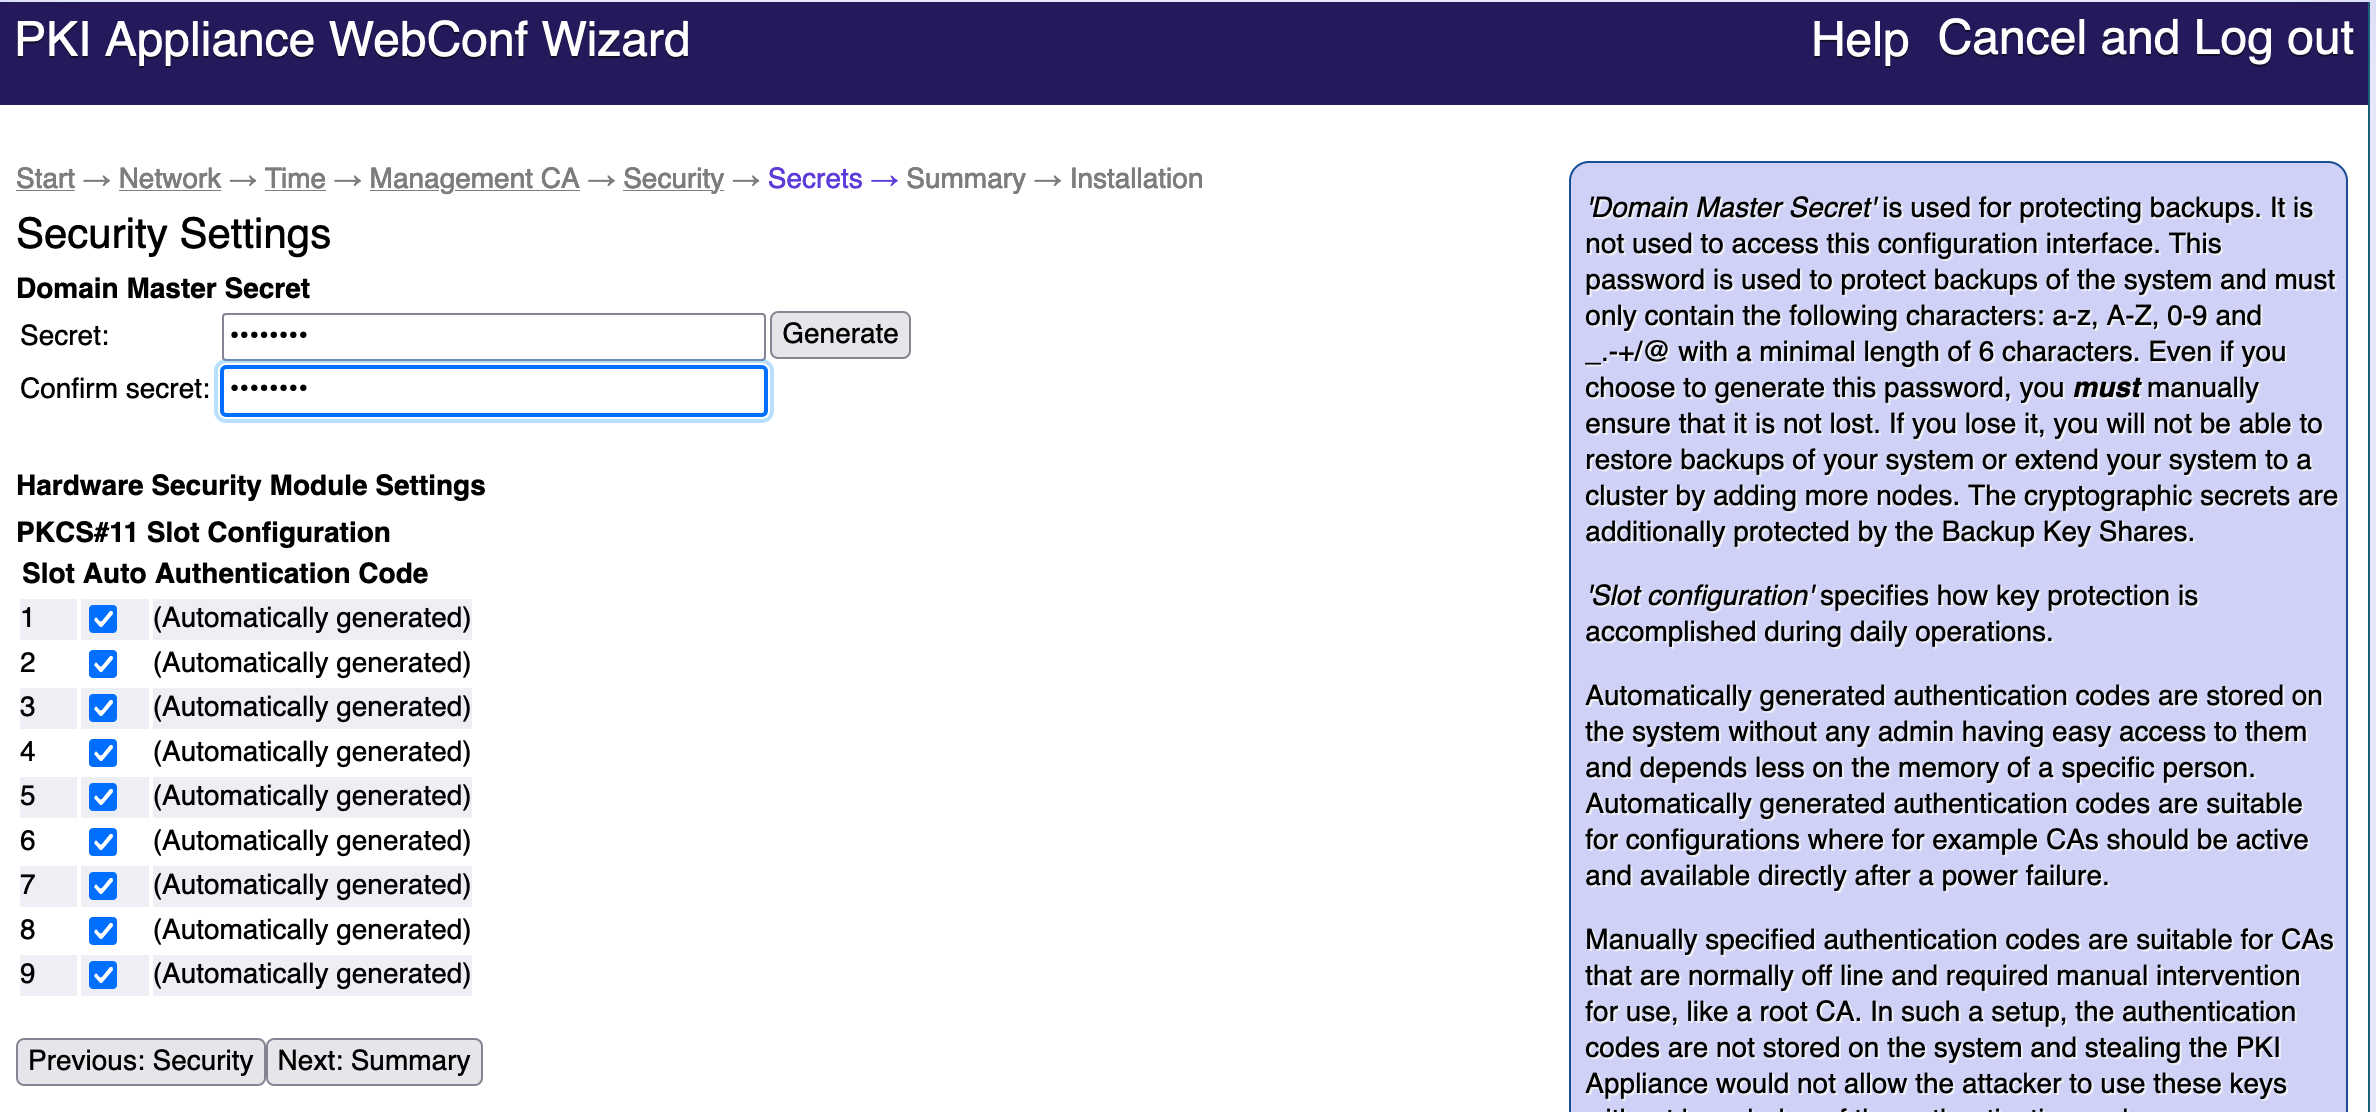
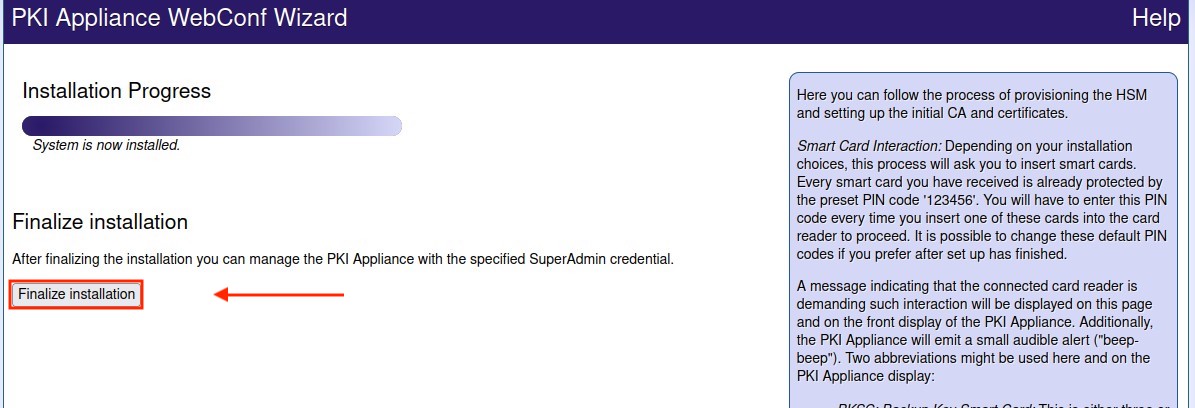
- Check all entries carefully on the Summary page. For possible corrections click: Previous Secrets.
If all settings are correct click: Begin installation. - For the last step, click on: Finalize installation.
Changing the Application Interface TLS Certificate
Proceed as follows to change the Application Interface TLS certificate in the VA Hardware Appliance.
This example will show you how to create a new certificate that will be signed by PeerMgmtCA.
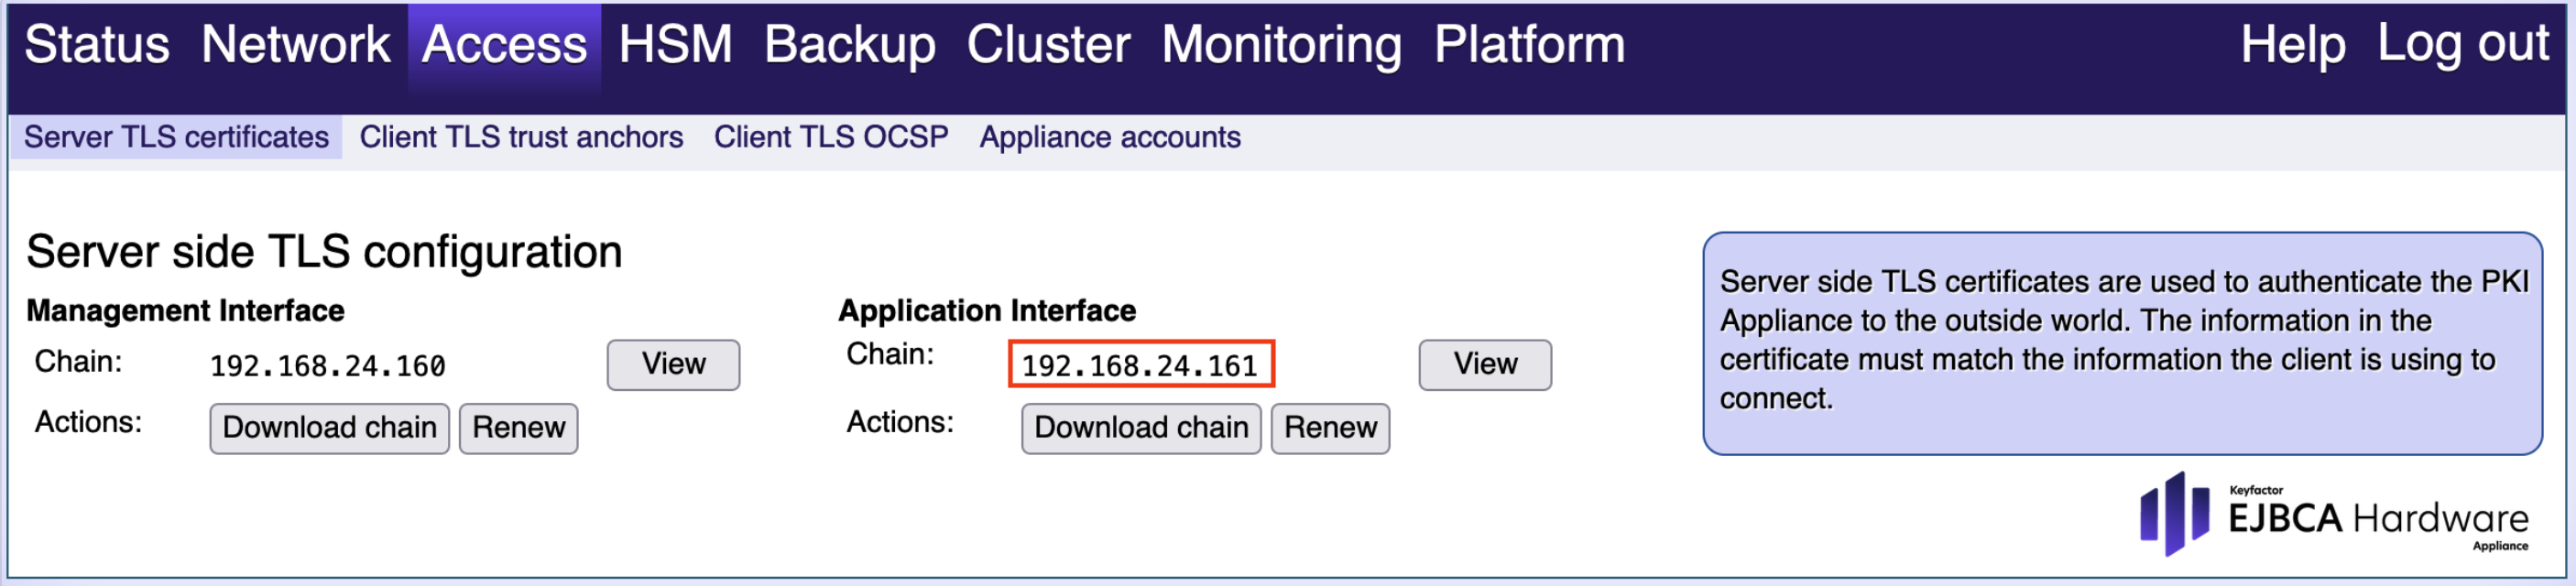
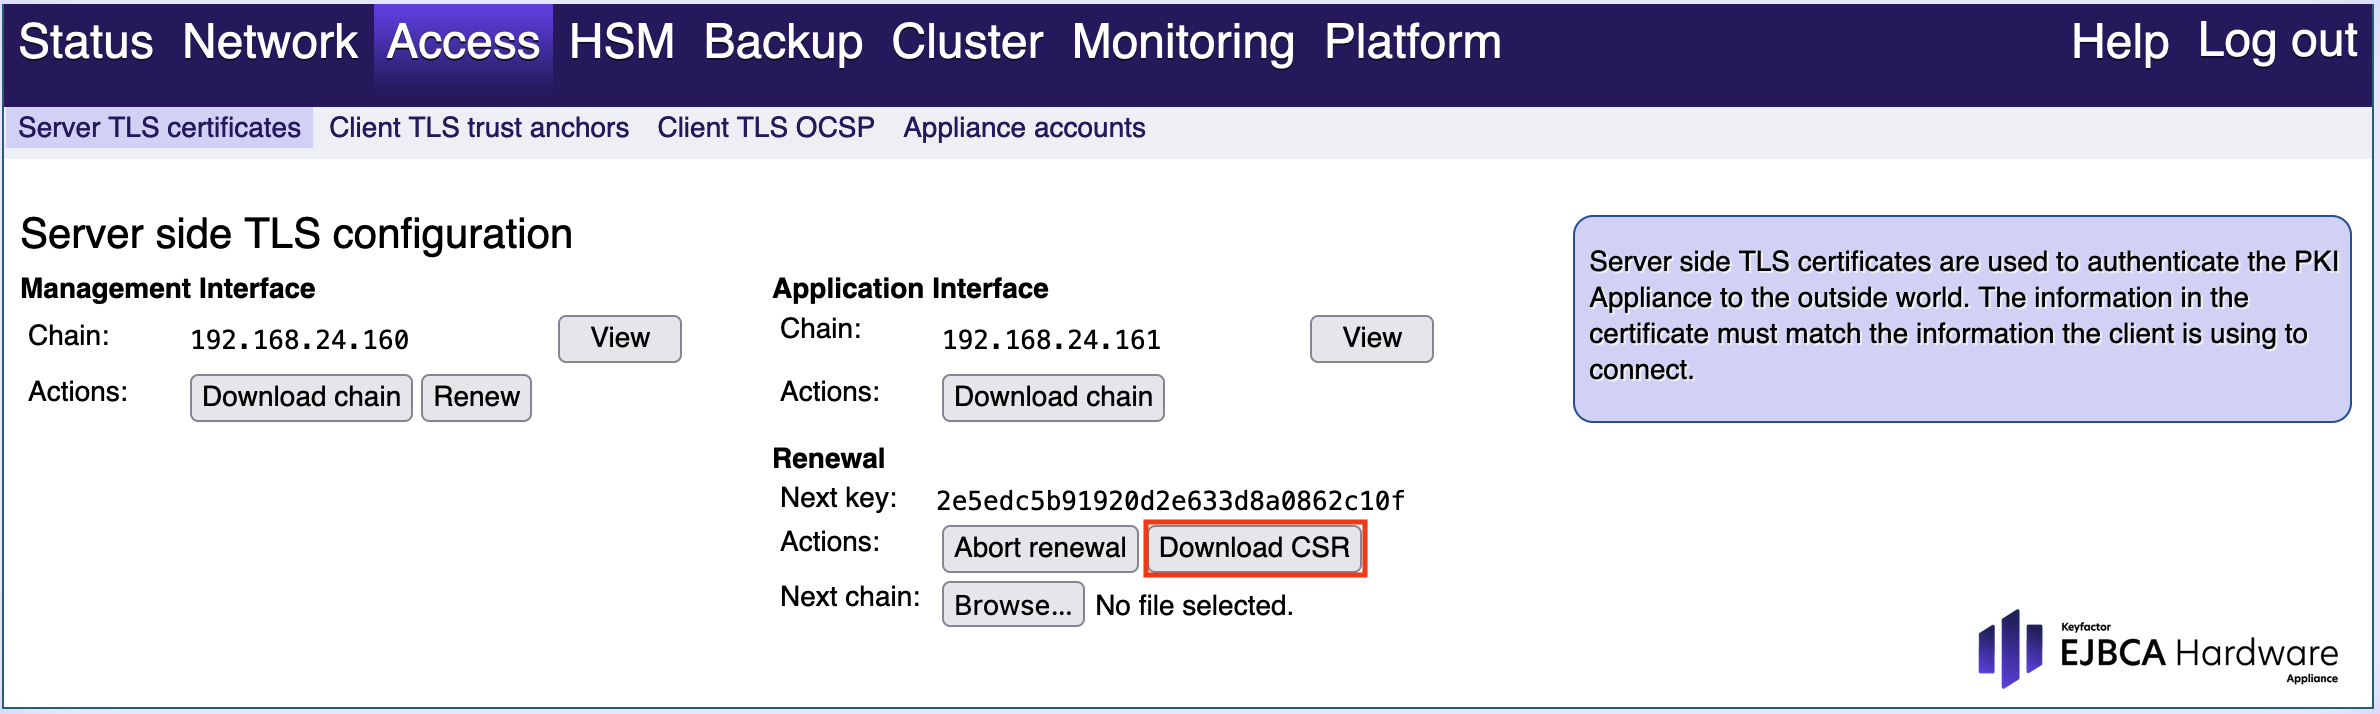
From the VA Hardware Appliance WebConf, select Access and select the Server TLS certificates tab from the sub menu.
Copy the value in Chain field from the Application Interface.
- In the VA Hardware Appliance WebConf, create a CSR as follows:
- Select Access and select the Server TLS certificates tab from the sub menu.
- In the section Application Interface, click Renew.
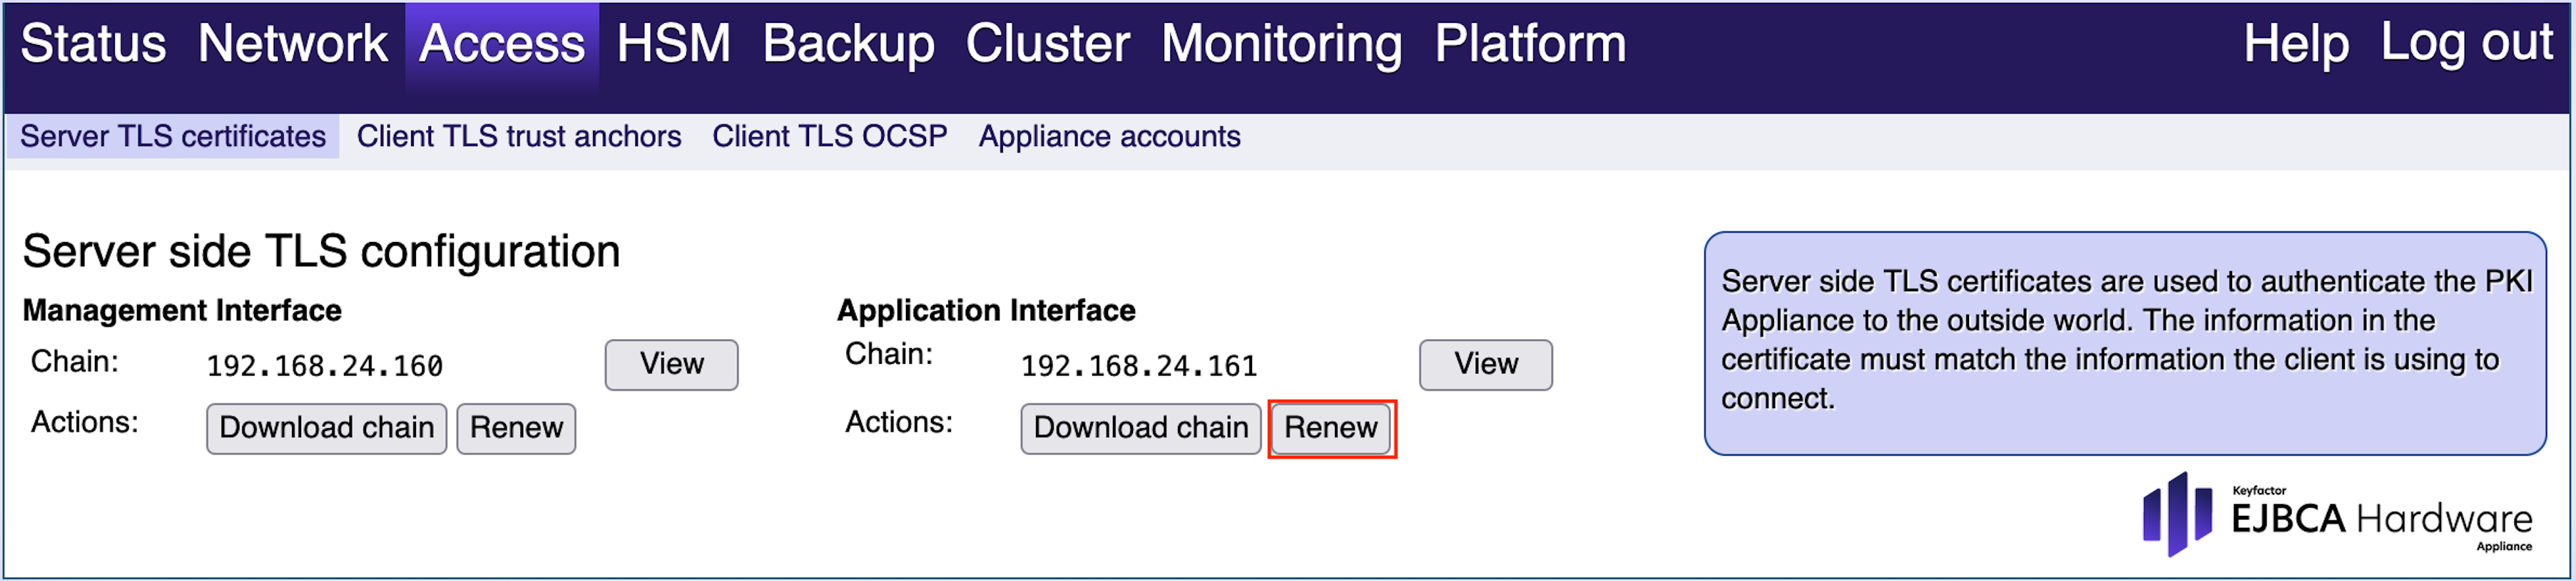
In the section Renewal click Download CSR and save the file.
- In the CA Hardware Appliance, open the EJBCA Enterprise RA Web.
From the top menu choose Enroll.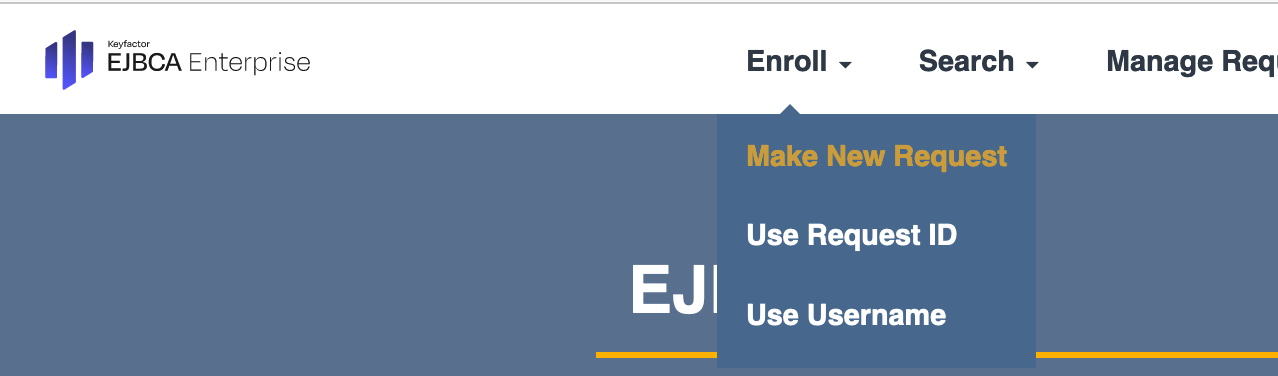
- From the Enroll drop-down menu choose Make New request.
In the Select Request Template chose the Certificate Type from the drop down menu.
Select SslServerProfile.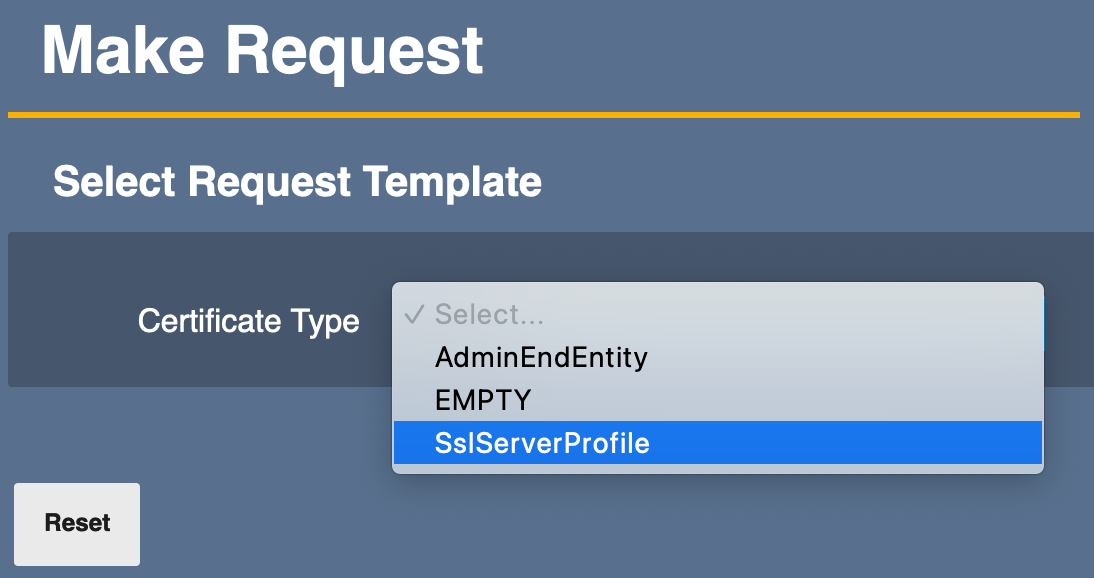
In the Key-pair generation section check mark Provided by user.
In the Upload CSR section click Browse... - Click Browse to select the previously downloaded .crs.pem file.
- Further sections open in the Request Template. Enter the 2 mandatory fields in: Required Subject DN Attributes and User Credentials.
At the bottom of the page click Download PEM full chain to finish. - In the VA Hardware Appliance, click Browse to select and upload the signed request .pem file. Confirm that the Next Issuer is displayed
Click Activate new cert and wait a few seconds for the configuration to be updated.
Renaming the Management CA and configuring peer systems
To begin, you renamed the Management CA in the CA Hardware Appliance instance to PeerMgmtCA. In the next steps, you will do the same for the VA Hardware Appliance and configure the peer systems.
- Open the VA EJBCA Administration.
- In the left-side menu, in the CA Functions section, select Certification Authorities to open the Manage Certification Authorities page.
- Select a CA. In the Add CA field enter PeerMgmtCA and click Rename selected.
- Open VA EJBCA Administration.
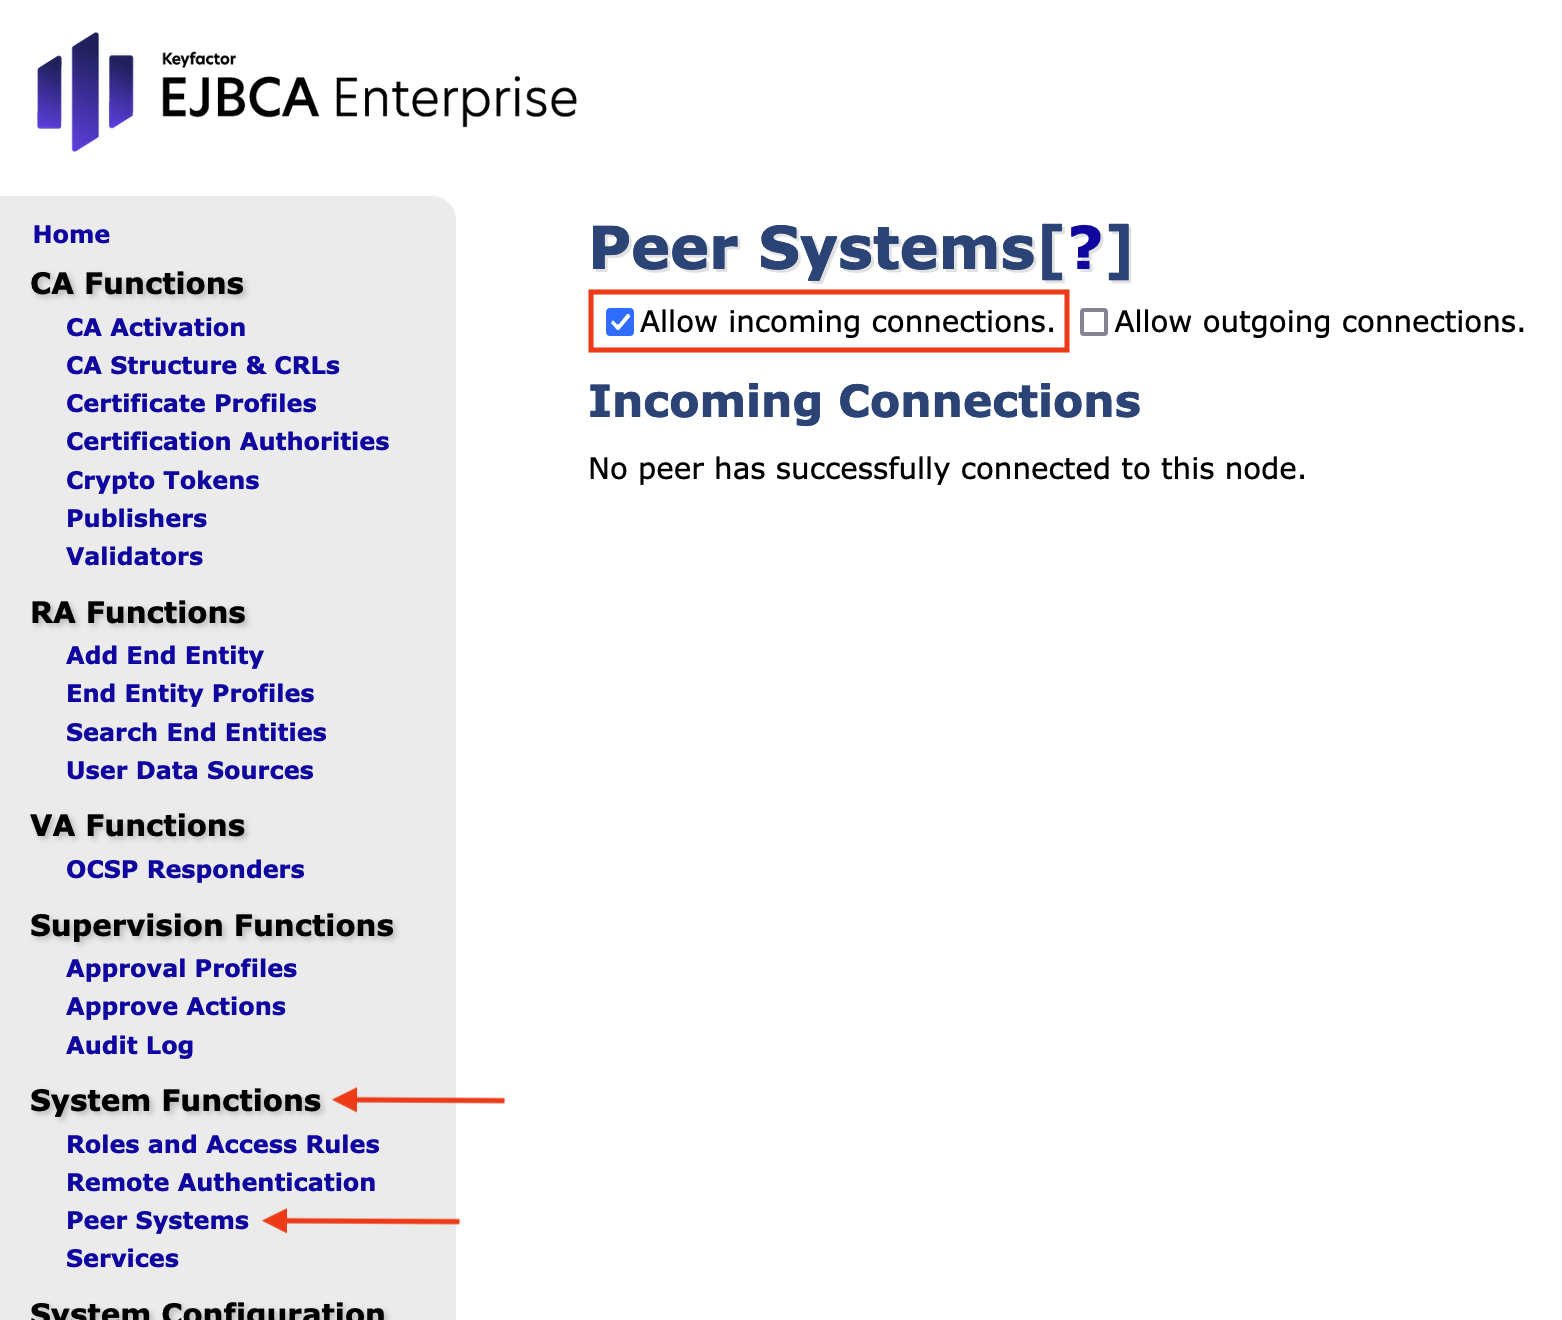
- In the left-side menu, in the System Functions section, select Peer Systems and make sure only Allow Incoming connections is selected.
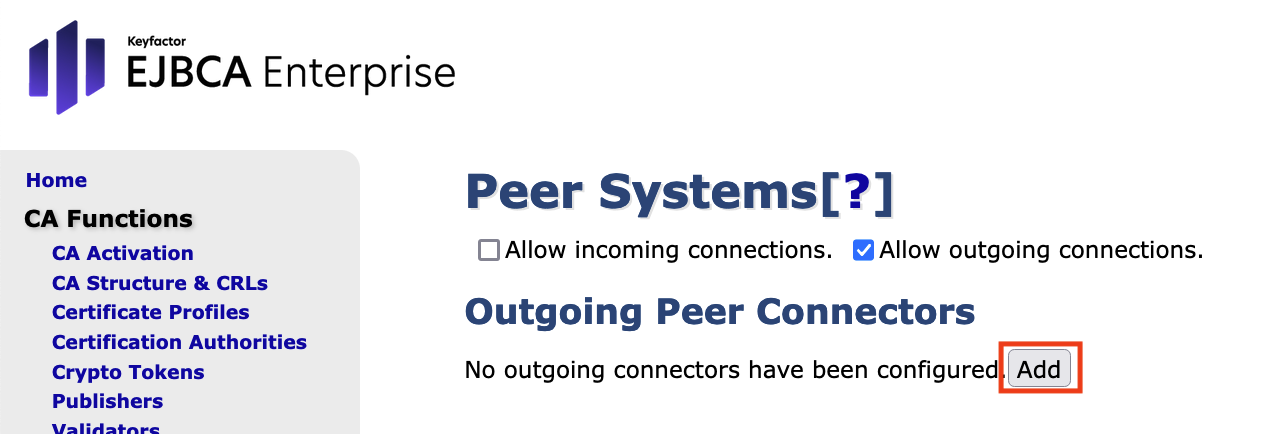
- Open CA EJBCA Administration.
- In the left-side menu, in the System Functions section, select Peer Systems and make sure only Allow outgoing connections is selected.
In the section Outgoing Peer Connectors, click Add.
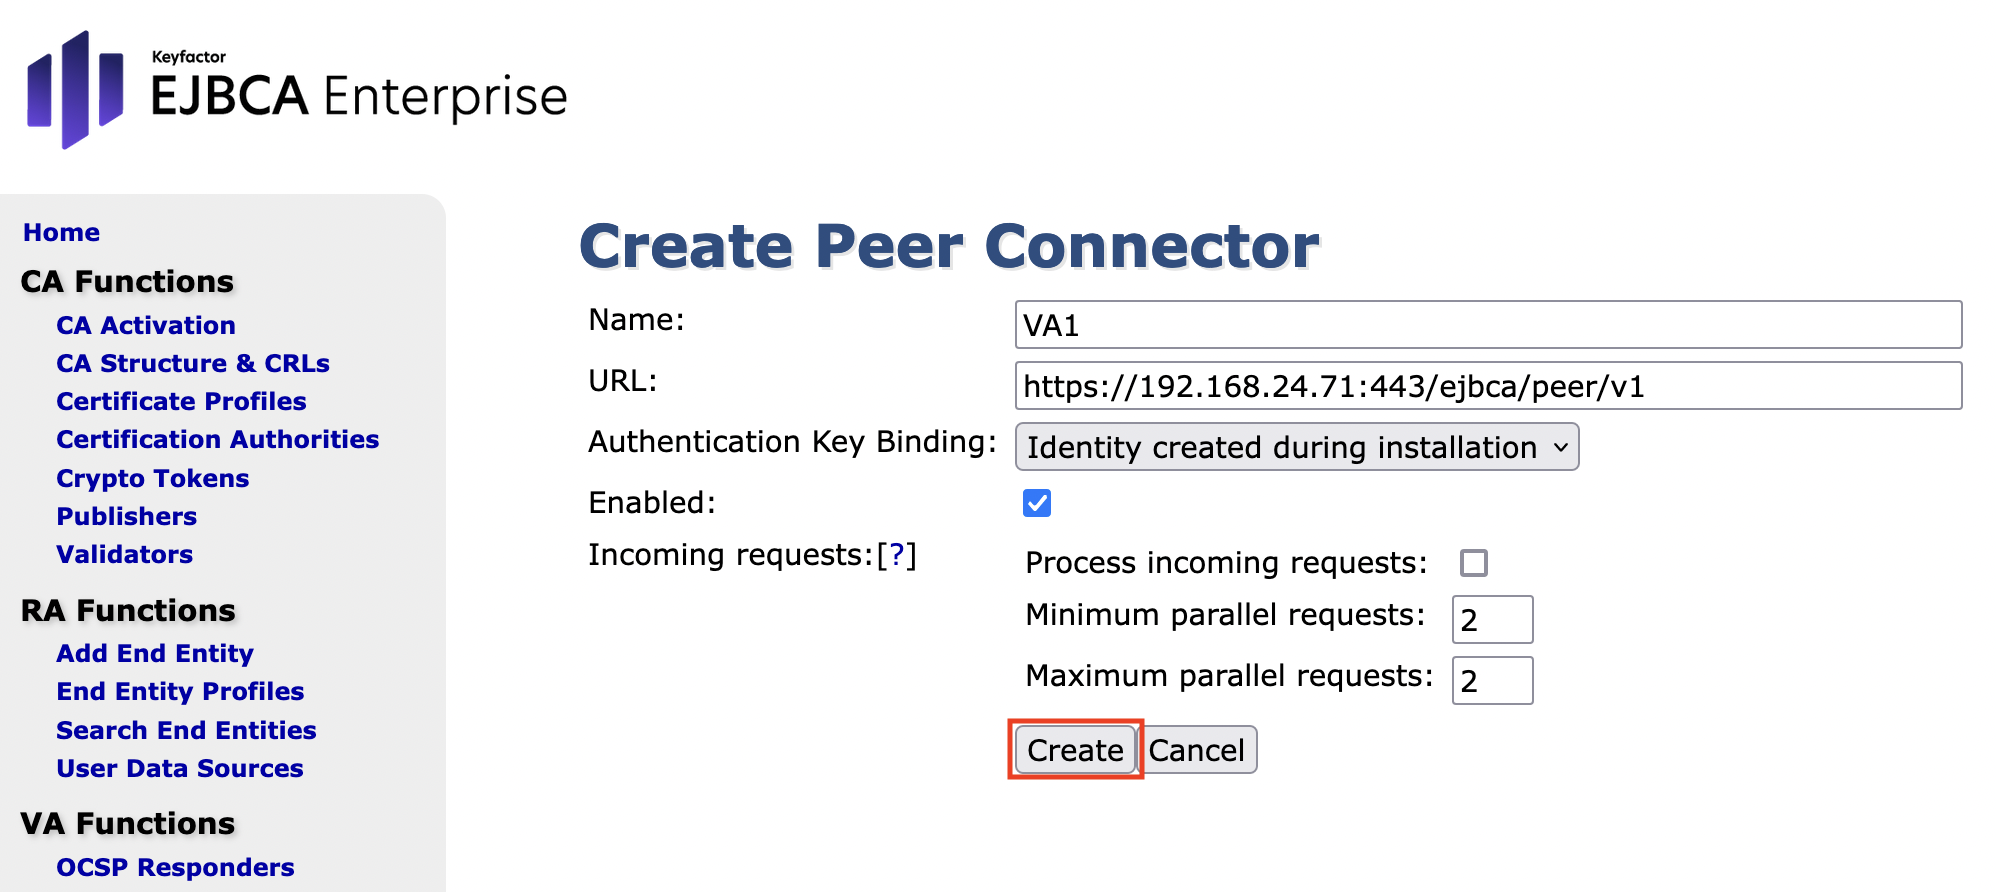
Enter the following values and click Create:
- Name: Enter VA1
- URL: Enter https://<application_VA_IP>:443/ejbca/peer/v1
- Authentication Key Binding: Identify created during installation
- Enabled: Enable this option
On the page Peer Systems click Ping to ping the connector.
No privileges have been configured yet, so you will receive the following message: Unable to connect to peer. Unable ...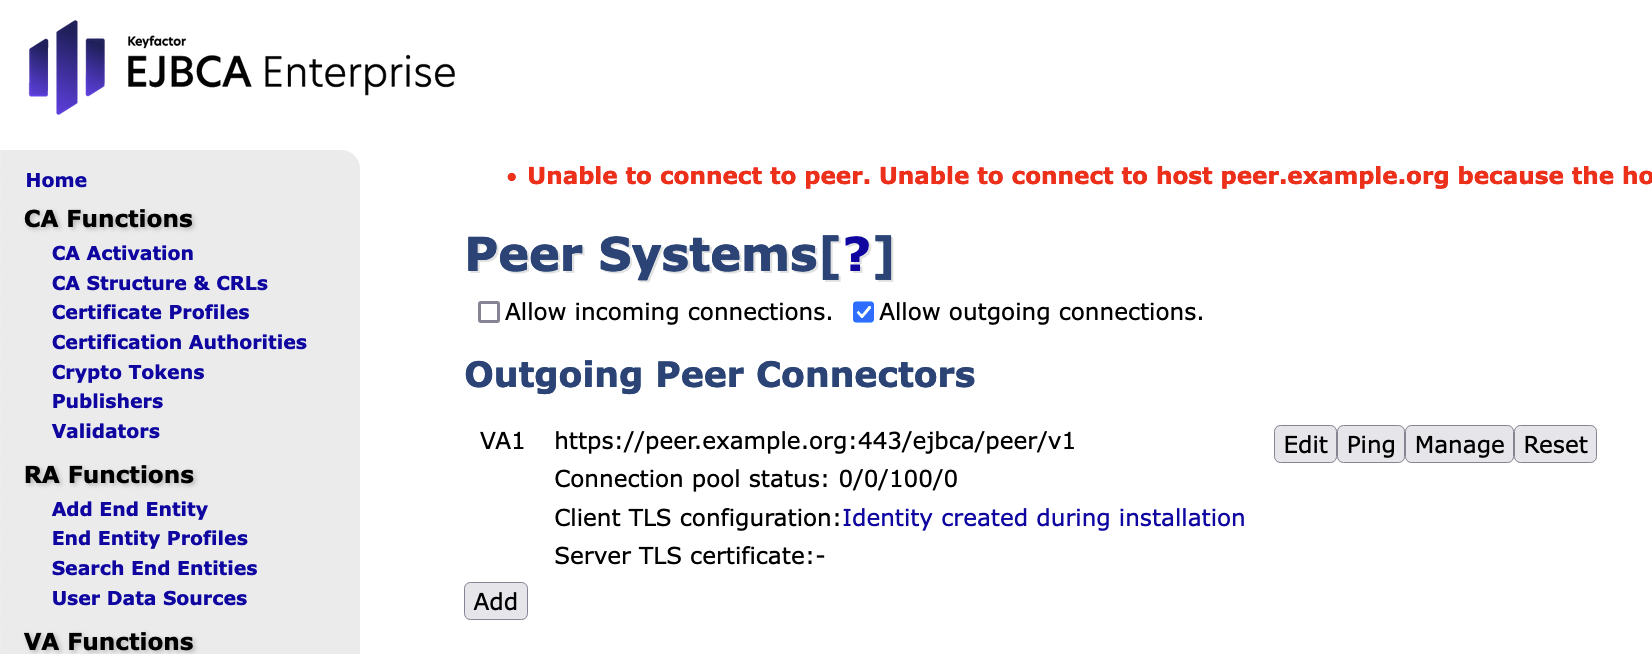
- In the VA Hardware Appliance, the page EJBCA AdminWeb > Peer Systems indicates that the CA-peer tried to connect with it. Click Create authentication to create authentication for the CA-peer.
For Role, select Create new role to create a new role for the connection, and click Select:
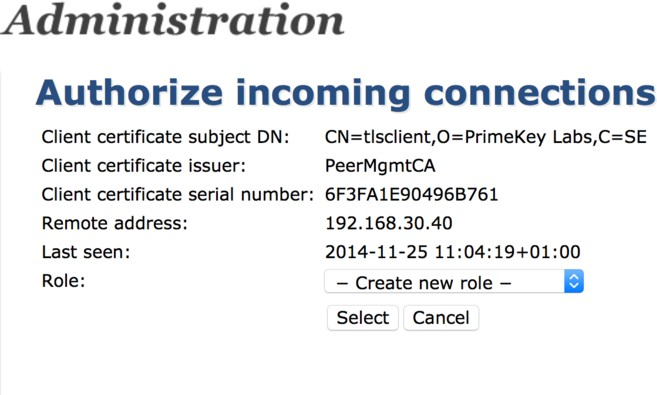
For the Authorize incoming connections, specify the following and click Create authorization:
- Role: Specify CA_Peer to rename the role.
- Generic rules: Enable Role is intended for peer connections.
- CAs: Enable Access 'PeerMgmtCA'.
- Publishing: Enable all Publishing options.
- In the page CA Hardware Appliance AdminWeb > Peer Systems, click Manage to manage the peer connector.
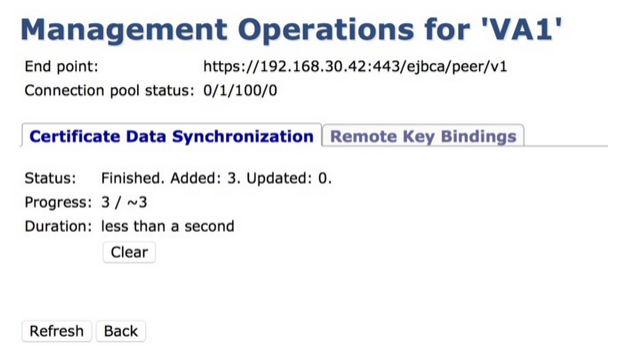
In the form Management Operations for 'VA1', specify the following and click Start:
- Push certificate: Enable this option.
- Push integrity protection Enable this option.
- Only check for discrepancies (dry run): Enable this option.
- Filter: Select Certificate Profile.
- Certificate Profiles: Select SslServerProfile.
The CA-peer is now authorized to connect to the VA-peer and perform the actions configured in the previous step, indicated in the Status field, displaying Status Added:3: