Step 5: Running WebConf Wizard
The final step of the initial setup is to run the web-based configurator WebConf. During this procedure all components of the system will be configured according to the parameters provided.
WebConf is designed and tested to work with Firefox 26.0+. Other browsers like Chrome or Safari are not officially supported and minor incompatibilities may be observed.
Internet Explorer is not officially supported. Depending on the version, the configuration process may not finish successfully.
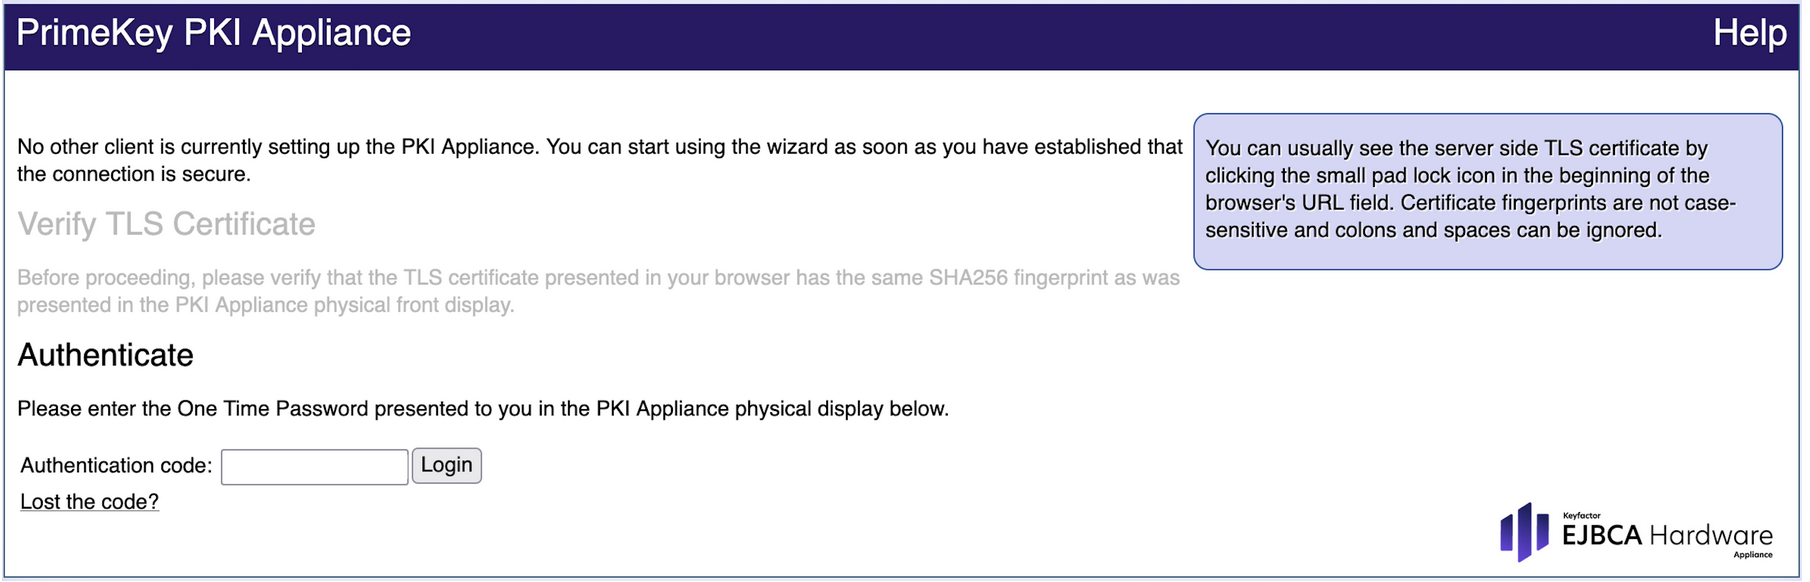
Initial Log In
For the initial log in you need to have the One Time Password (OTP) ready. It is displayed on the front display of the Hardware Appliance. Until the system is completely installed, the One Time Password is newly created when the machine is started.
- In the Authenticate page, enter the One Time Password in the field Authentication code.
- Click Login.
Fresh Installation
After your login with the OTP on an unconfigured Hardware Appliance you will have the following options:
- Fresh install
- Restore system from backup
- Connect to cluster
- Update
Click Next in the section Fresh install.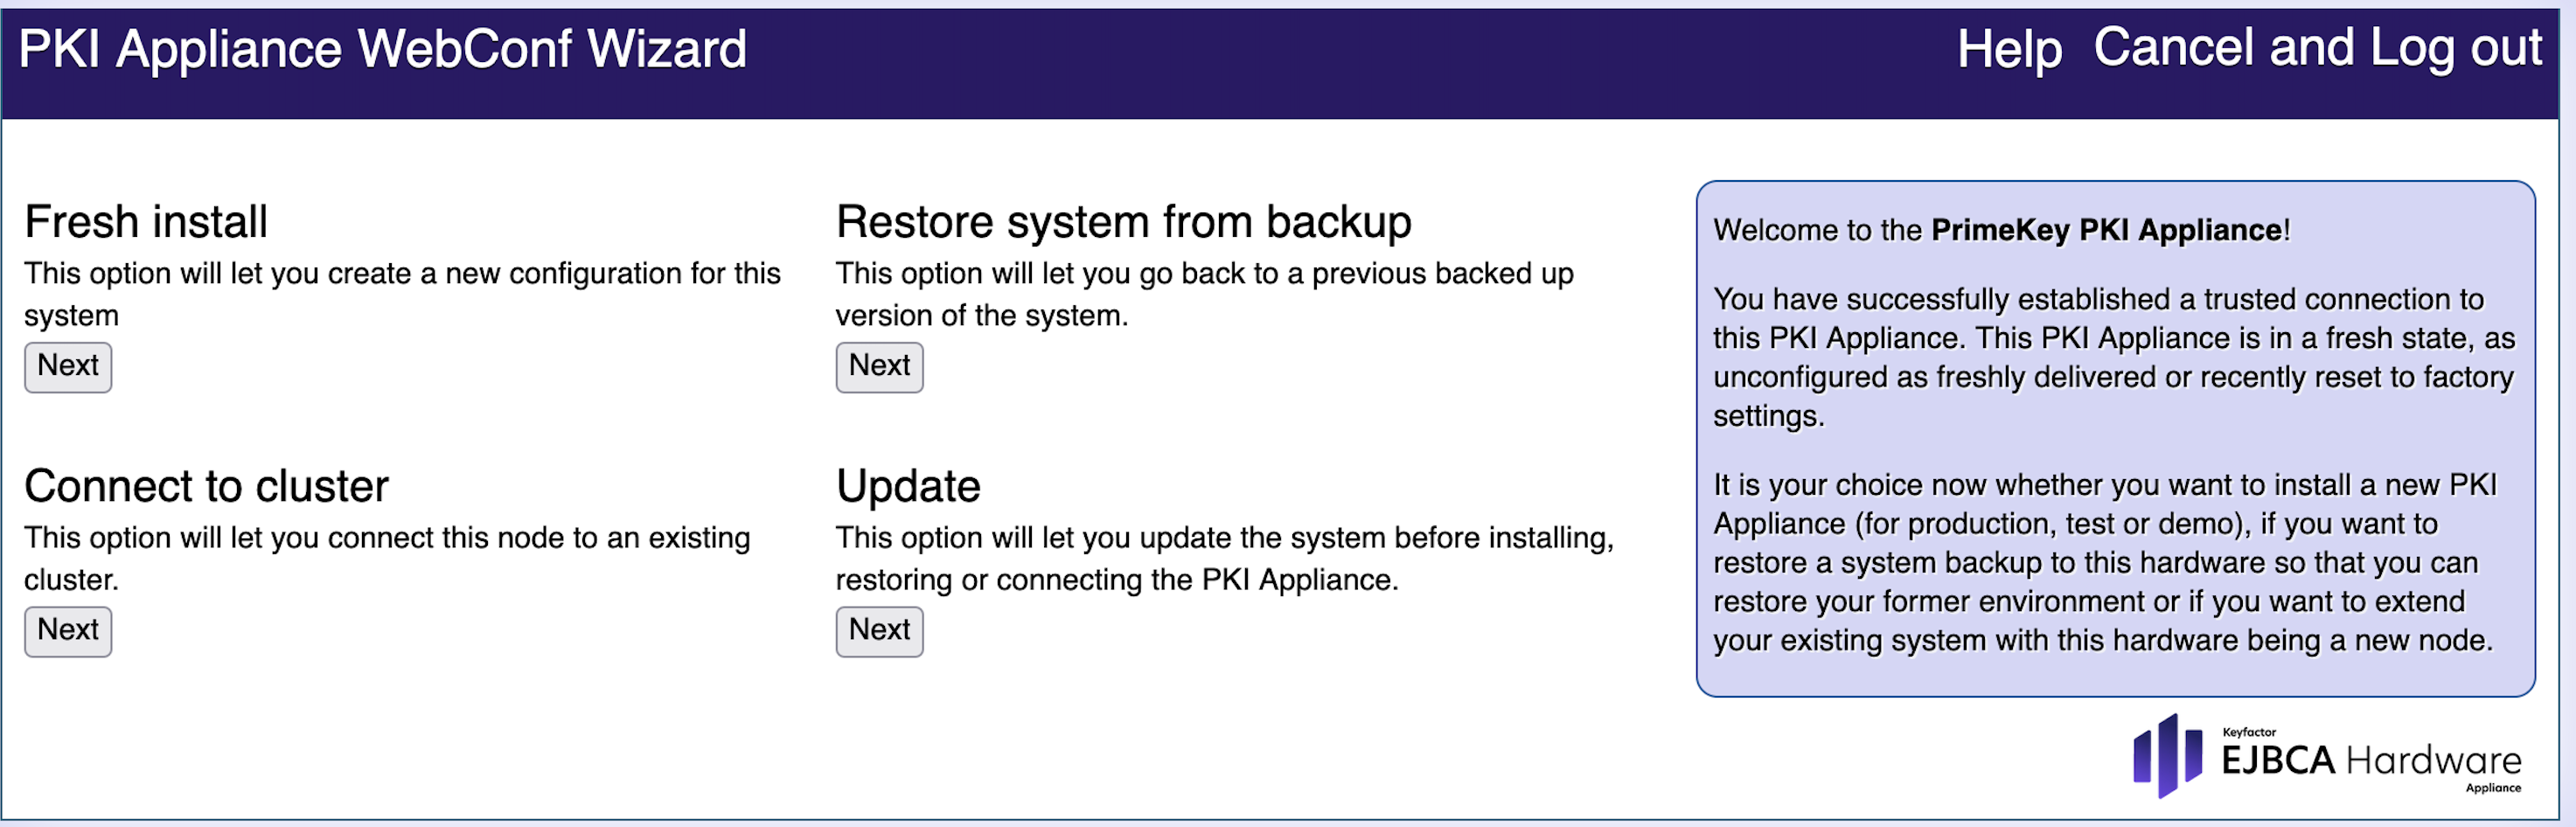
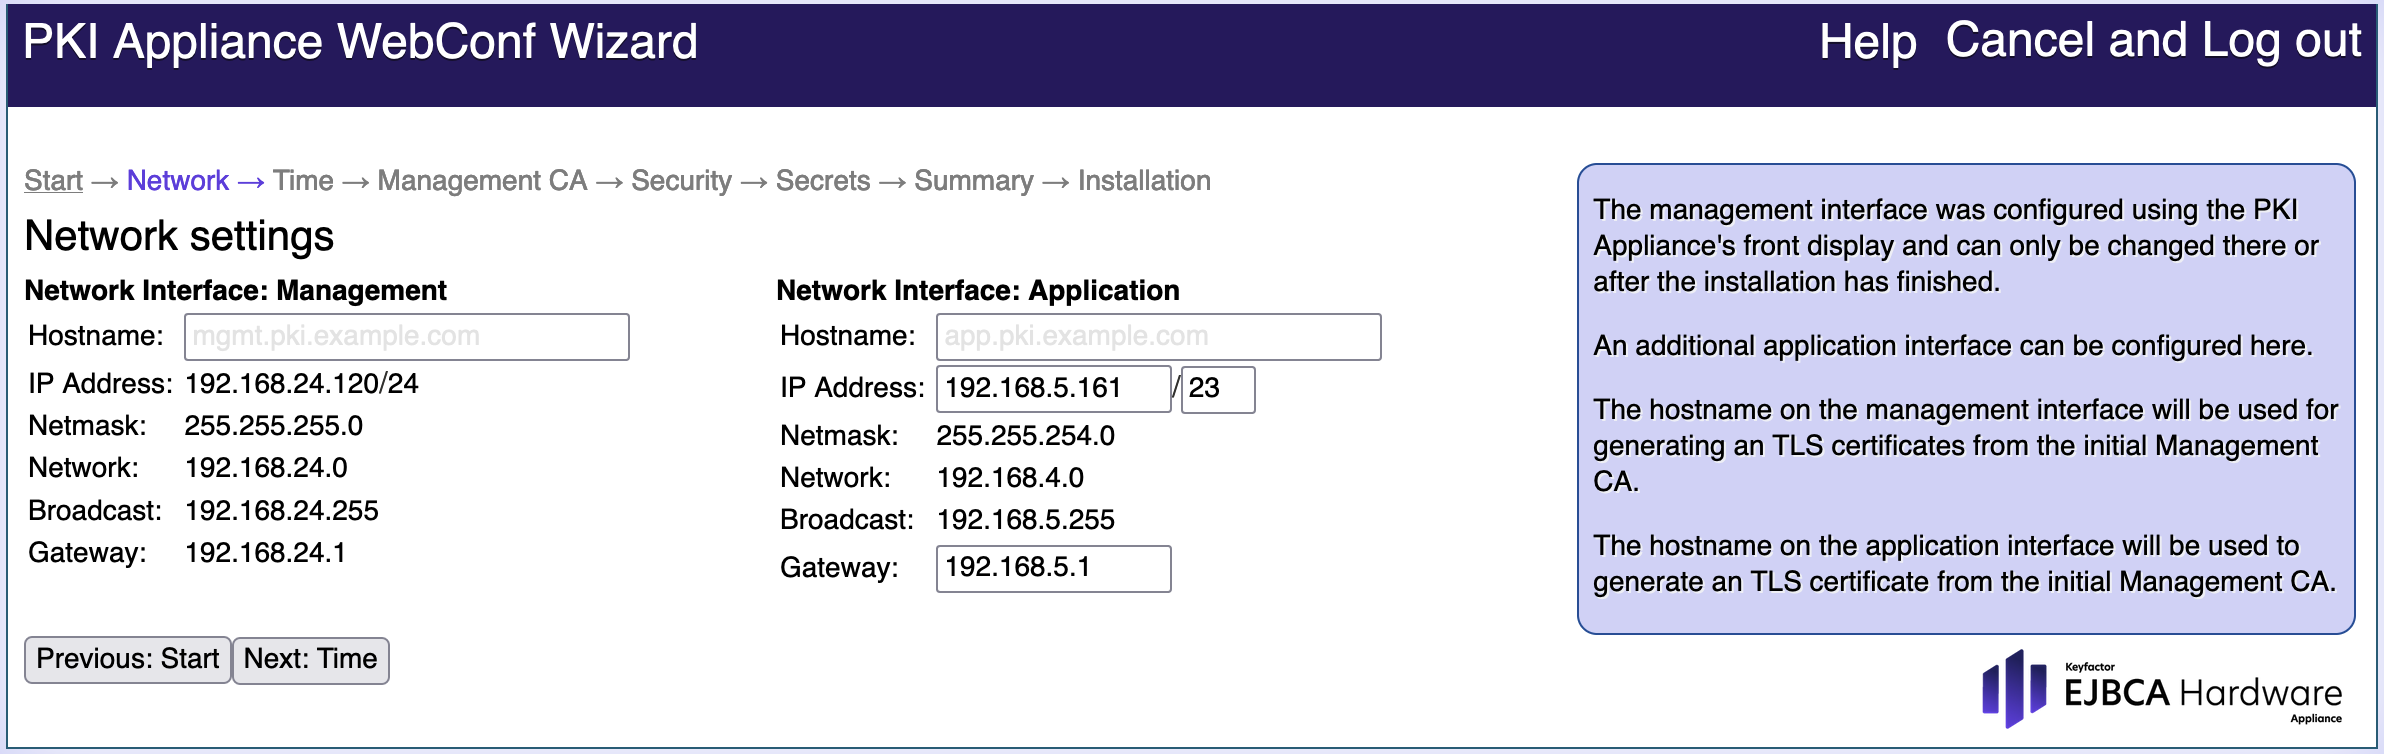
Network Settings
After the Fresh Install is complete, you can configure the network settings of the Hardware Appliance. There are two physical network setting interface designs:
- Management Interface: Provides access to the configurator WebConf and to the Admin GUI of EJBCA.
The Management Interface IP address has been configured via the front display in Step 3: Changing the IP Address of the Hardware Appliance. It is preset to a network prefix of /24 (subnet mask 255.255.255.0). - Application Interface: Provides routing for the operational payload.
You can use this wizard step to enter the IP address, network prefix, and default gateway manually.
If needed, the two networks can be separated.
After the installation is complete you can use the WebConf > Network page to edit your network settings. However, we recommend to decide on the network configuration beforehand.
Proceed as follows to configure the Network Settings:
- Enter the Hostname for the Management and Application Interfaces.
This is required if the Hardware Appliance needs to be available through DNS name resolution. - If needed, enter the IP address, Network prefix and Gateway for the Application Interface.
- Click Next: Time to proceed to the next page of the wizard.
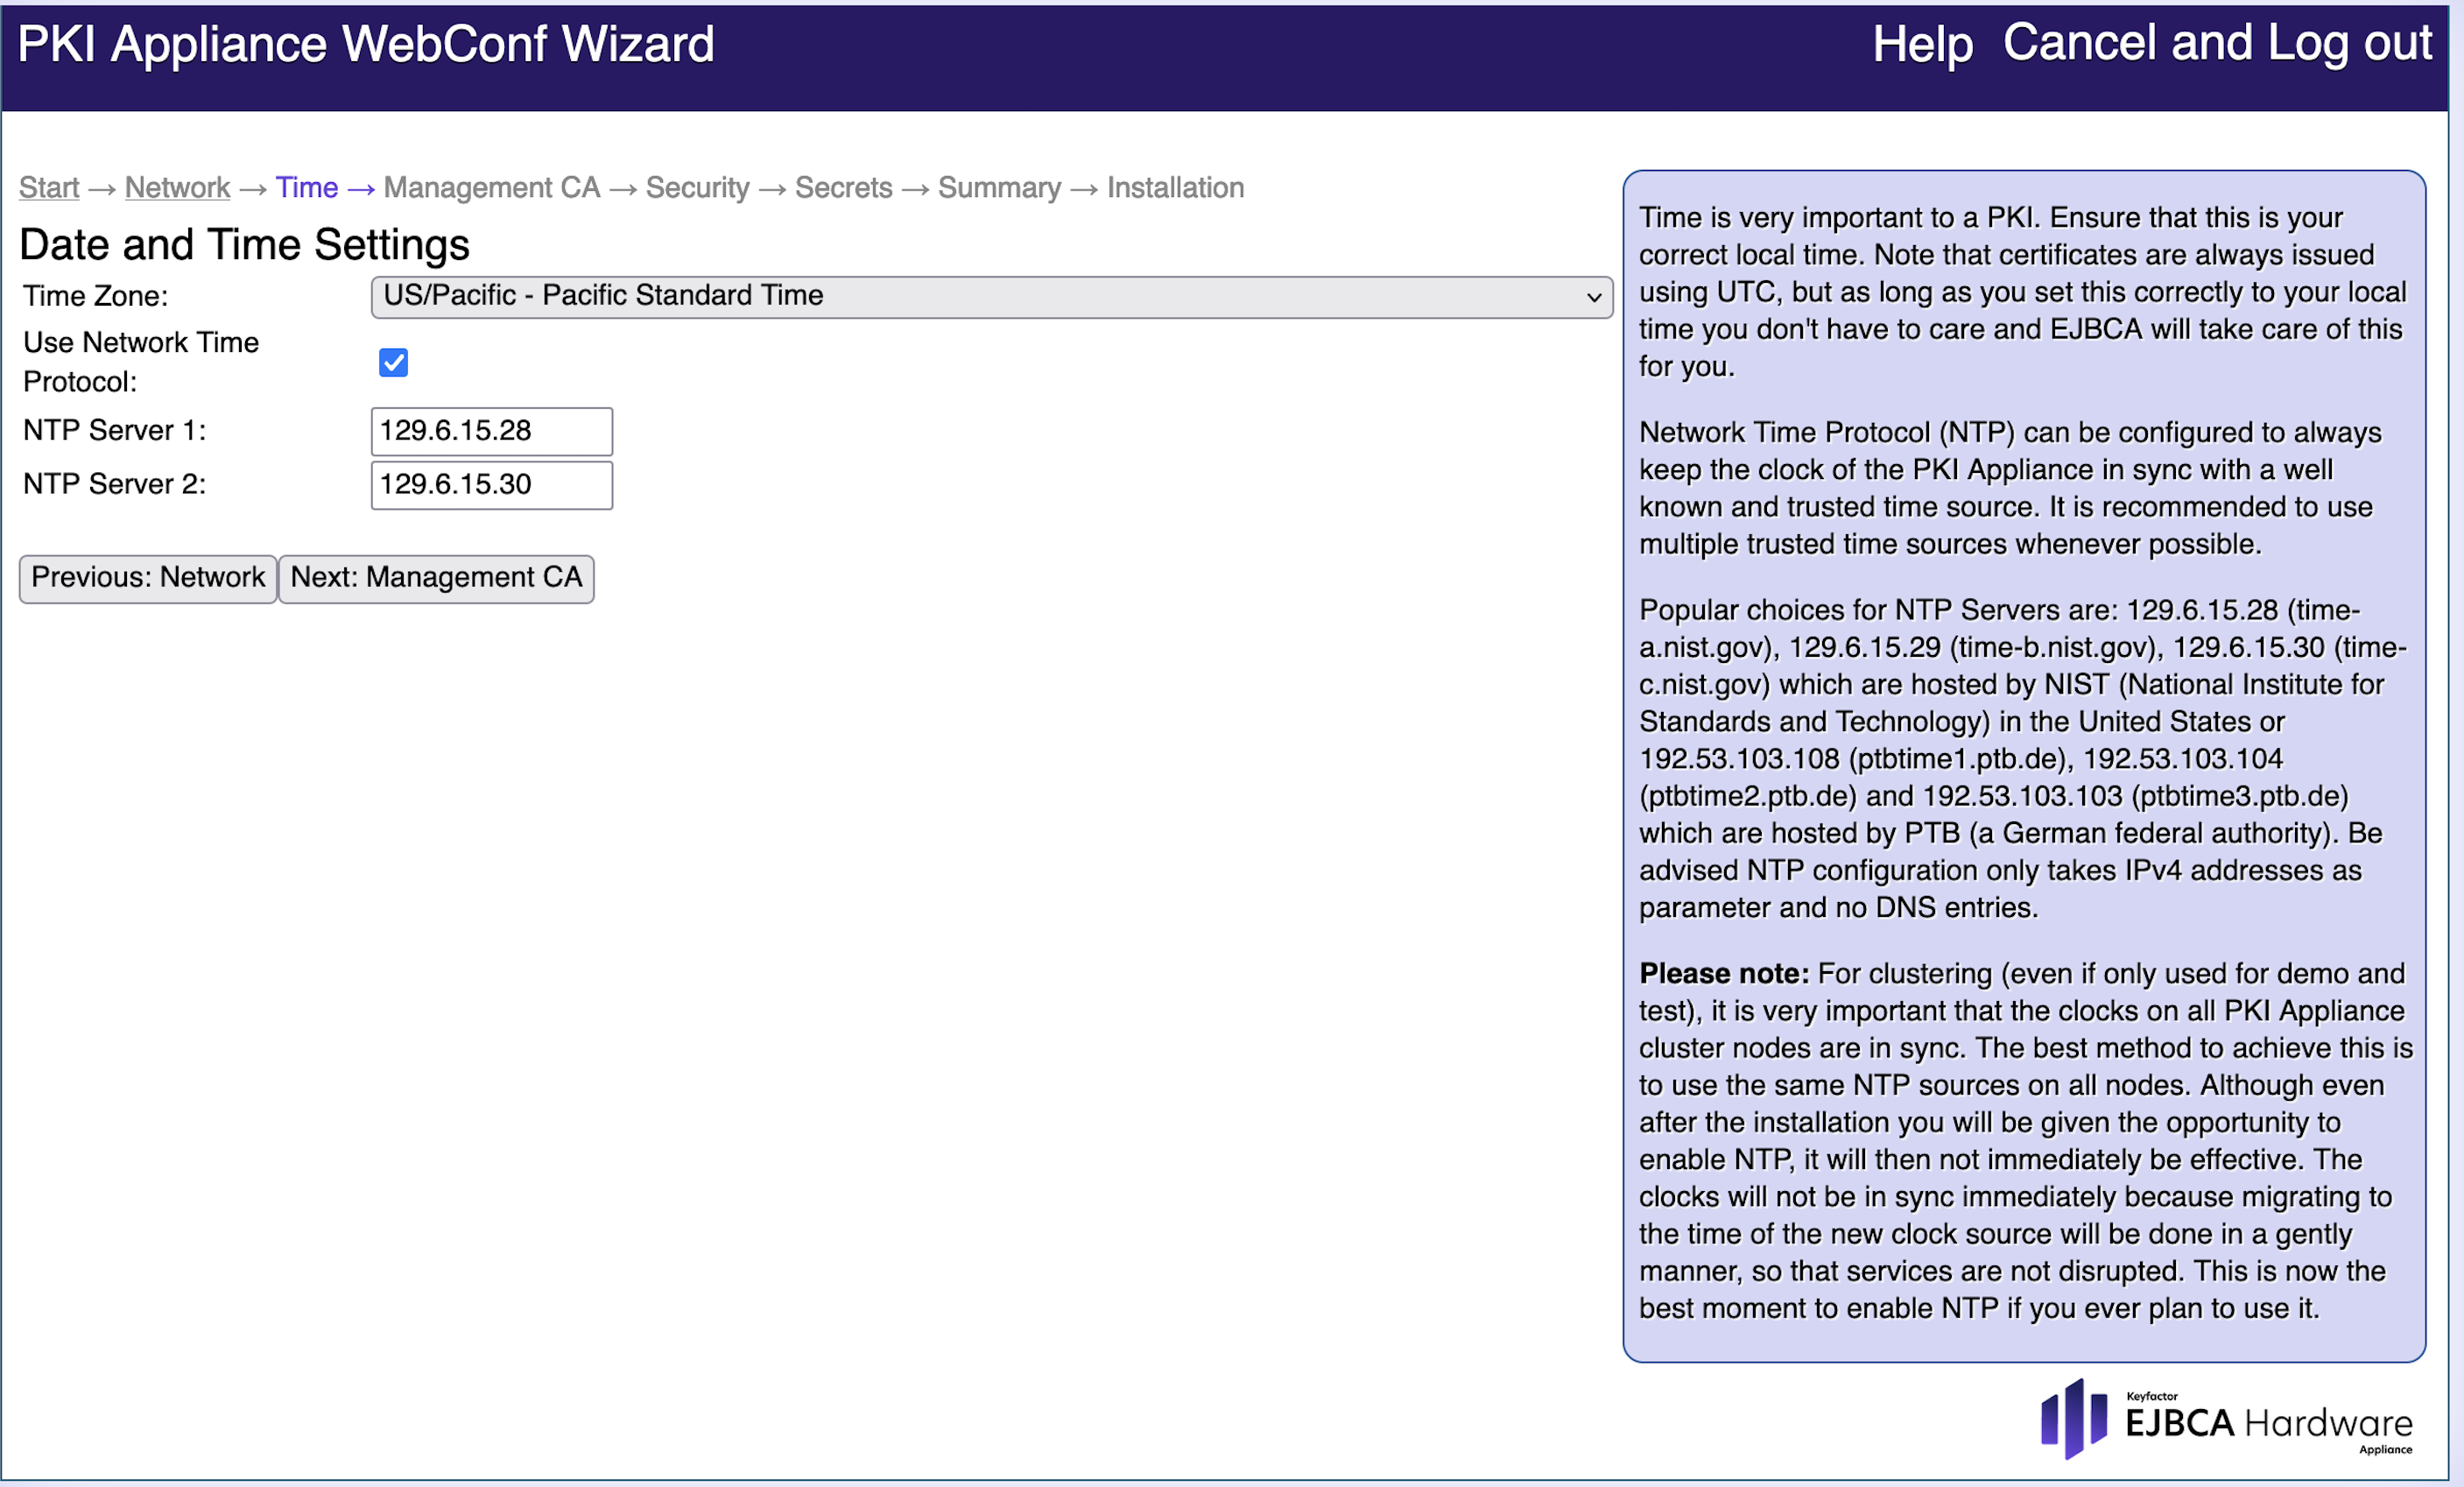
Date and Time Settings
Many Public Key Infrastructure (PKI) applications need a correct date and time. Use a Network Time Protocol (NTP) time source, as this protocol synchronizes the clocks of computers over a network. NTP is for example required to build a cluster.
We recommend to enable Use Network Time Protocol at this stage. If NTP is configured at a later time, there will be time synchronization issues between the NTP Server and the current system time.
Proceed as follows to configure the Date and Time Settings:
- Select the Time Zone from the drop-down list that applies to you (here US/Pacific - Pacific Standard Time is set).
- Enable Use Network Time Protocol if you want to use an NTP time source.
If enabled, also specify the NTP Server to be used. - Select the exact Date and time.
- Click Next: Management CA to proceed to the next page.
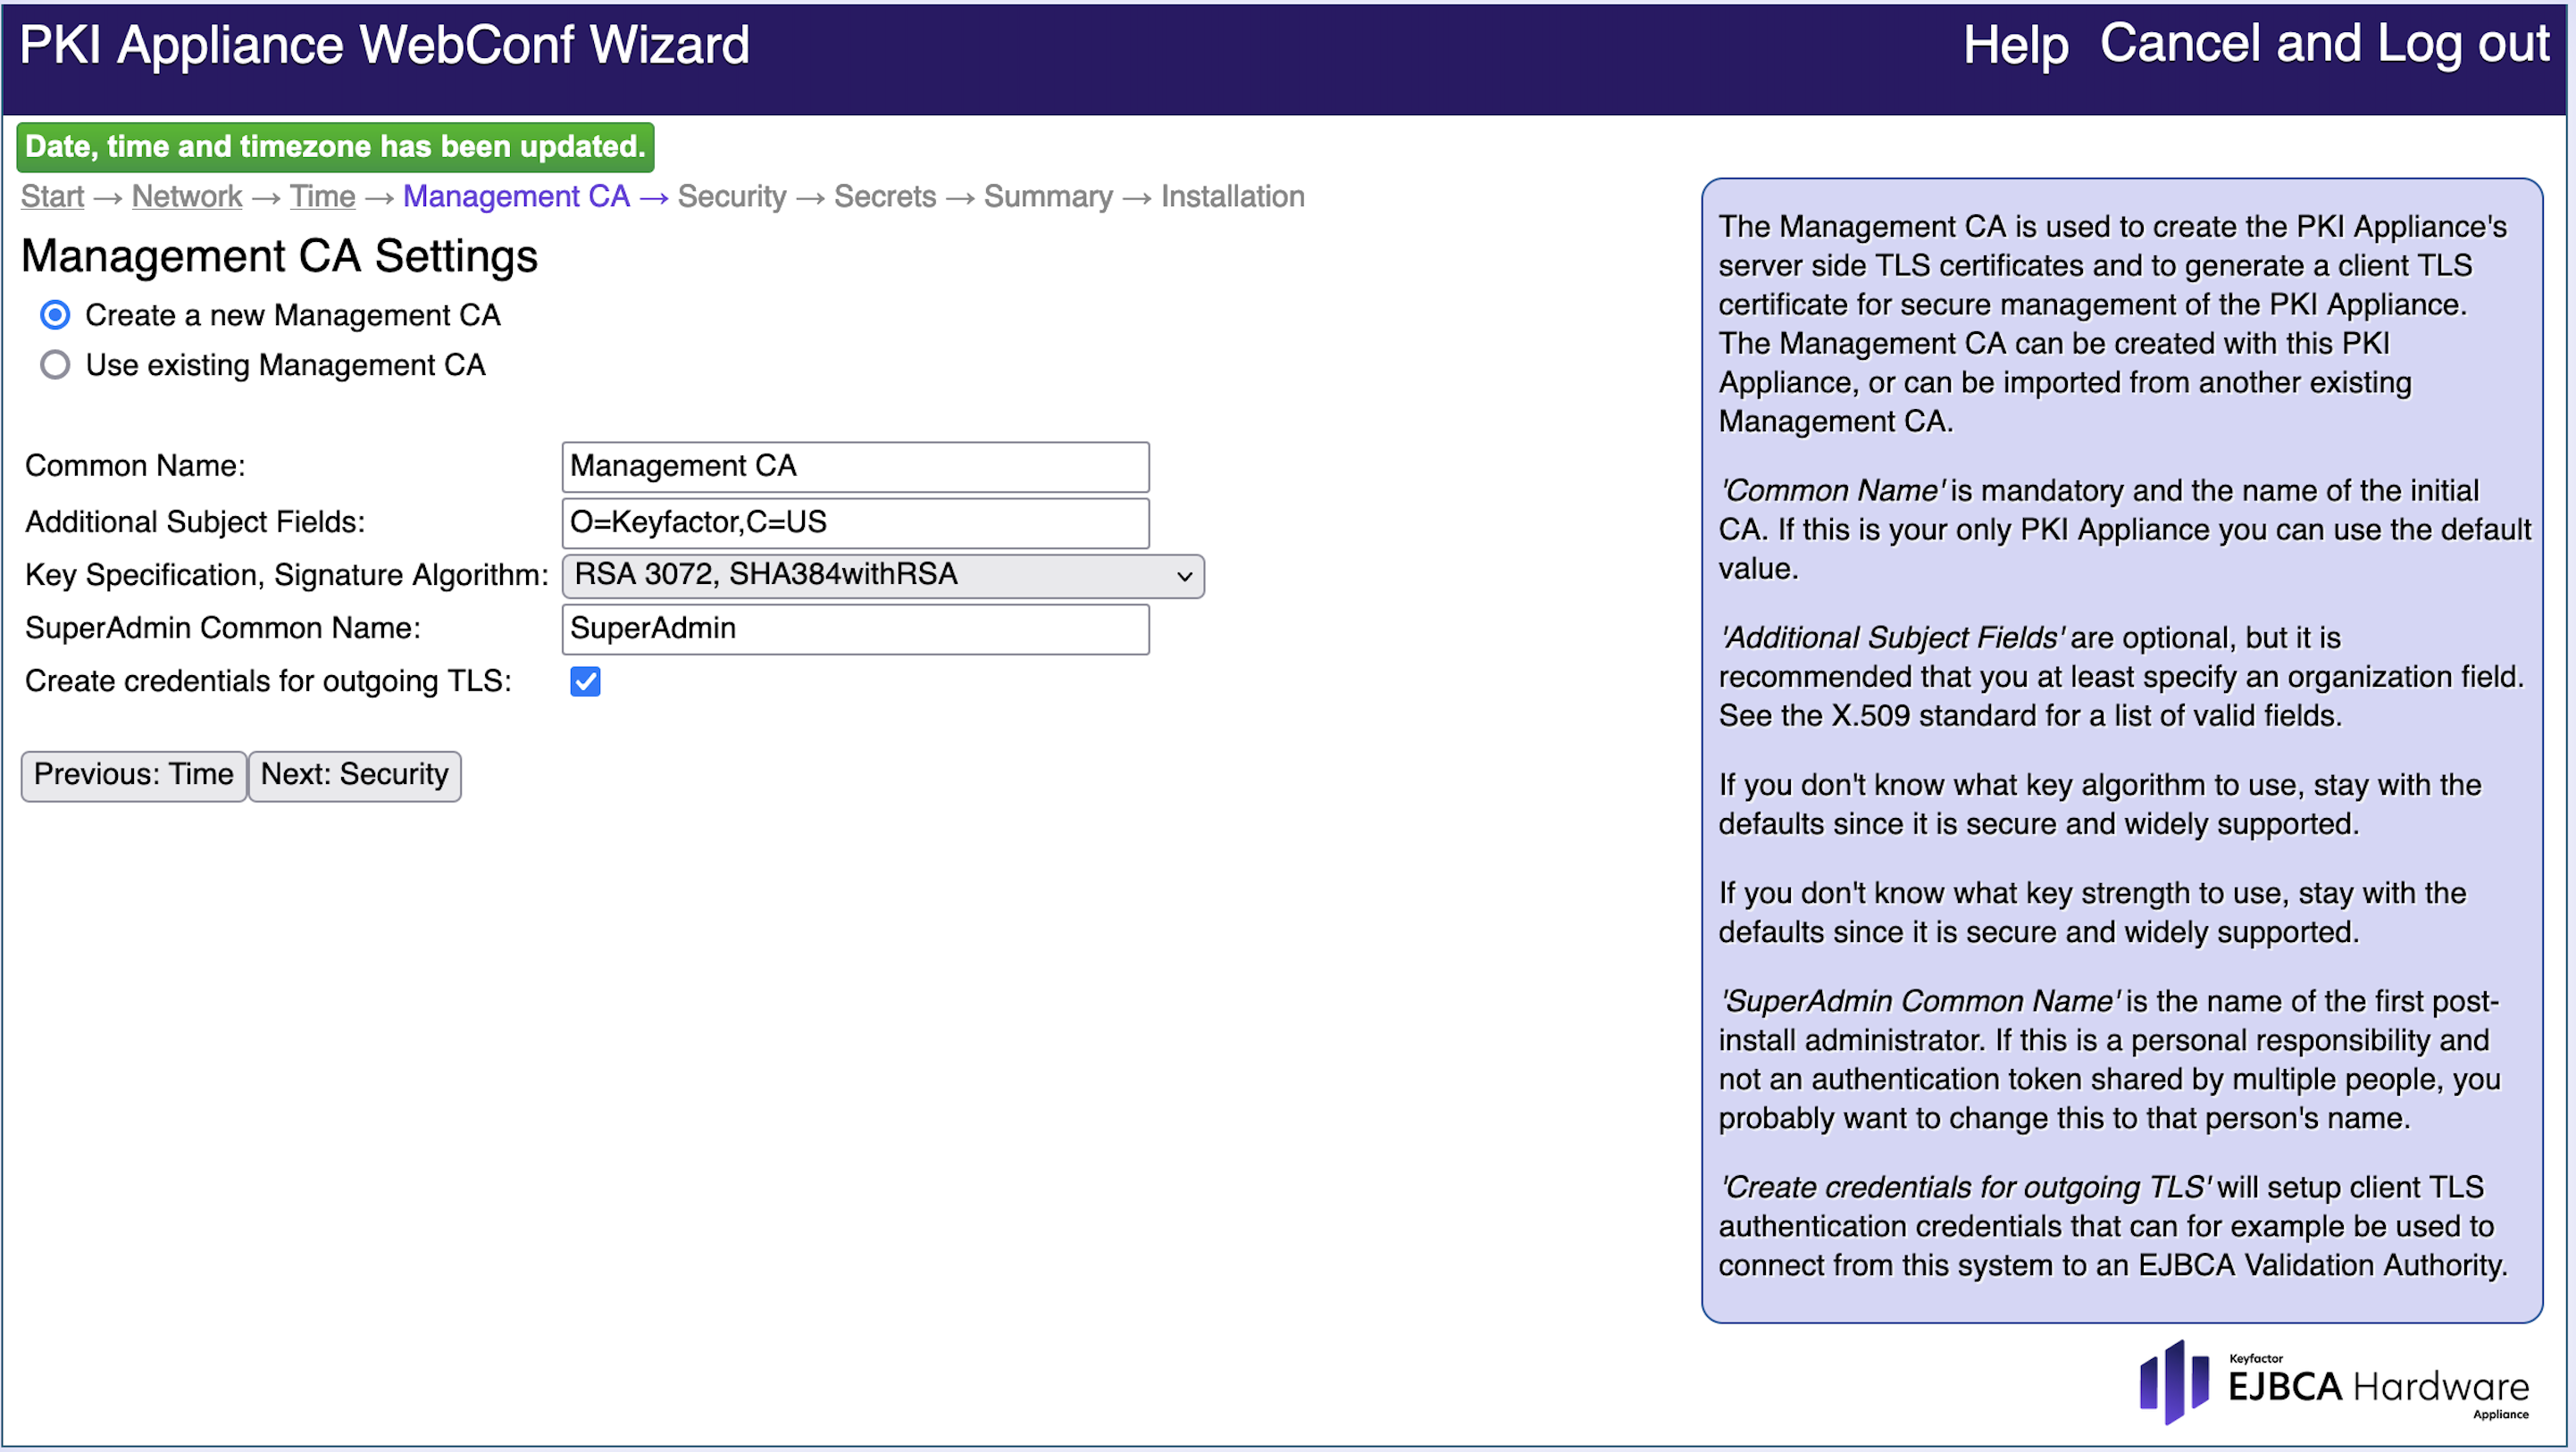
Management CA Settings
The initial Management CA will be used to create the Hardware Appliance's server side TLS certificate. It will also generate a client TLS certificate for secure management of the Hardware Appliance.
Carefully consider the Management CA Settings. These settings cannot be altered after the installation. If there is an existing TLS PKI, you can use an existing Management CA. There will be a prompt to upload the PEM-encoded CA certificate.
Proceed as follows to configure the Management CA Settings:
- Enter the Common Name of the EJBCA Management CA.
- Add the Additional Subject Fields, such as organization and country:
- It is important to specify a meaningful identifier for the Additional Subject Fields.
- The Additional Subject DN is reflected in the TLS certificates stored in your browser and in the name of the backup files.
- If you want to perform several test and/or demo installations, this is where the name can be branded.
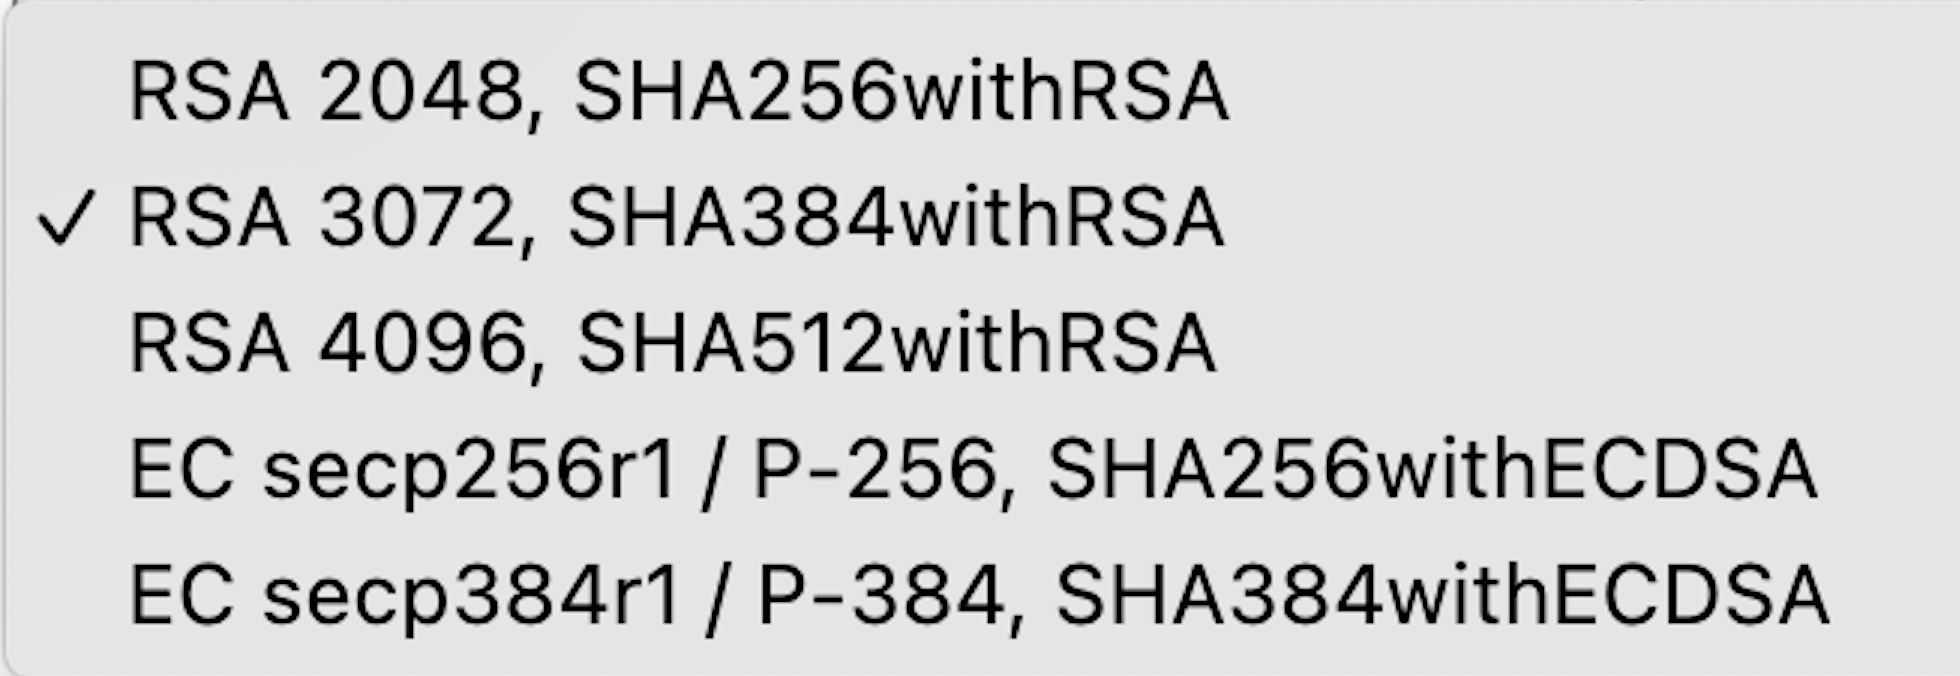
Select the signing Key Specification and the Signature Algorithm to be used by the EJBCA Management CA:
Enter the SuperAdmin Common Name. This is the name of the first post-install user with administrative rights.
Click Next: Security.
Hardware Security Module Settings
Use this tab to configure all relevant security aspects of the Hardware Appliance.
Security settings cannot be altered after the installation.
Proceed as follows to configure the Hardware Security Module Settings:
- Select the desired Appliance Security Level option. See Appliance Security Level for detailed information.
- Select the desired PKCS#11 Stack Generation option:
- New PKCS#11 v3 stack (R3 with P11NG): Includes new PKCS#11 standard v3 algorithms and P11NG.
Established PKCS#11 R2 stack (R2 with SunP11Wrapper): Offers Smart Card Authentication and FIPS module loading.
If Established PKCS#11 R2 stack is selected, select whether CryptoToken/PKCS#11 Slot Smart Card Authentication is needed or not. See Crypto Token/PKCS#11 Slot Smart Card Authentication for detailed information.

If PKCS#11 Slot Smart Card Authentication is selected for CryptoToken Activation, this decision is final. It is no longer possible to reverse this process after finishing the installation!
For the option Yes, require smart card ... specify the appropriate further options.
- Select Store signed audit log, if needed. See Audit Log Storage for detailed information.
- Select Load HSM FIPS Module, if needed. This option is only available when Established PKCS#11 R2 stack is selected.
Activate this option to load and activate the FIPS firmware module. This enforces the restrictions required by the FIPS 140-2 standard. Click Next: Secrets.
Appliance Security Level - Detailed information
Define here if and how many smart cards shall be used to protect the HSM key material. For example:
If 2 out of 3 Backup key share cards is chosen, 3 smart cards are inserted during installation and each card will share and store a symmetric key (the Backup Key). The symmetric key will be used to encrypt the backups. As the Backup Key is also securely stored on the HSM smart cards, it will not need to be provided for every backup operation.
If the Hardware Appliance needs to be restored from a backup:
- Import the Backup Key into the HSM to decrypt with 2 of the 3 initial smart cards.
- Import the backup data.
The same scenario for the 3 out of 5 Backup key share smart cards.
For low security or testing scenarios, it is possible to operate the Hardware Appliance without smart cards and use software based keys, which are stored on the Hardware Appliance instead. In this case, any backup of cryptographic keys (from the HSM) will not be secured by the Backup Key Share smart cards, but only by the Domain Master Secret, that encrypts all data in a backup file.
Higher security can be achieved by enabling smart card activation on slots (as of Hardware Appliance 2.2.0). For more information about smart card activated slots, please refer to the section PKCS#11 Slot Smart Card Activation.
Crypto Token/PKCS#11 Slot Smart Card Authentication - Detailed information
- No, application start Crypto Token activation should be possible remotely:
The manually generated authentication codes will enable remote activation from any device allowed to access the WebConf or the Adminweb. These codes are stored encrypted in a database. - Yes, require smart card authentication for Crypto Token activation:
Physical access to the appliance with a PIN Pad and the administrator's smart cards and codes are required in order to activate these crypto tokens.
Audit Log Storage - Detailed information
Here you can select to Store signed audit logs, that is, log records of security operations, should be stored on the clustered storage. By default, the option is enabled. Audit log records consume database disk space. For a typical installation, the creation of a single certificate issues approximately 10 audit log records. For all typical installations, the audit log database table will be at least double the size of the other database tables. If you disable the option, you can store the audit log records externally, over syslog shipping (unsigned, unencrypted).
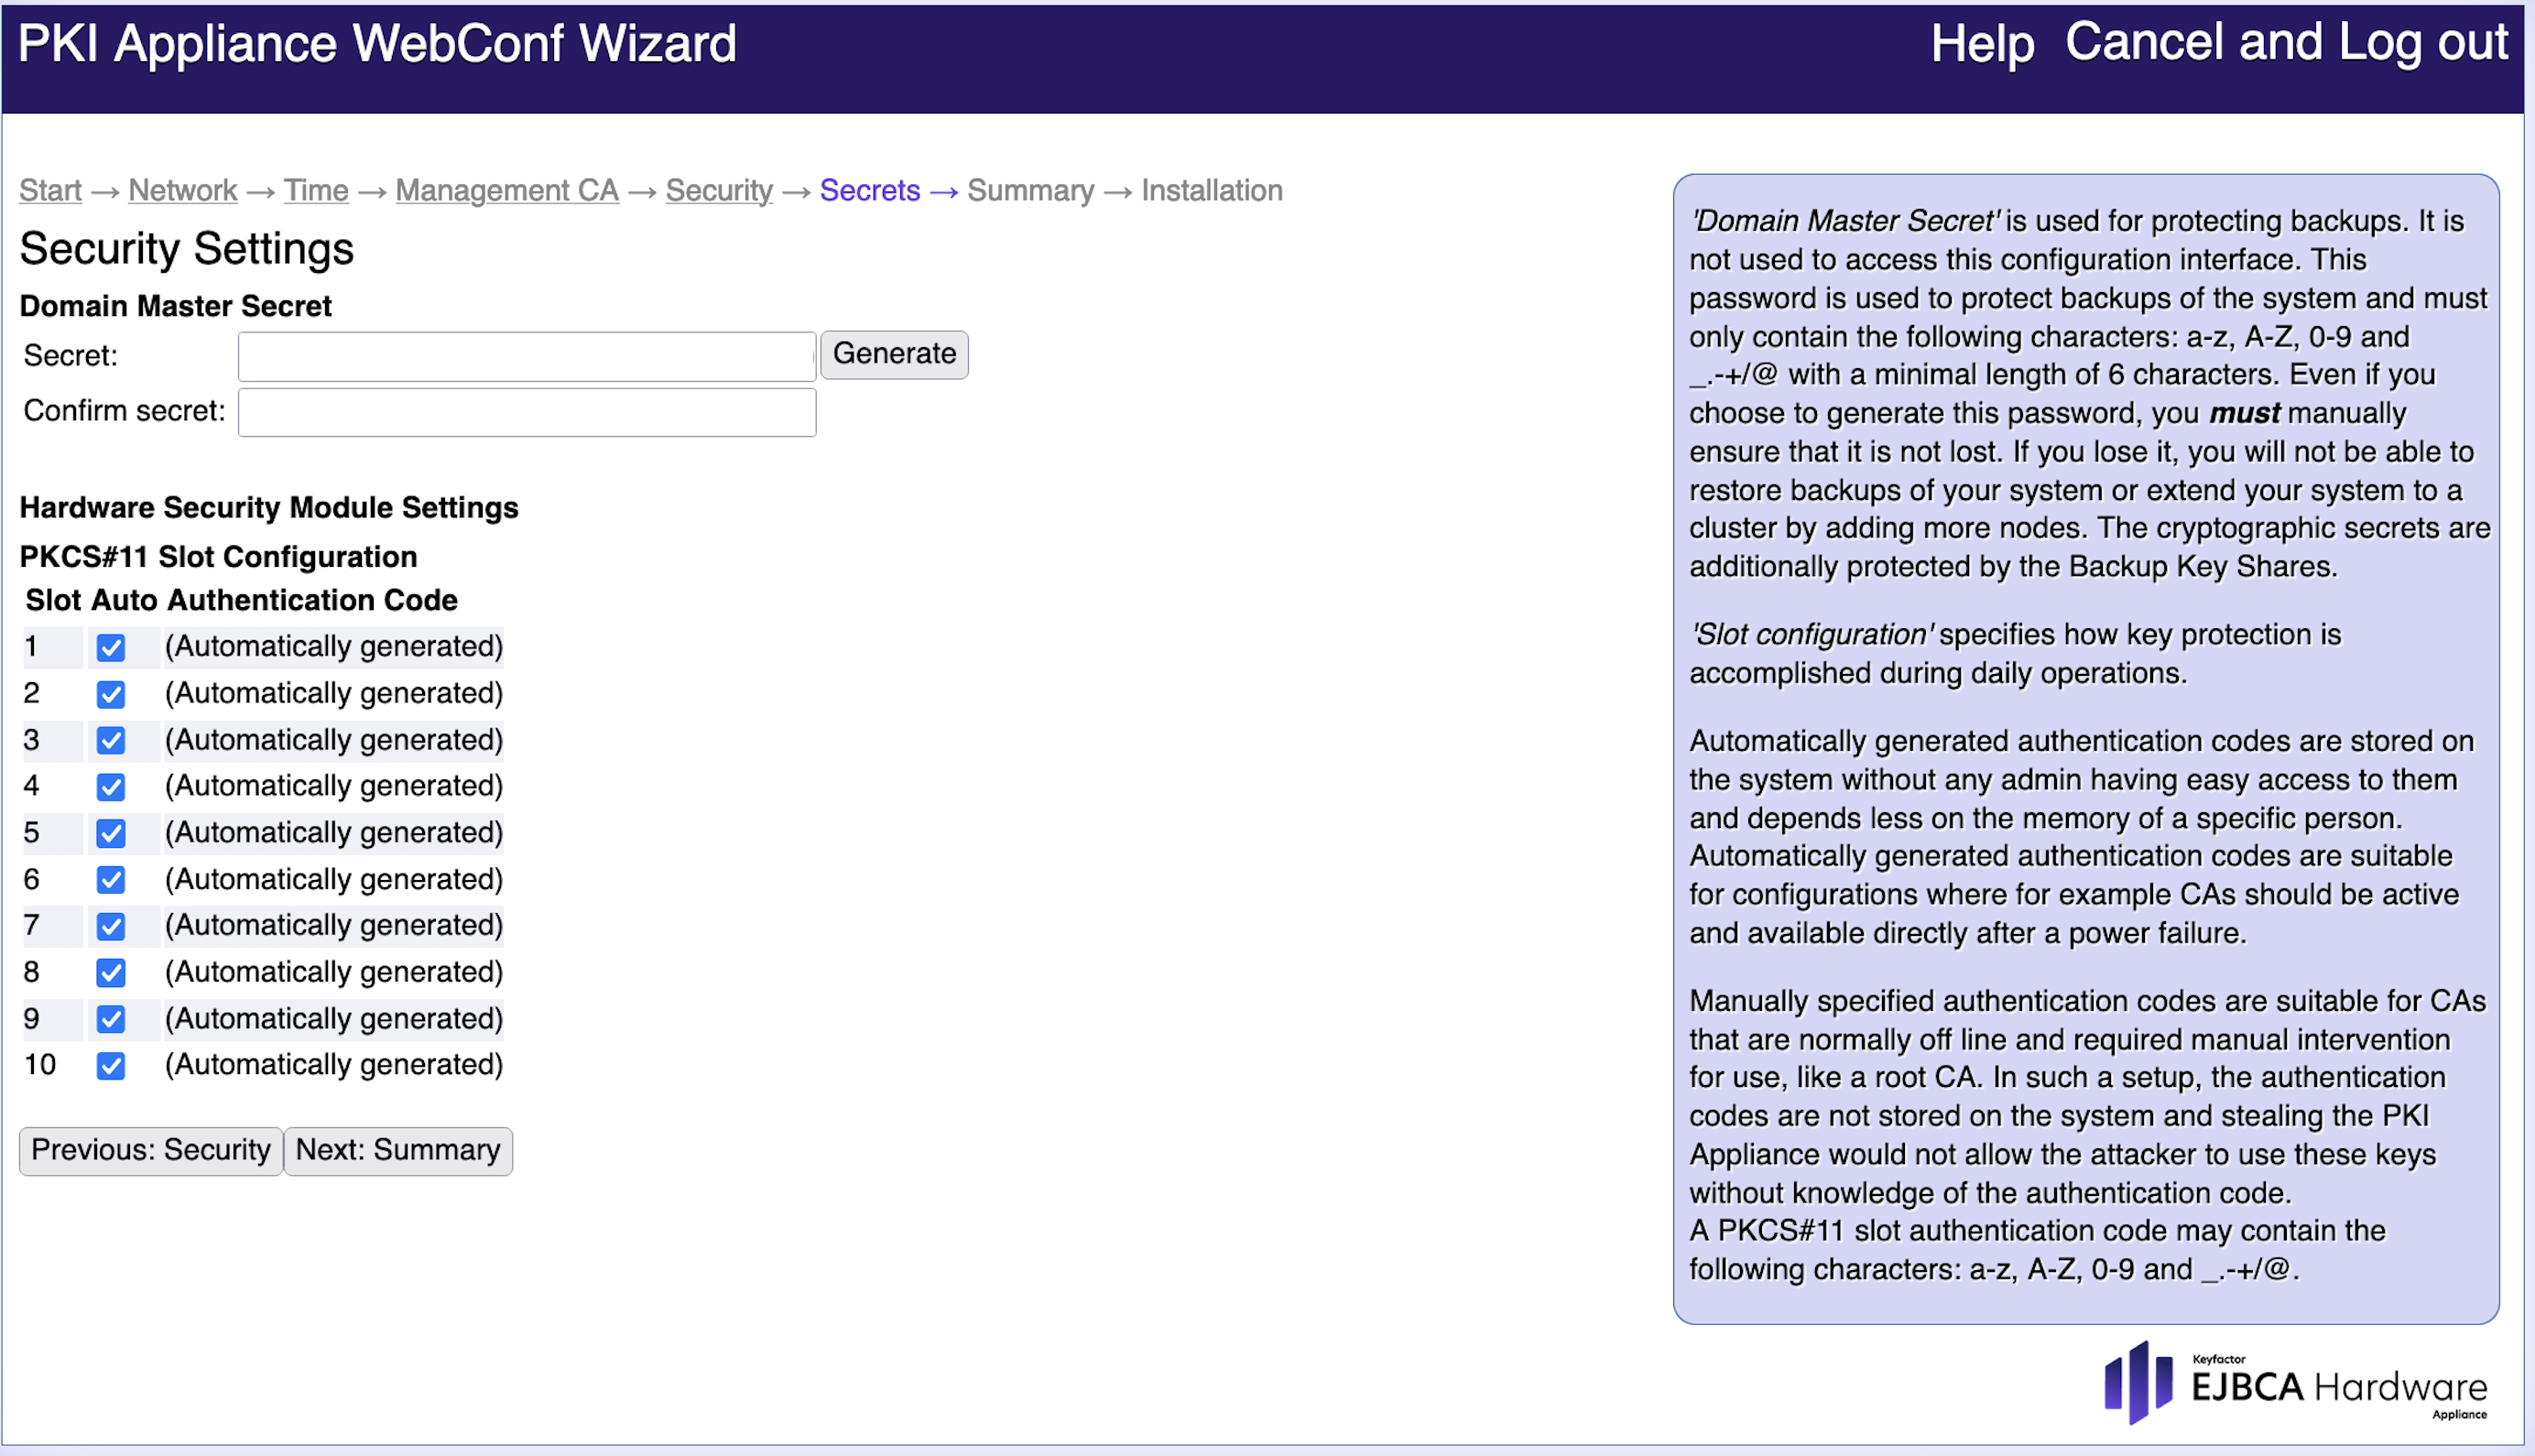
Security Settings - Secrets
Domain Master Secret
A Domain Master Secret ensures a higher level of security. This passphrase is used to derive a symmetric key which is used to encrypt backup archives created by the Hardware Appliance. A Domain Master Secret can be specified manually or it can be generated by the system. If generated by the system, the highly secure Domain Master Secret can be printed.
Important
Document the Domain Master Secret and keep it in a safe place. If it is lost, you cannot restore the device from a backup and you cannot extend this system to a cluster.
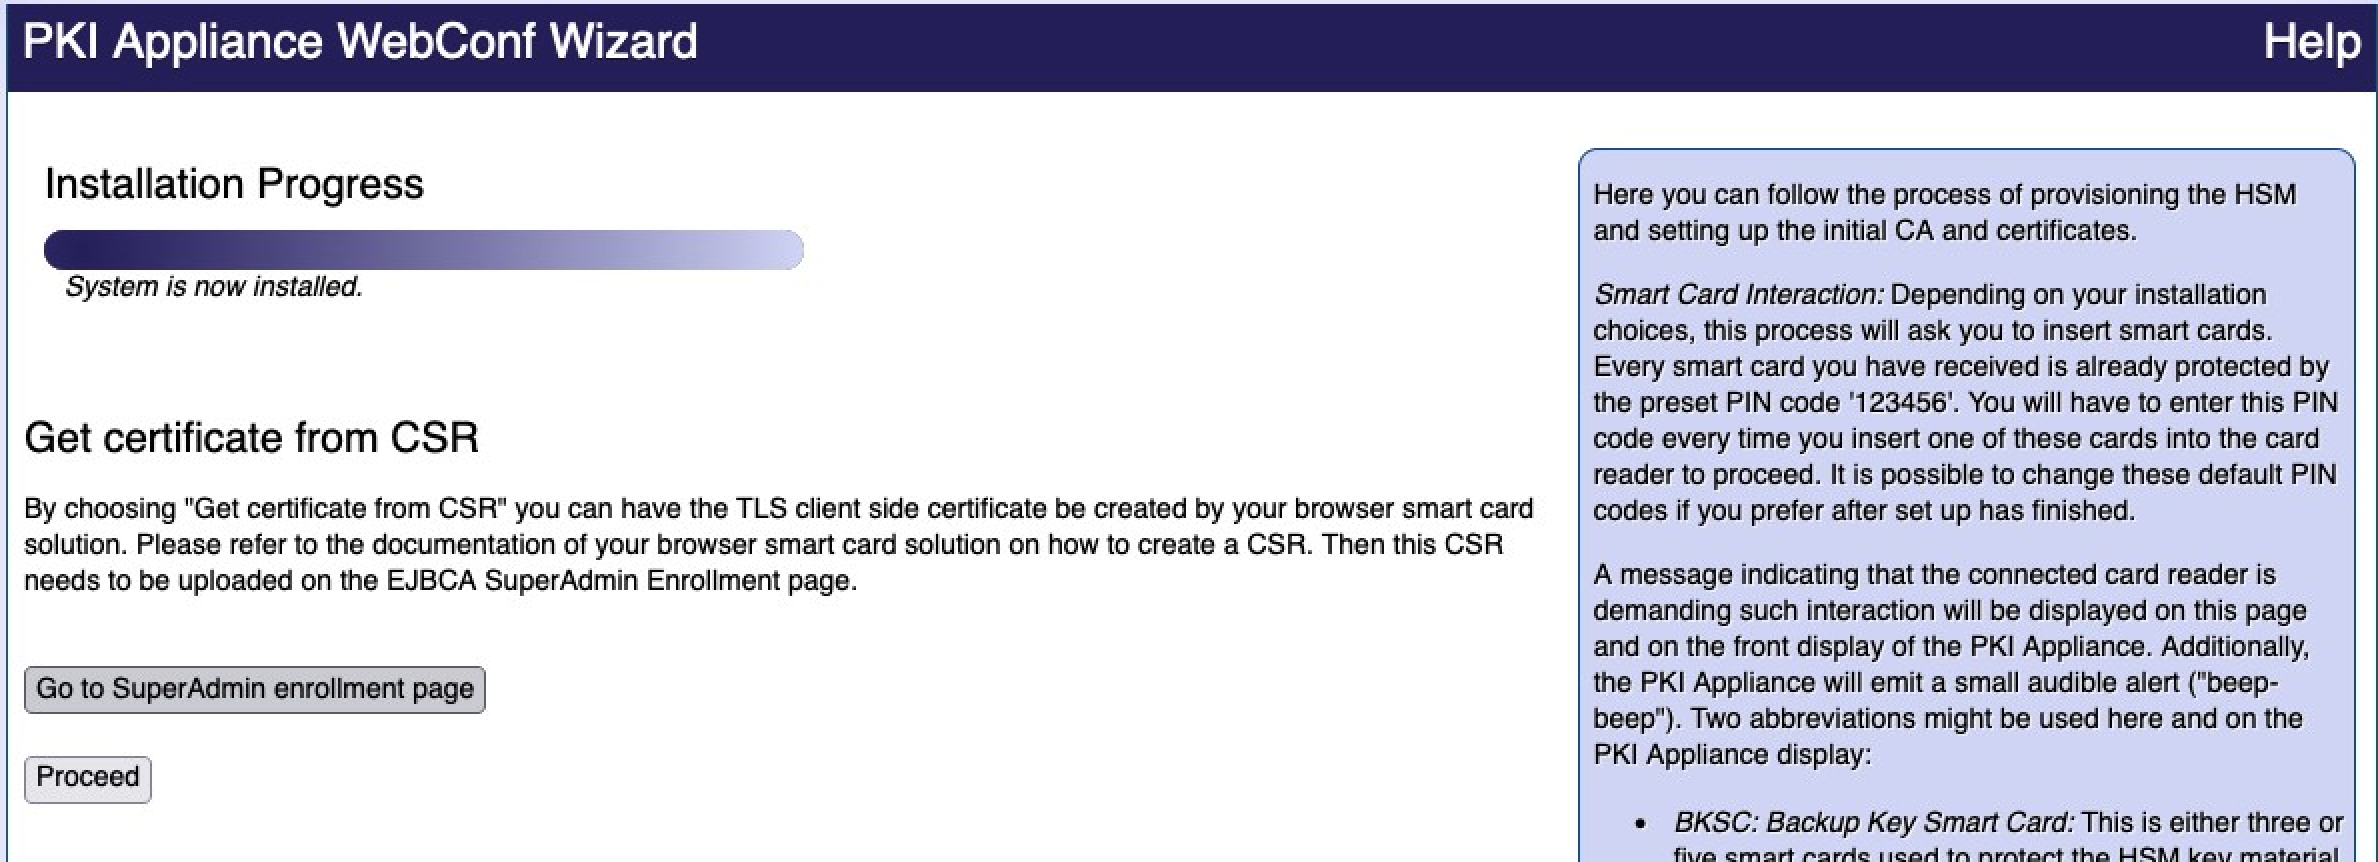
Summary and Start of the Installation
The Summary step lists all configuration settings from the previous wizard steps. We highly recommend the following:
- Check everything on this page before starting the actual installation.
- Print this page for future reference.
If smart cards were used for setup, ensure the following:
- Connect the provided PIN Pad to one of the USB ports at the front of the Hardware Appliance.
- Have a sufficient number of smart cards ready.
The smart cards are delivered with the default PIN "123456". You can change the PIN of a smart card after the installation.
Proceed as follows to check and confirm the Summary and begin the installation:
- Check the settings very carefully. All configuration entries are clearly listed on the Summary page.
To correct errors in the configuration, use the Previous: ... button at the bottom of the page or the links in the breadcrumbs path at the top to navigate to the relevant wizard page. - Click Begin installation at the bottom of the page. The installation will take a few minutes.
- Follow the installation and configuration steps shown below the progress bar. These steps include the configuration of the HSM, the database and the applications, like EJBCA.
When using smart cards pay attention to the PIN Pad during the installation process: You will be prompted to insert the smart cards and enter the PIN. Enter the smart cards in two steps using the 'k out of n' schema:
- Key generation: Insert all (n) smart cards you have chosen to use, always providing the PIN.
- Key import (to HSM): Insert again the amount of smart cards that is needed to restore the backup key (k)
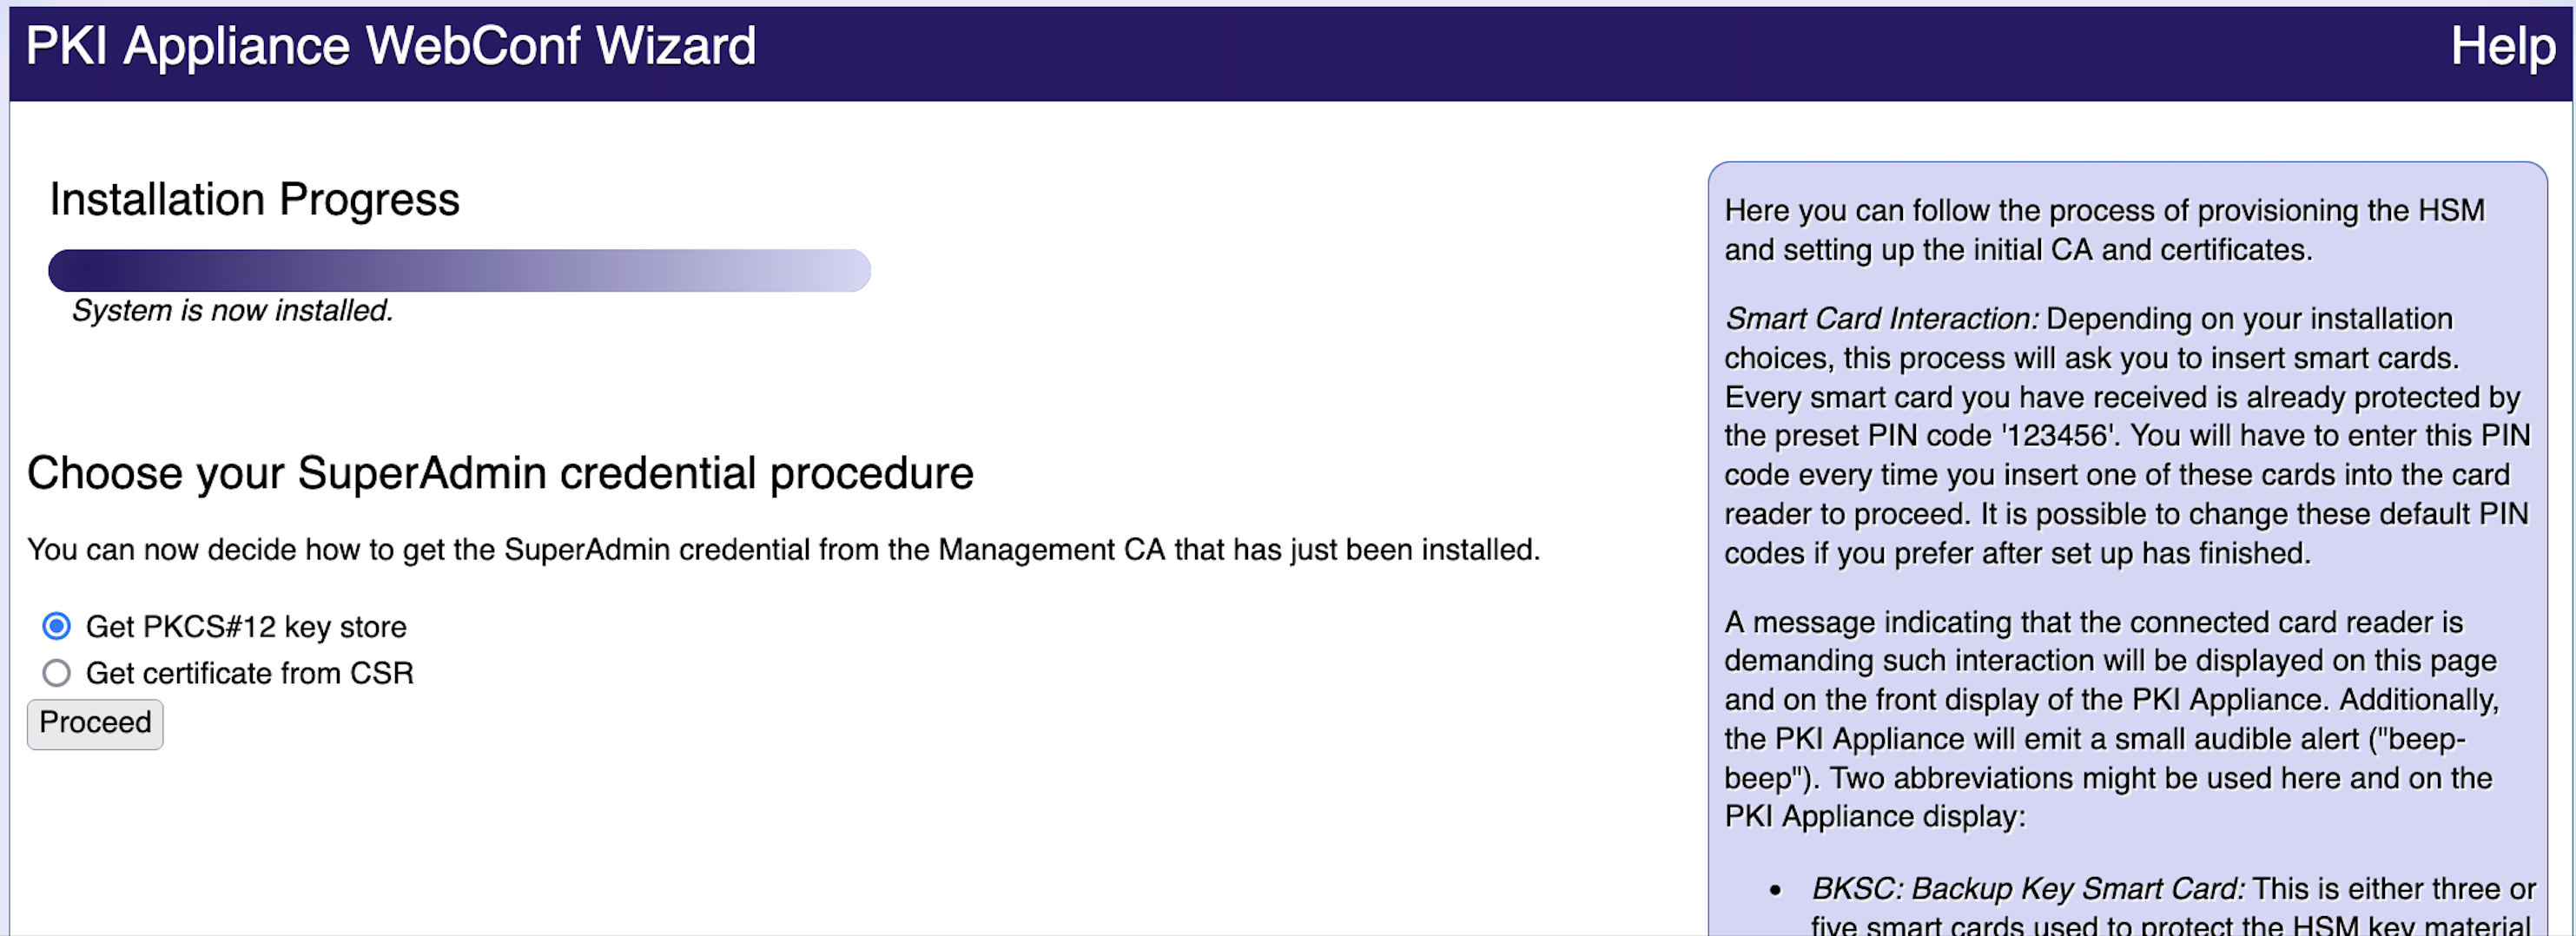
Choose SuperAdmin Credentials
For managing the Hardware Appliance you need a client side SuperAdmin TLS certificate. This certificate is issued by the Management CA and can be used by your browser. The certificate will be your only authentication to the system, unless you configure other access methods. For information on configuration of further users and other authentication methods, see the section Access.
After the installation you will be automatically prompted to choose your SuperAdmin credential procedure:
To retrieve SuperAdmin credentials, select the option appropriate for the current client environment:
- Get PKCS#12 key store: The SuperAdmin certificate and corresponding key pair is generated on the Hardware Appliance and manually imported into the browser.
- Get certificate from Certificate Signing Request: The SuperAdmin key pair is generated outside the browser context and the SuperAdmin certificate will be created from a Certificate Signing Request.
The following sections provide more detailed information about each of these options.
The certificate and it‘s key pair is a vital component of your system. Protect and secure it with the same care that you take for the backups and data of the Hardware Appliance itself. Anyone in possession of this certificate can manipulate your installation. You cannot access the Hardware Appliance without this certificate.
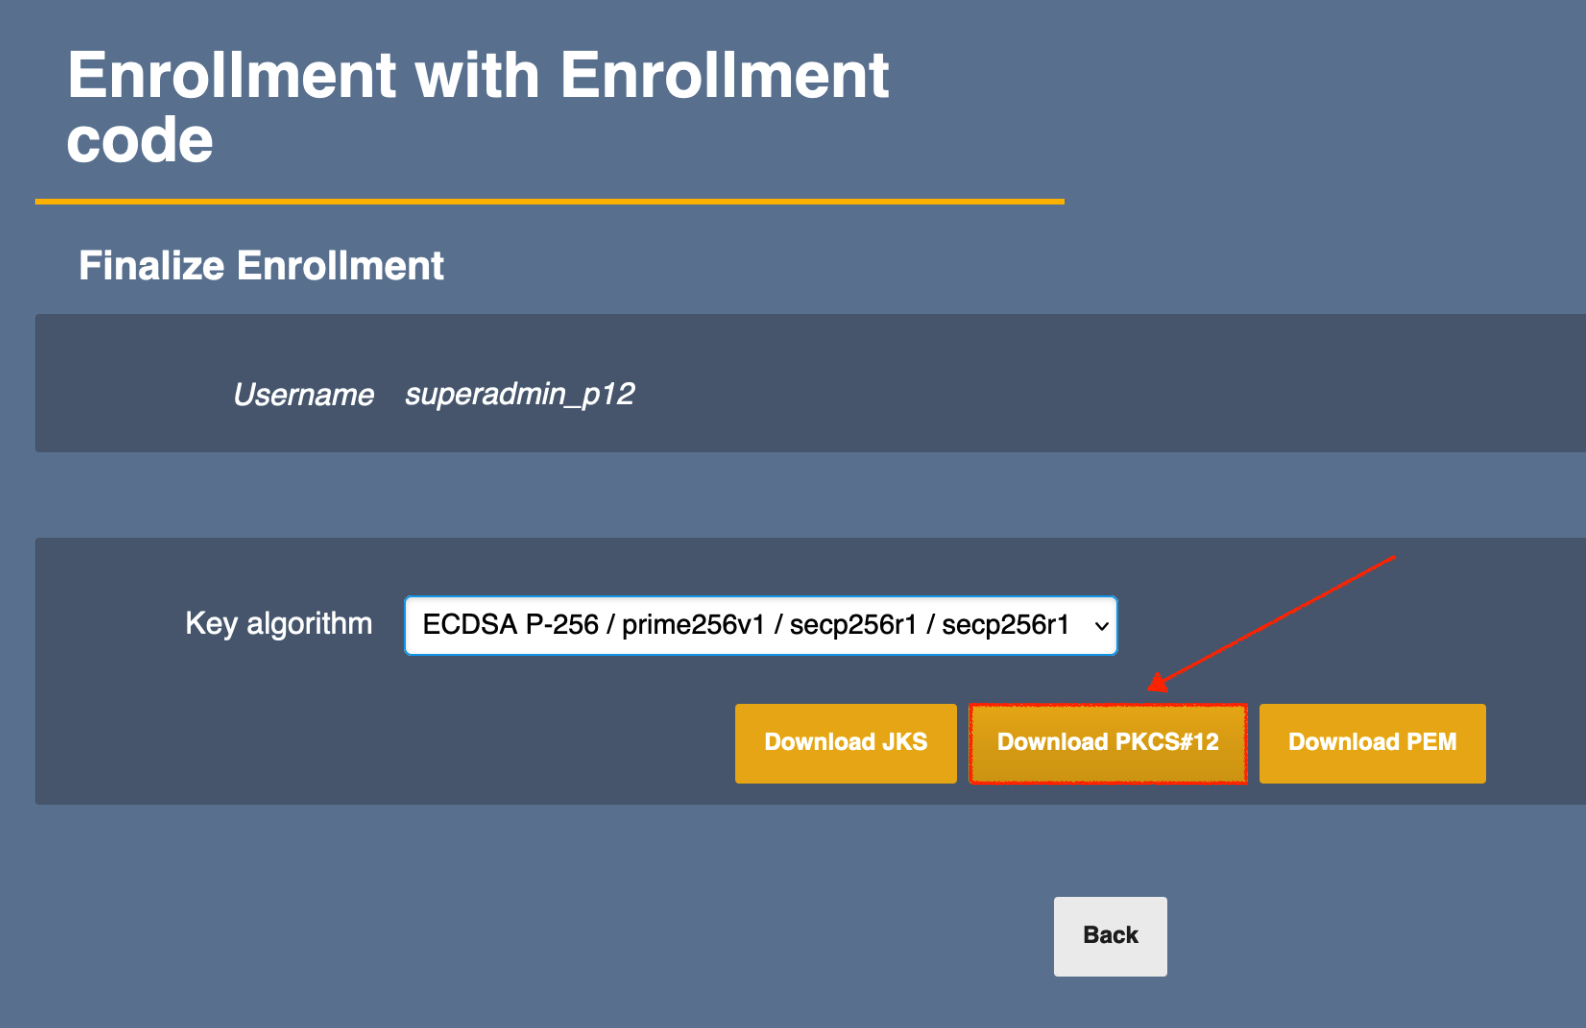
Get PKCS#12 key store
A PKCS#12 key store is a format for storing both private keys and certificates protected by a password. Select this option to download such a key store that contains both a SuperAdmin certificate and the corresponding key pair. You will then have to manually import the .p12-file into the browser using the PKCS#12 protection password shown to you.
Proceed as follows to download a PKCS#12 key store:
- Select Get PKCS#12 key store and click Proceed.
- Copy the PKCS#12 protection password.
- Click Get SuperAdmin PKCS#12 key store.
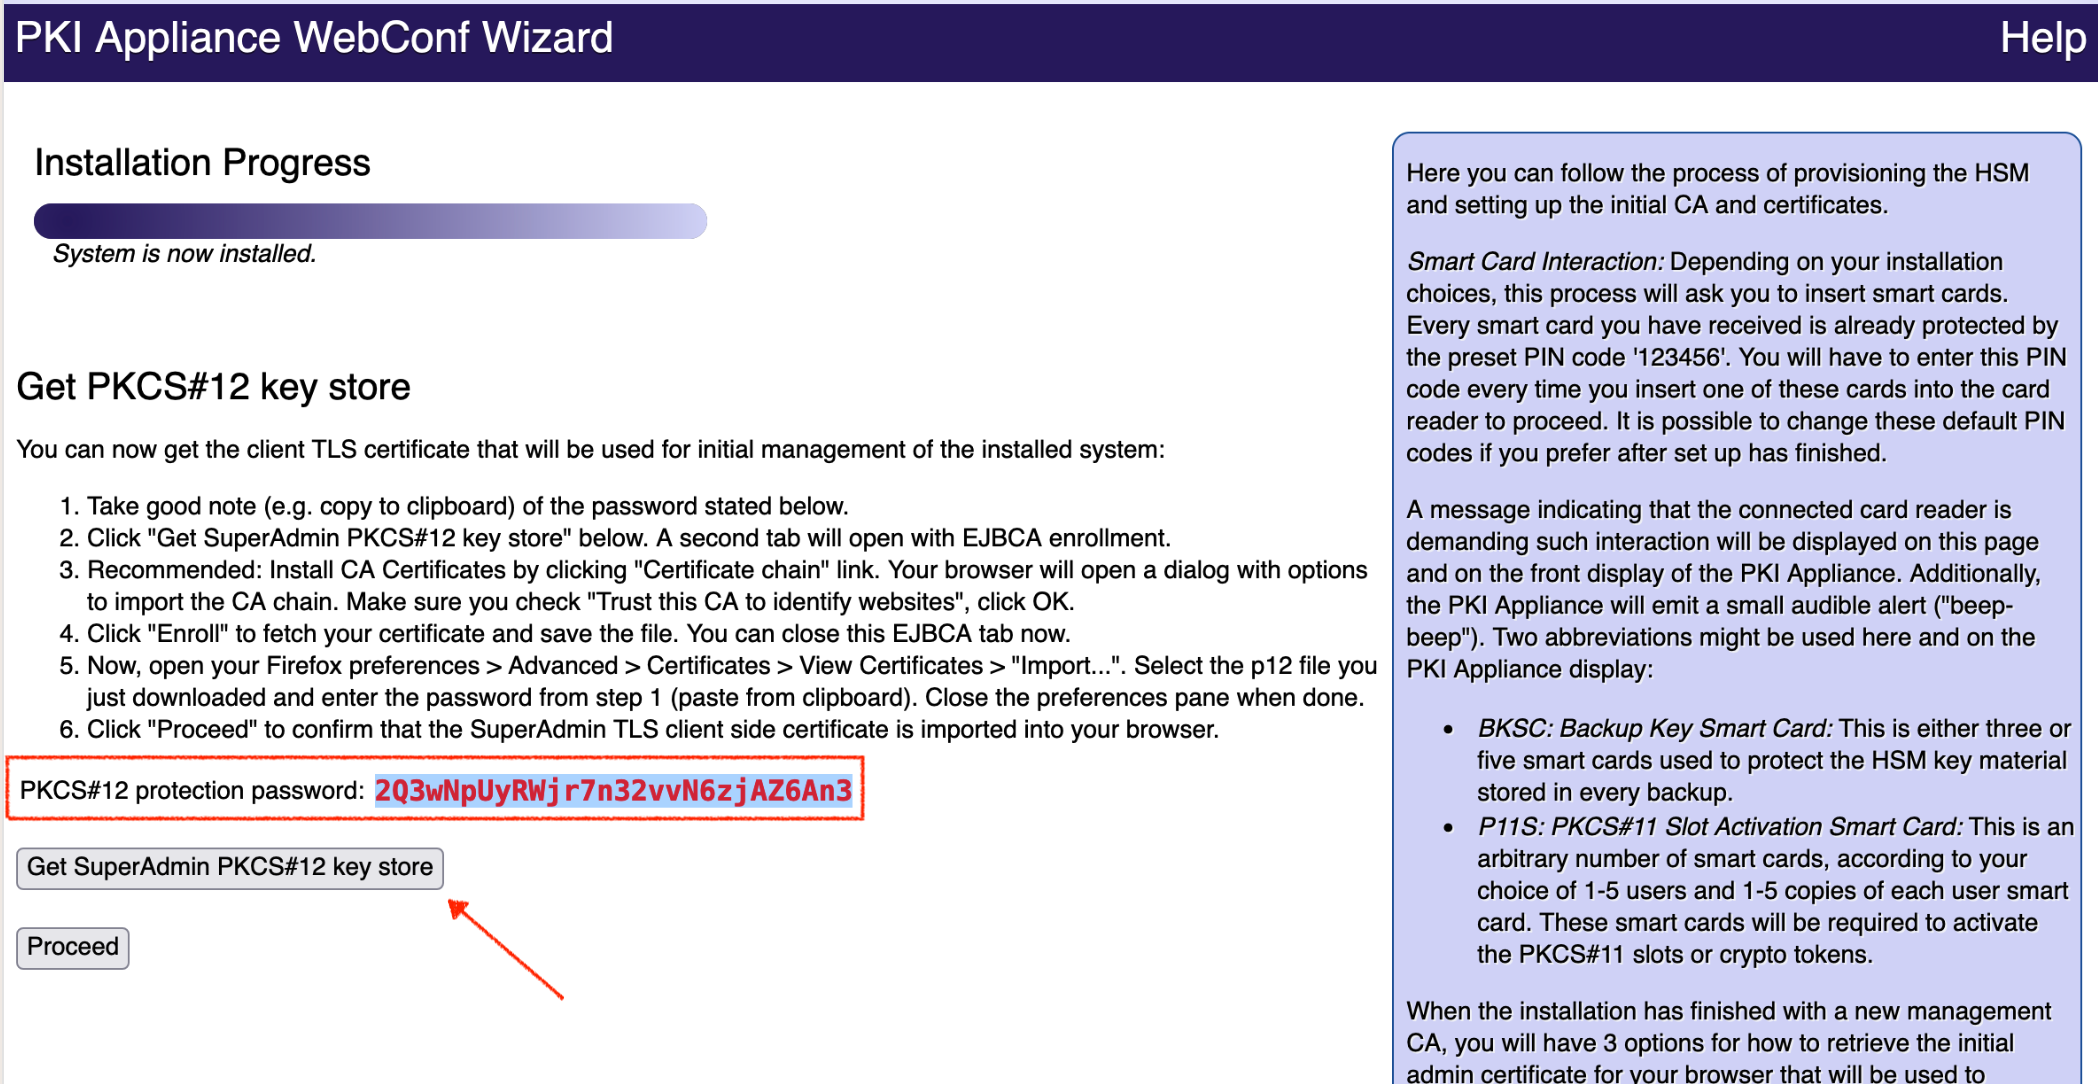
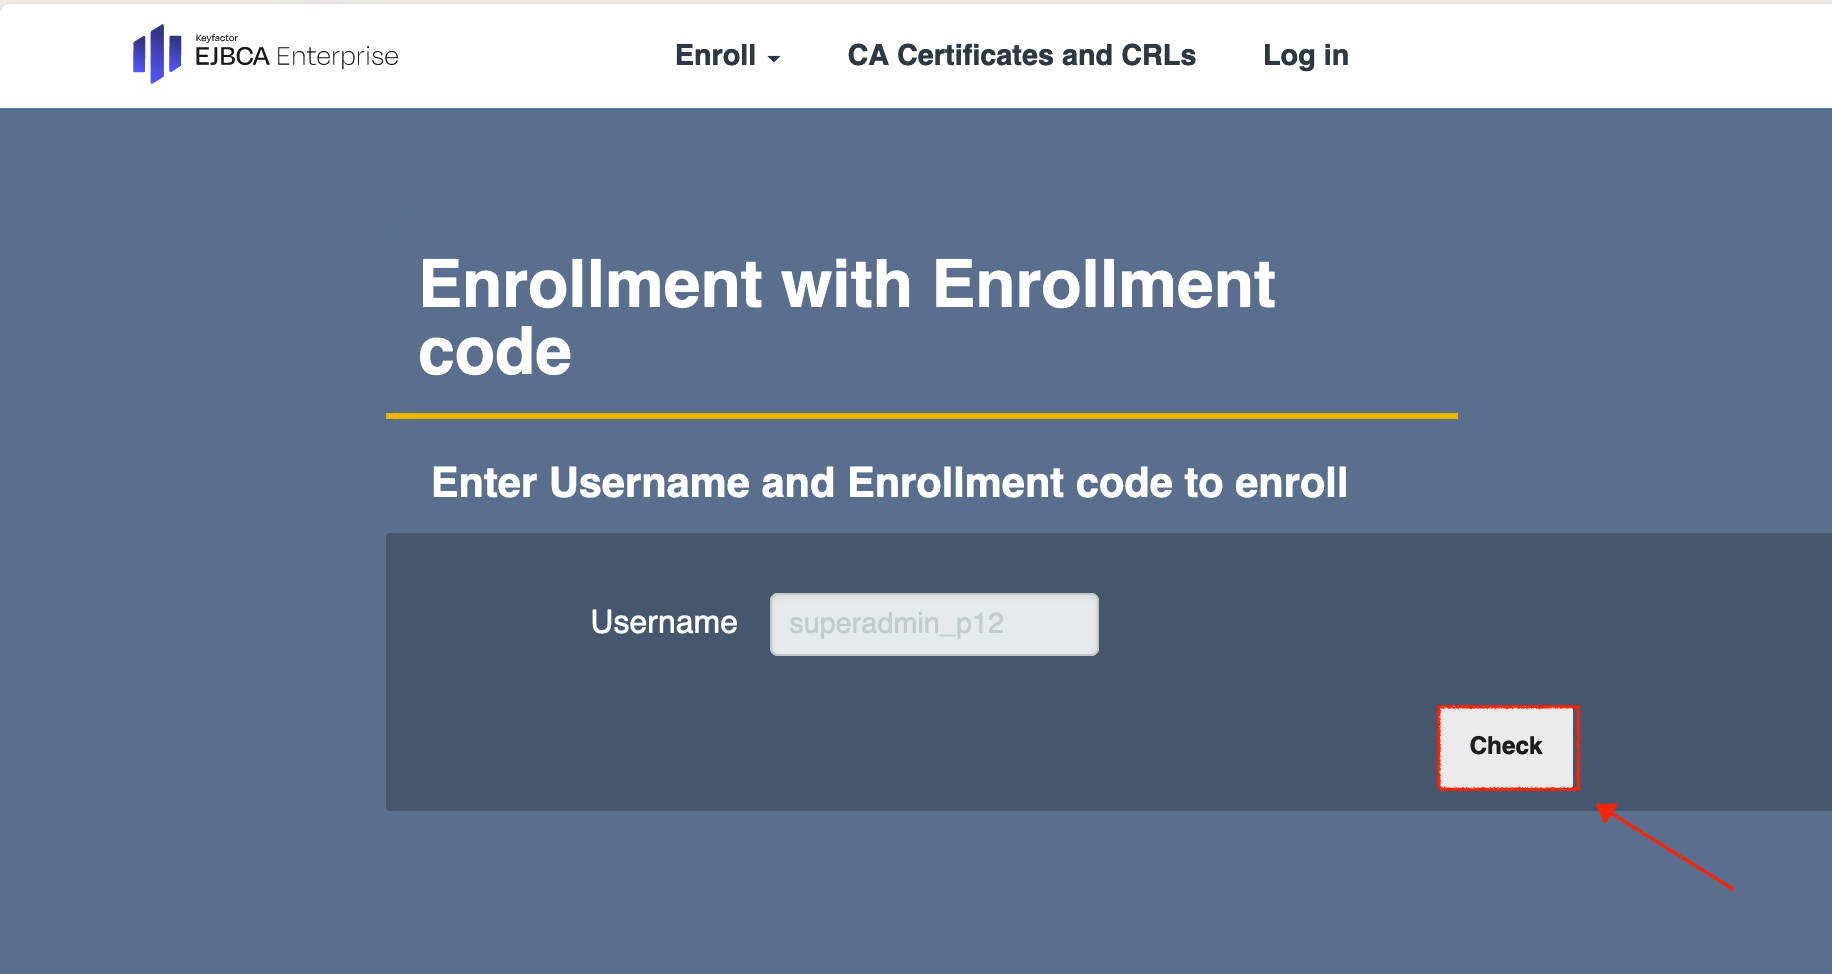
- The Enrollment with Enrollment code page opens in a new tab.
- The Username is preset. Click Check to continue.
- On the next page select the Key algorithm from the drop-down menu.
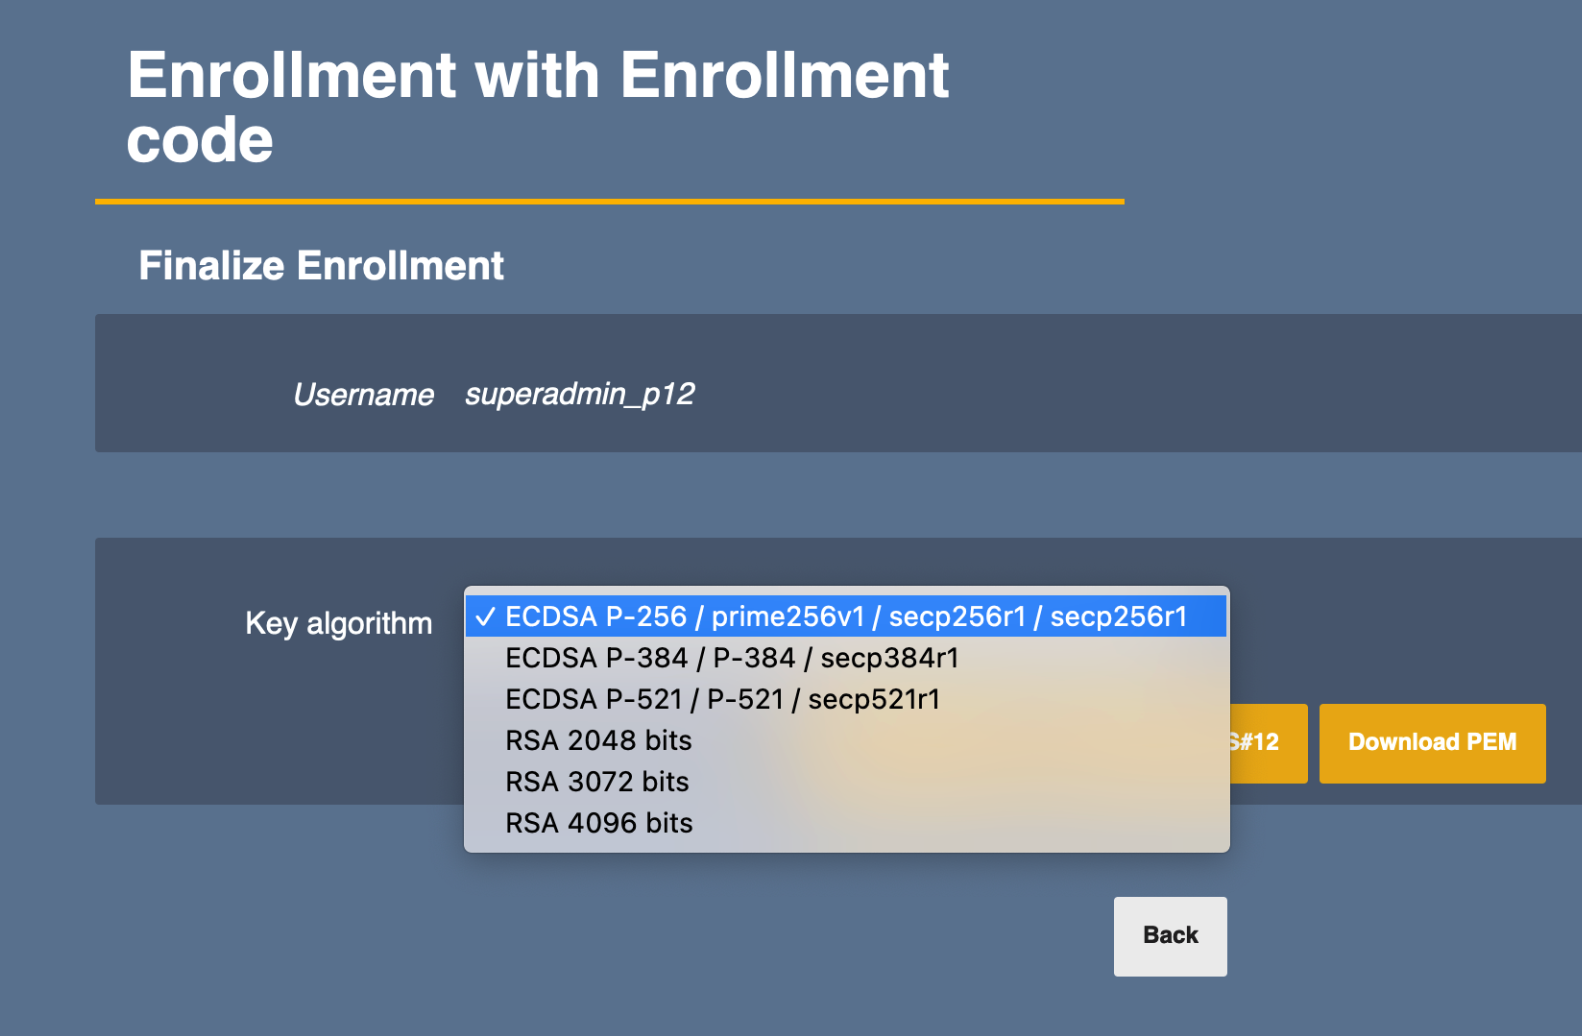
- Continue with Download PKCS#12 to download the file to the local machine, and close the tab.
Import the .p12 file into your browser using the PKCS#12 protection password you saved in the previous step 2.
- When the .p12 has been successfully imported, click Proceed.
- After the installation is done click Finalize installation.
Get certificate from CSR
Only enroll the initial SuperAdmin certificate with the option Get certificate from CSR (Certificate Signing Request) if you cannot use any of the other methods. Creating the CSR and installing the resulting certificate so that it is usable for client TLS authentication is outside the scope of this document.
Proceed as follows to get a certificate from a CSR:
- Select Get certificate from CSR and click Proceed.
Click Go to SuperAdmin enrollment page.
- The Enrollment with Enrollment code page opens in a new tab.
The Username is preset. Click Check to continue.
Choose file or paste the certificate signing request you want to use to issue the initial SuperAdmin certificate.
Click Upload CSR.
- Click Download PEM full chain.
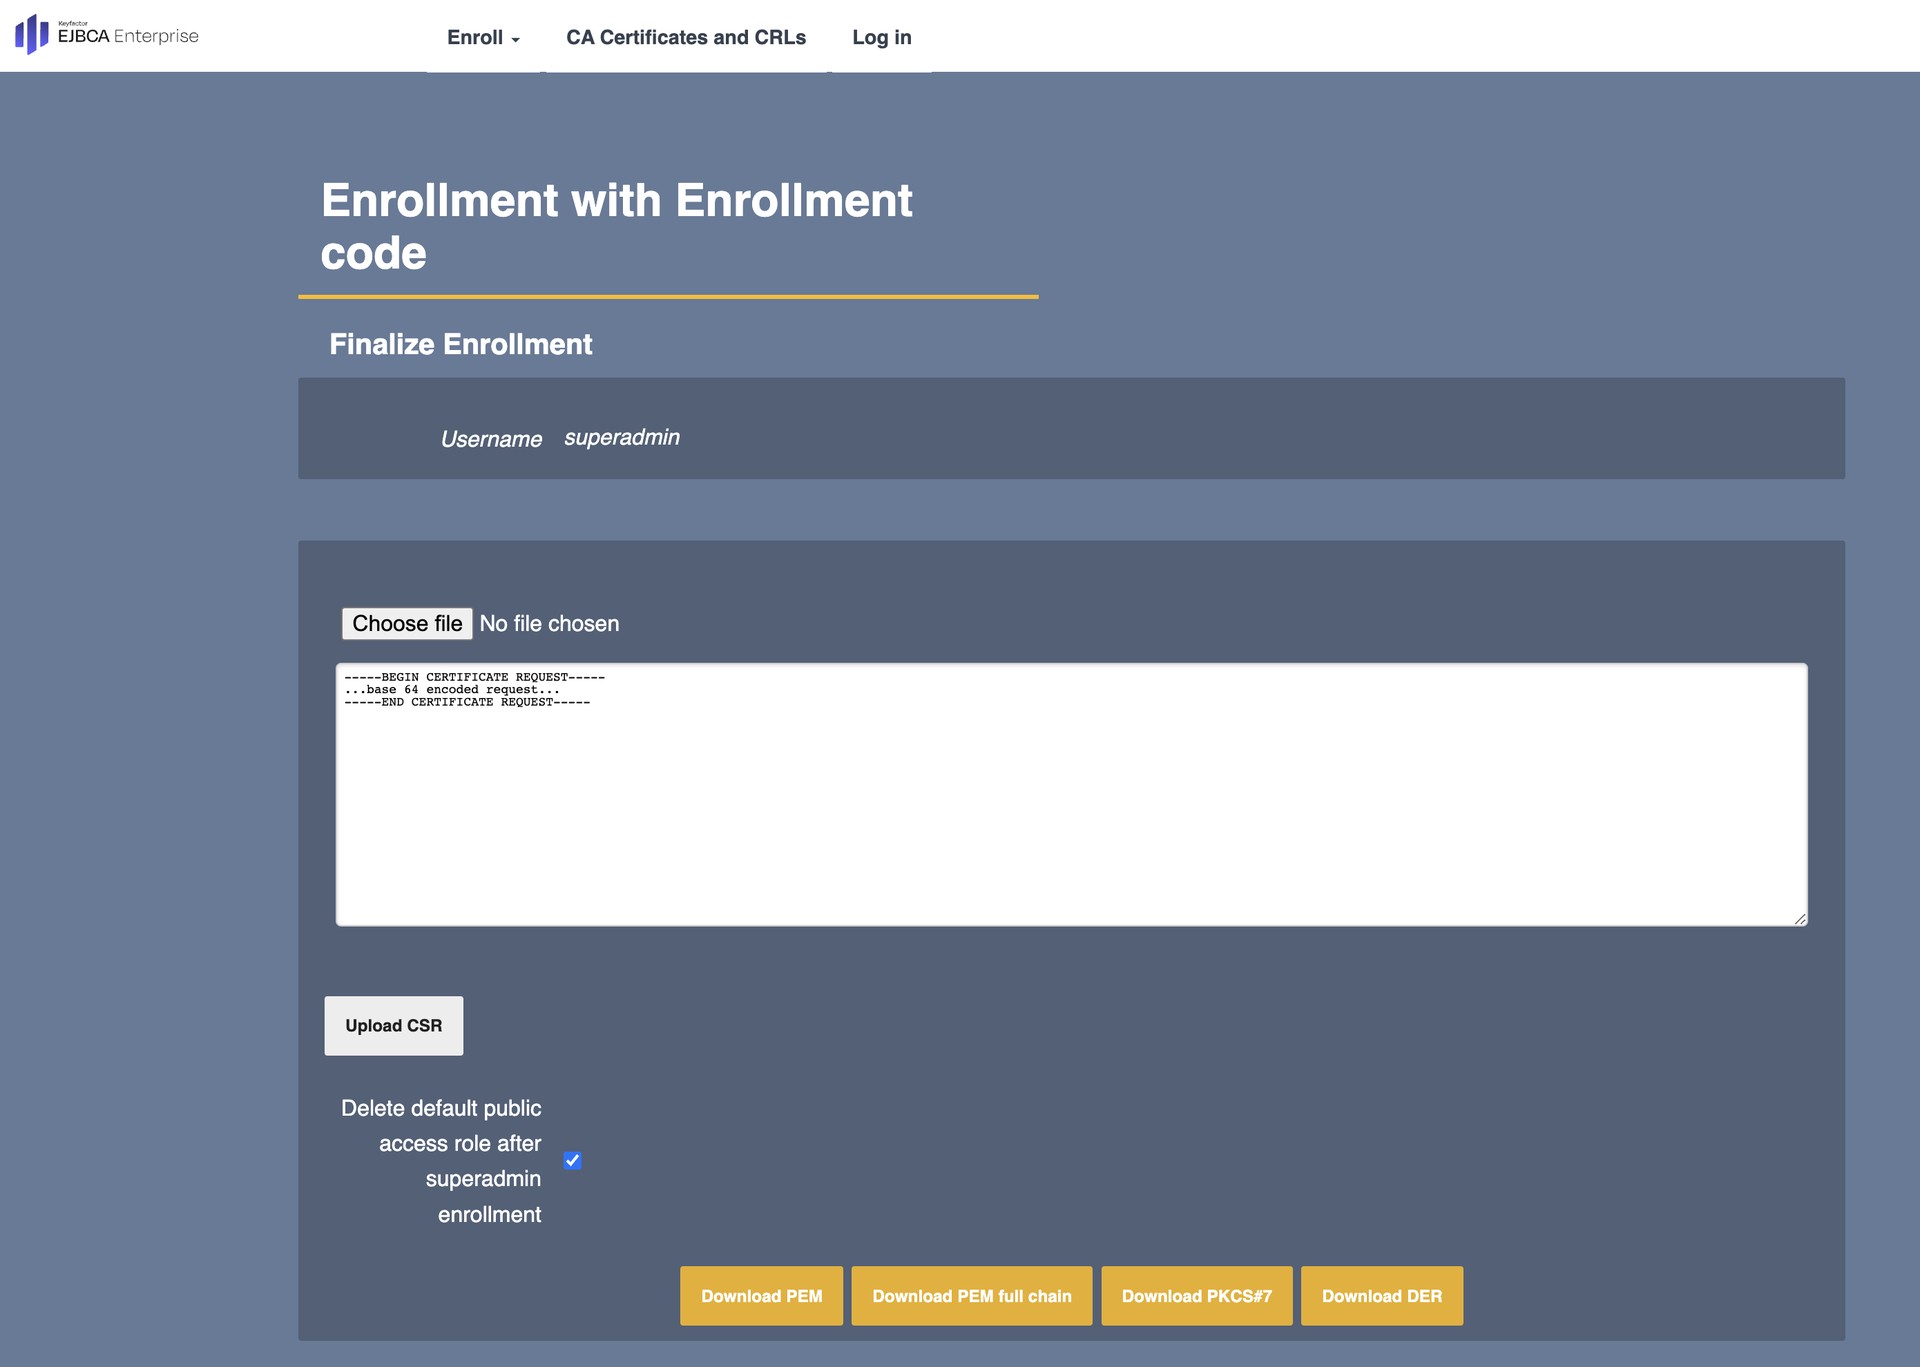
Install the certificate using a proprietary method. Close the tab when done.
In the installation wizard tab, after the installation is done click Finalize installation.
.
Finalize Installation
After you click Finalize installation, it takes about 30 seconds for the process to complete. The browser reloads the page and prompts you to confirm the client side certificate used for authentication.
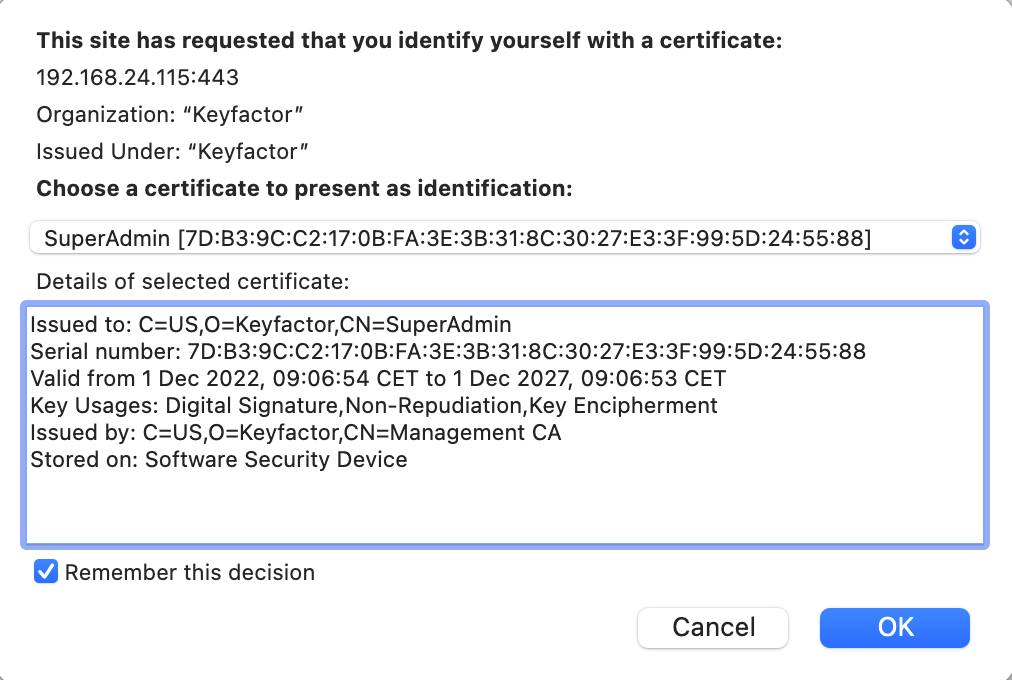
If you use different AdditionalSubjectDN for the different installations, the matching certificate should be preselected. If you want to delete certificates from your browser at a later time, you must to restart your browser for these changes to take full effect.
Some antivirus software performs a Man-in-the-Middle (MITM) on all TLS connections. In such a case, the wizard cancels the finalization step and displays the following message:
"Another client session is currently installing."
To avoid this, you must turn off the MITM feature in your antivirus software or completely disable the software.
Configuration changes become permanent only after about an hour or when the Hardware Appliance is properly shut down and rebooted. Therefore, a power outage immediately after installation can cause configuration changes to be lost. Please keep this in mind when performing a test installation on your desktop or in a test lab.
The final step of the initial setup is to run the web-based configurator WebConf. During this procedure all components of the system will be configured according to the parameters provided.