Configure Custom S3 Publisher
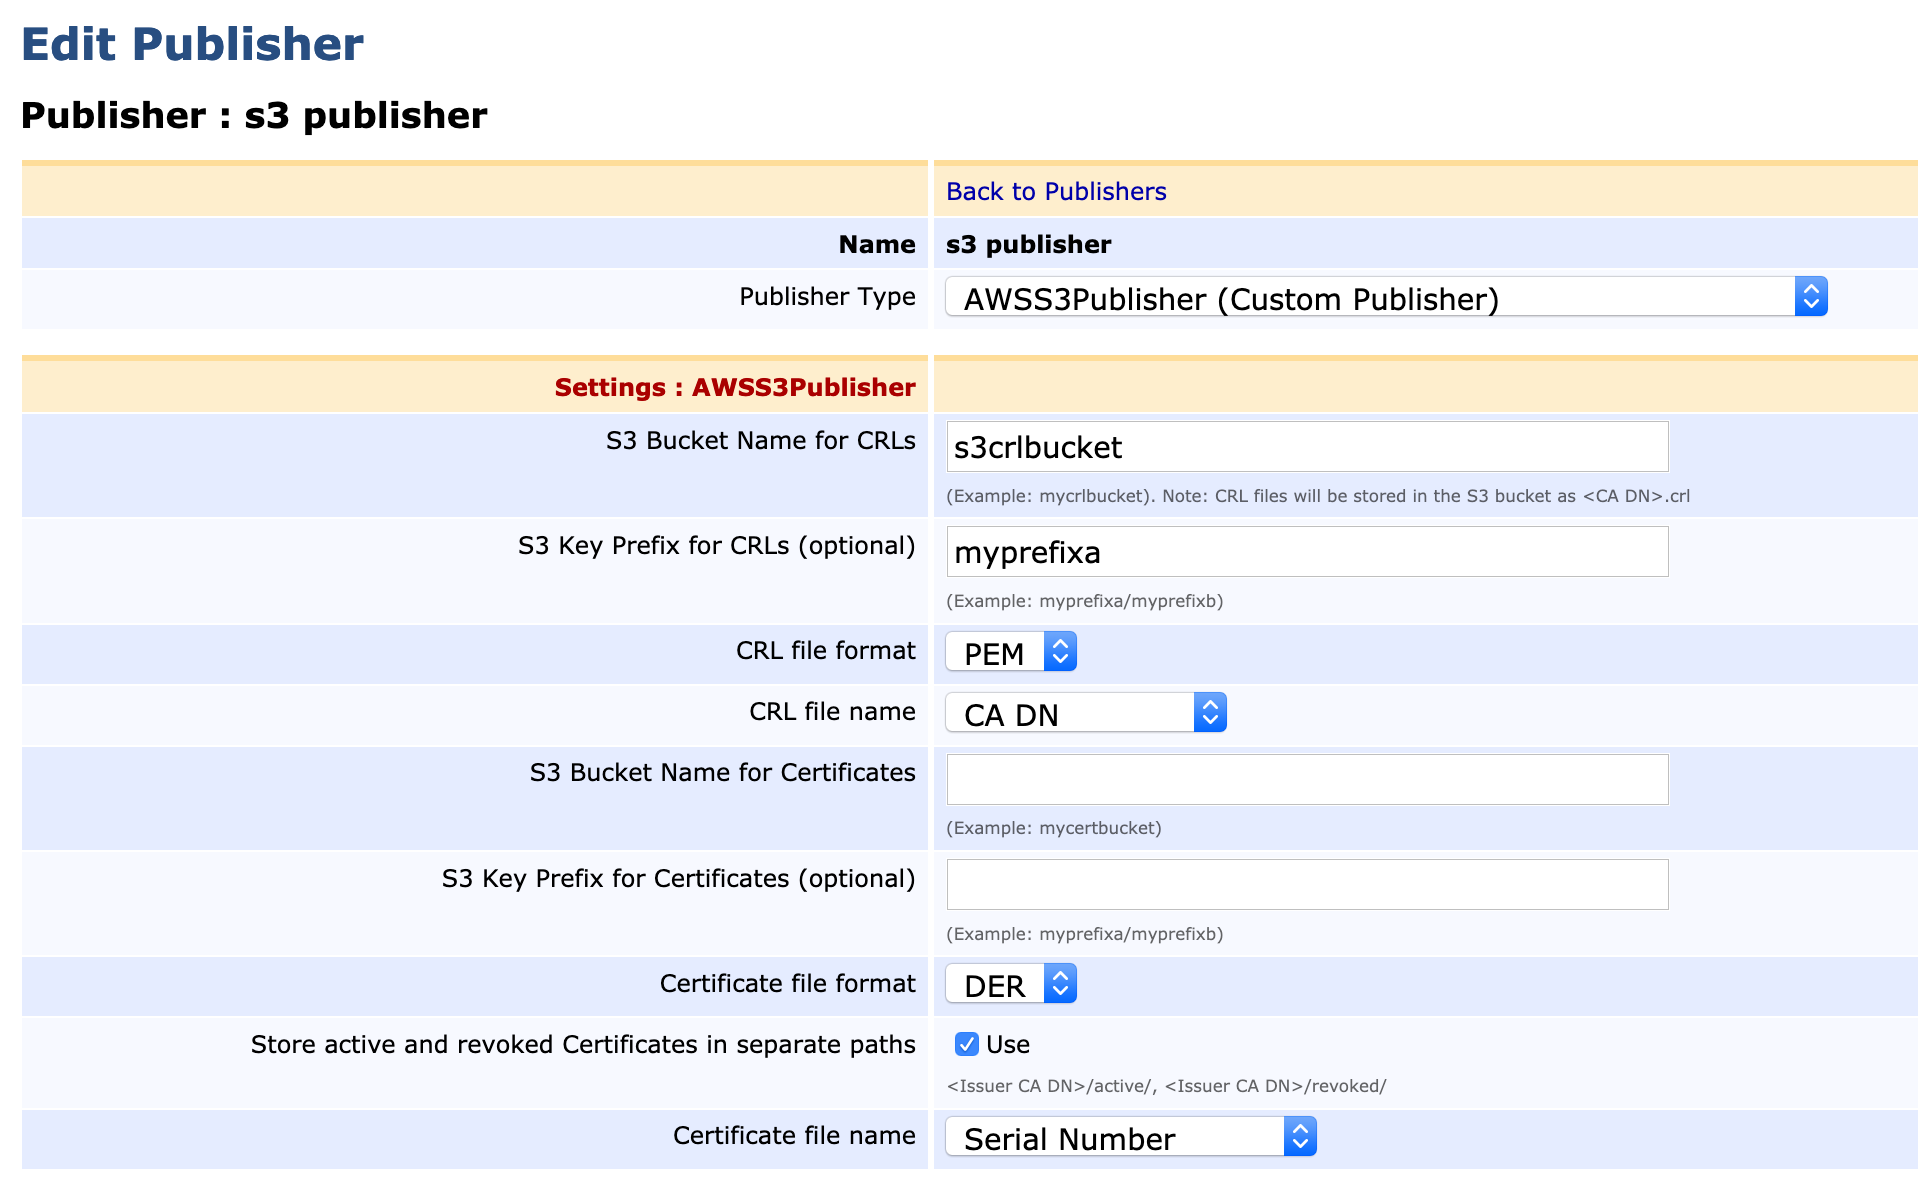
To add and configure an AWS S3 Publisher, do the following:
Go to EJBCA Admin Web > CA Functions > Publishers.
- In Add Publisher, enter the publisher name, for example, s3 publisher, and click Add.
- Select s3 publisher from the List of Publishers and click Edit Publisher.
- Specify the following on the Edit Publisher page:
- Publisher Type: Select AWSS3Publisher (Custom Publisher).
- S3 Bucket Name for CRLs: Enter the S3 bucket name for CRLs. For example, s3crlbucket. Validation is in place for the bucket naming restrictions specified in the AWS documentation Bucket Restrictions. The bucket must have been previously created, see Create S3 Bucket.
- S3 Key Prefix for CRLs (optional): Optionally specify a key prefix. The key prefix will be created when a CRL file is copied to the bucket. The key prefix may have multiple levels separated by "/" (for example, mykeyprefixa/mykeyprefixb). Validation is in place for the Safe Characters specified in the AWS documentation Object Key and Metadata and characters listed in the Characters That May Require Special Handling section are not allowed.
- CRL file format: Select the encoding method for CRLs (DER or PEM).
- CRL file name: Select the value to use for the CRL file name:
CA SHA-1 Fingerprint: The fingerprint of the CA certificate that issued the CRL. If selected, the file name will be the CA fingerprint with a .crl extension (for example, 614fa28653d1ec24e97dad02c3a2d077c3a9f1d9.crl).
CA CN: The CN part of the issuer DN. If selected, the file name is derived from the CA DN. For example, the CRL file name for Corporate Issuing CA - G1 would be: CorporateIssuingCAG1.crl.
CA SN: DN SERIALNUMBER if CN does not exist.
CA O: If neither of CA CN or CA SN exist. - S3 Bucket Name for Certificates: Enter the S3 bucket name for certificates. For example, s3crlbucket. Validation is in place for the bucket naming restrictions specified in the AWS documentation Bucket Restrictions. The bucket must have been previously created, see Create S3 Bucket.
- S3 Key Prefix for Certificates (optional): Optionally specify a key prefix. The key prefix will be created when a certificate file is copied to the bucket. The key prefix may have multiple levels separated by "/" (for example, mykeyprefixa/mykeyprefixb). Validation is in place for the Safe Characters specified in the AWS documentation Object Key and Metadata and characters listed in the Characters That May Require Special Handling section are not allowed.
- Certificate file format: Select the encoding method for certificates (DER or PEM).
- Store active and revoked Certificates in separate paths: If enabled, active and revoked certificates will be stored in separate paths (active/ or revoked/). For example, an active certificate would be stored as s3://s3certbucket/myprefixb/ManagementCA/active/614fa28653d1ec24e97dad02c3a2d077c3a9f1d9. When an active certificate is revoked, the certificate will be stored under "revoked" and deleted from "active", and vice versa. If this option is not enabled, certificates will be stored directly under the Issuer CA DN subpath. If the same certificate is published again (active or revoked), it will overwrite the existing file (e.g. s3://s3certbucket/myprefixb/ManagementCA/614fa28653d1ec24e97dad02c3a2d077c3a9f1d9).
- Certificate file name: Select the value to use for the certificate file name: Serial Number, SHA-1 Fingerprint, or SHA-256 Fingerprint.
NOTE Certificates for a given issuer are stored under a subpath derived from the Issuer CA DN. For example: .../CorporateIssuingCAG1/active/614fa28653d1ec24e97dad02c3a2d077c3a9f1d9.
- Click Save and Test Connection to perform input validation using the AWS S3 API to verify access to the S3 bucket(s). At least one S3 bucket name must be provided (for Certificates or CRLs). The same S3 bucket may be used for certificates and CRLs if desired.
Next, Update the CA Settings.