Configure via EJBCA Cloud Configuration Wizard in Azure
The following covers how to configure using the EJBCA Cloud configuration wizard.
Step 1: Host Settings
In the first step, you enter the host settings for the instance.
- The host name is automatically detected but can be changed. The host name must match the name of the host or DNS name that will be entered into a browser when accessing the Administration Interface of this EJBCA installation.
- Using a Subject Alternative Name (SAN) with this host can be done so that a public URL can be used to access EJBCA. For example, if you would like to use https://pki.company.com/ to access a cluster of hosts, you can enter that DNS name into the wizard to be added as a SAN in the instance's TLS certificate. To use this feature, select the option to specify a Valid domain name. Note that the wizard will not verify that the domain name is a valid domain, but will confirm that the syntax is a recognized domain format.
- Click Next to continue to the database configuration.
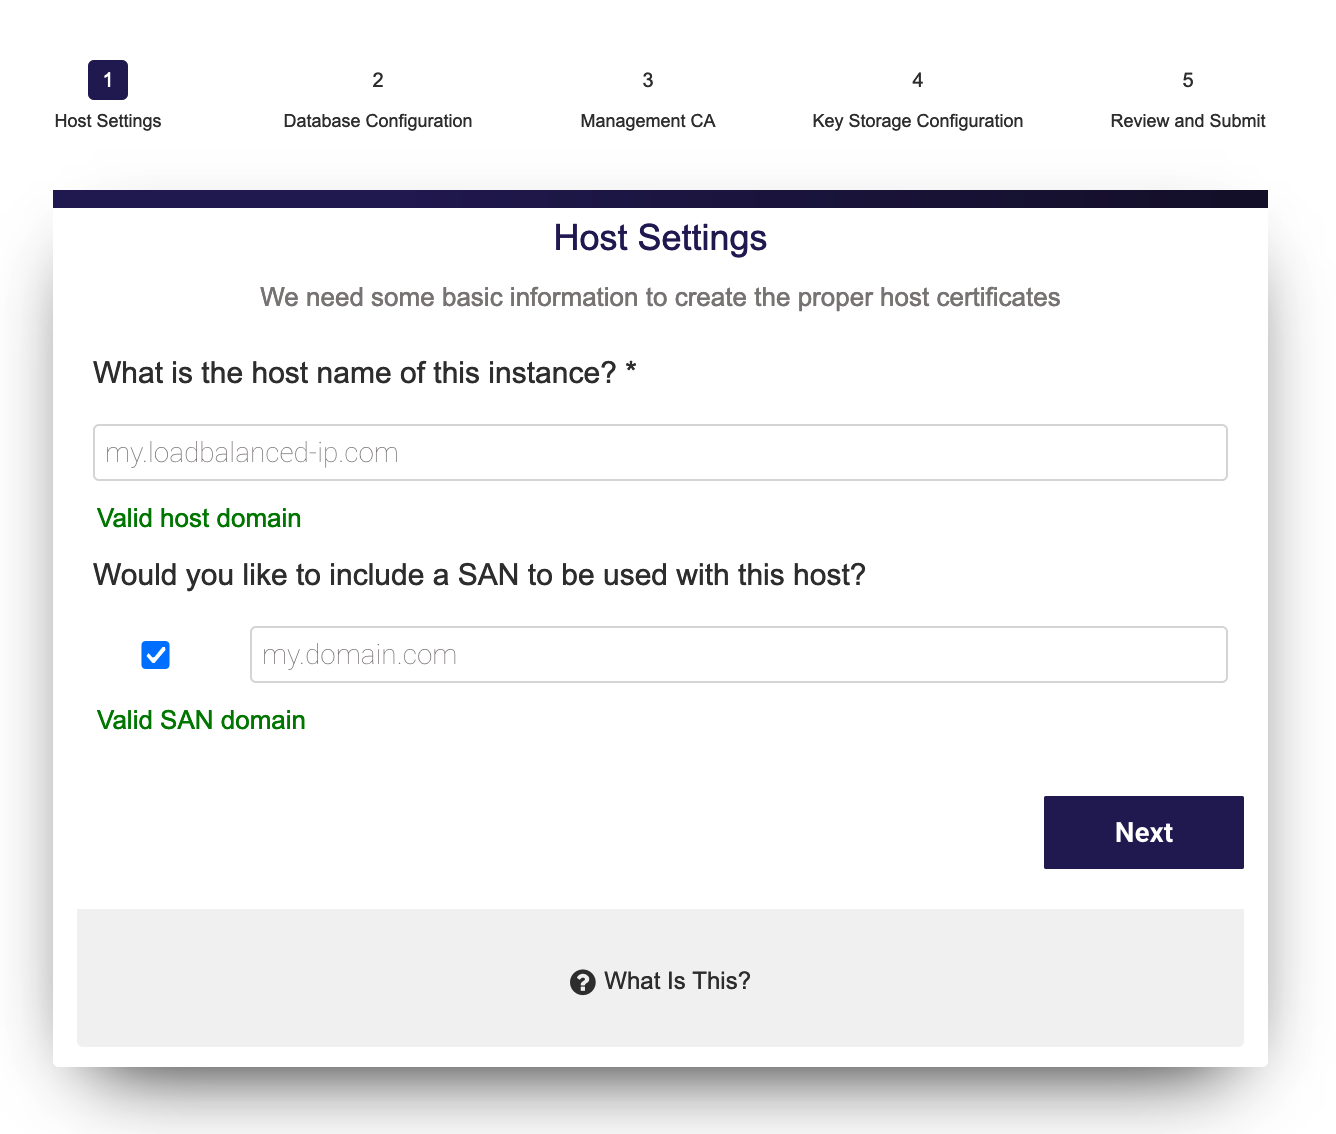
Host Settings Fields
The following lists available fields.
Field | Description |
|---|---|
Host name | Hostname of the host that EJBCA is going to be installed to (auto populated). |
SAN | Alternate Name to be included in the certificate generated for this host during the installation. |
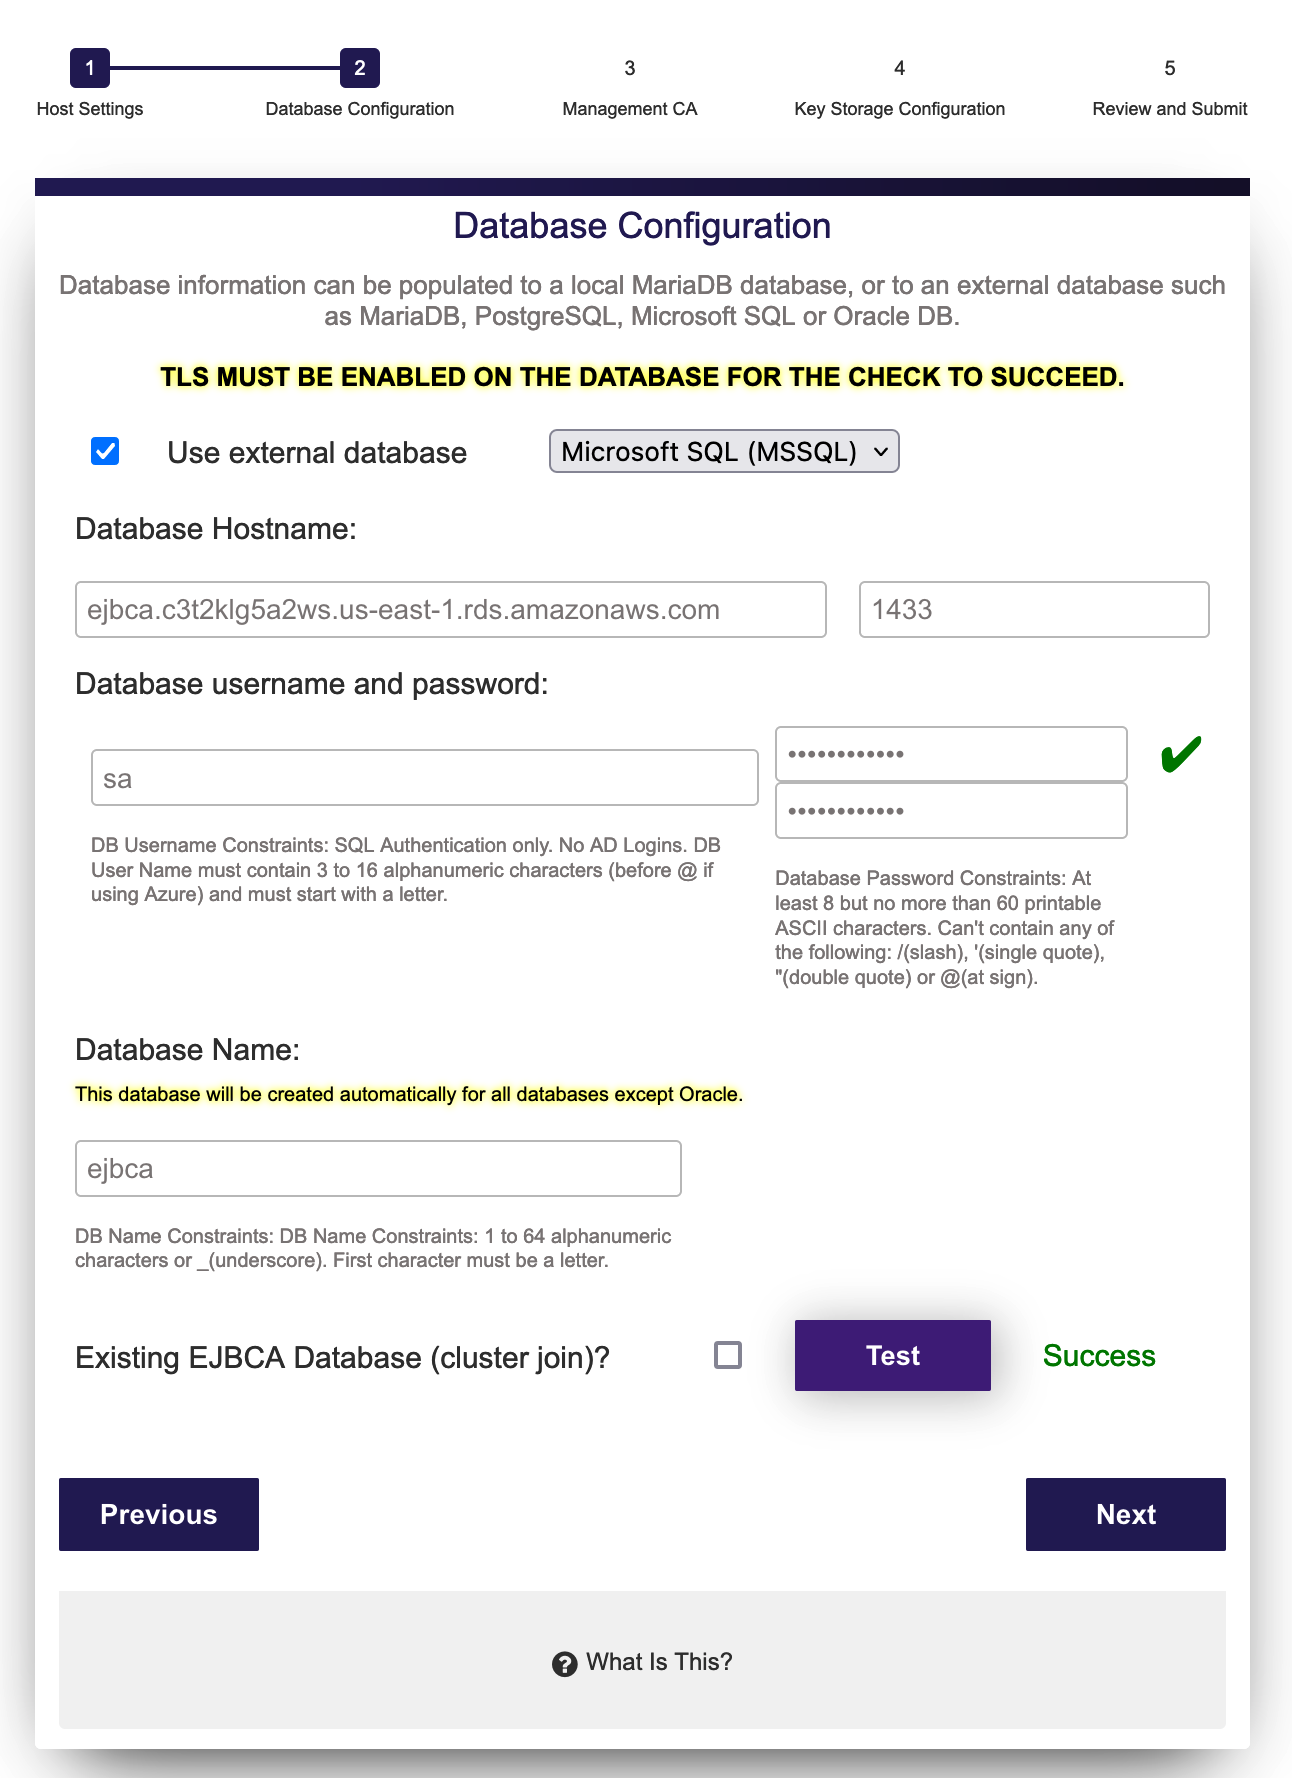
Step 2: Database Configuration
The Database Configuration settings are optional. By default, a MariaDB server will be installed locally and you can optionally specify to use an external database using either MariaDB, PostgreSQL, Microsoft SQL or Oracle Database.
Select to use a new installation or to join a node to an existing EJBCA database, provided you already have a database with an existing EJBCA installation.
2a: New Installation
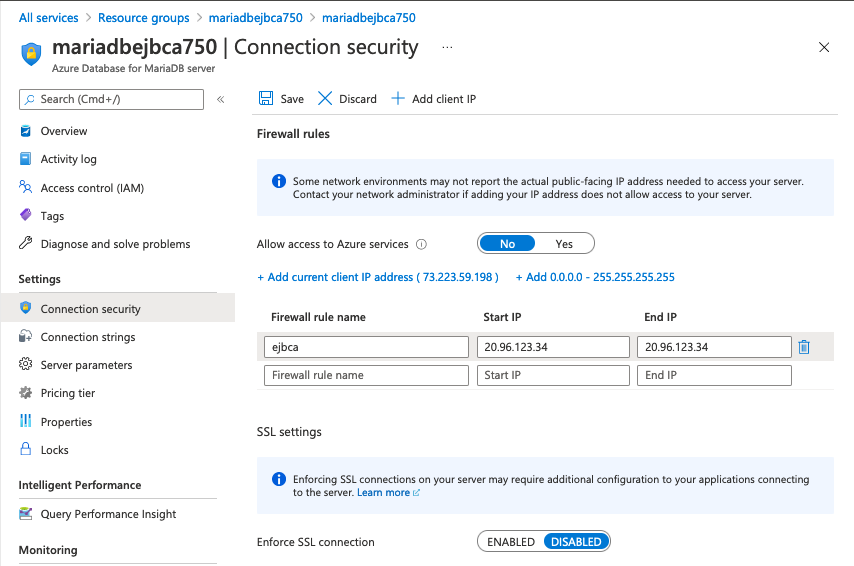
- To use a cloud hosted database such as Azure SQL or Azure Database for MariaDB, select the option to use an external database and enter the database information including Access URL, username, password and database name. The Azure Cloud Database engine can be MariaDB, PostgreSQL, Microsoft SQL or Oracle Database. Azure configures TLS on all deployed databases automatically.
 In order for this feature to work, you must have configured a valid Azure Cloud Database instance configured and running. For more information, refer to the Azure documentation on Creating an Azure Database for MariaDB Server.
 - In the Azure Database configuration for Connection security, add the IP address of the EJBCA Cloud instance into the database configuration. Also, make sure Enforce SSL connection is enabled. For more information, please refer to the Azure Cloud Database documentation.
- When specifying the username of the database, pay close attention to the username of the azure database. With some databases, Azure will use an "@" symbol in the username with the host name in the form of "username@hostname". If a username is used in the Azure database, be sure to add it to the wizard. Always configure the database with SQL Authentication and not Active Directory or Windows Authentication.
- Click the database Test button to ensure success. Note that you are not allowed to continue with a cloud database installation unless the test passes successfully. This should be a fresh Azure Cloud Database instance with no existing EJBCA database. If the database exists already and the Existing EJBCA Database option is cleared, the wizard will give the error Database exists!. If this database was created ahead of time, it can be dropped since the database is created automatically by the wizard.
 If the Cloud Database instance is unavailable for any reason, the installation will fall back to a local installation to ensure success. The only way to recover from this is to export the database, import it into the Azure Cloud Database, and reconfigure the node to point to a cloud database. It is recommended to fix the database connectivity problem and launch a new node from the Marketplace. Please see the latest EJBCA Cloud Documentation for more information.
 - Once the database connection is successful, the Success message is shown.
- Click Next to continue to Step 3: ManagementCA Configuration.
2b: Cluster Join
To join a node to an existing EJBCA database, provided you already have a database with an existing EJBCA installation:
- Select Existing EJBCA Database (cluster join)? to join this node to an existing EJBCA installation. If you select this option, please ensure the EJBCA CLI password is the original password of "ejbca".
- Click Test to ensure success. The wizard will check the connection to the RDS database and check for the existence of the database provided in the database name field. If the wizard cannot find this database, the test will fail and not allow you to proceed.
- When Existing EJBCA Database (cluster join)? is enabled, ManagementCA configuration is disabled and you can continue to Step 4: Azure Key Vault Configuration.
Database Configuration Fields
The following lists available fields.
Field | Description |
|---|---|
| Database type | Must be one of either MariaDB (10,x), PostgreSQL (13-14), Microsoft SQL (2019 and up) or Oracle Database (19 and up). It may work with other versions not listed. |
Database host name | Host name of the host that EJBCA is going to be installed to (auto populated). |
Database port | Hard coded to 3306 at this time. |
Database username | Azure calls this the "Admin username". Admin username must start with a letter. Use the Azure Application method of username@hostname if it exists in the username attributes of your database. |
Database password | Azure calls this the "Admin password". Admin Password must be at least 8 printable ASCII characters. Can't contain any of the following: / (slash), "(double quote) and @ (at sign), as in "mypassword". |
Database name | The name of the database created inside the Azure Cloud database instance. |
| Existing EJBCA Database | Joins the node to an existing EJBCA installation. Select Existing EJBCA Database if you want to expand or upgrade the nodes in your cluster. |
Step 3: ManagementCA Configuration
The Management CA can either be created during the installation or imported from an existing Management CA.
Create a new ManagementCA
EJBCA will create a Management CA based on attributes of the system to guarantee uniqueness. You can optionally import an existing ManagementCA to the instance and have certificates from that CA be allowed access to this installation, see Use Existing (Import) ManagementCA.
Note that the only required field when creating a new Management CA is the Superadmin password. For all available fields, see ManagementCA Configuration Fields below.
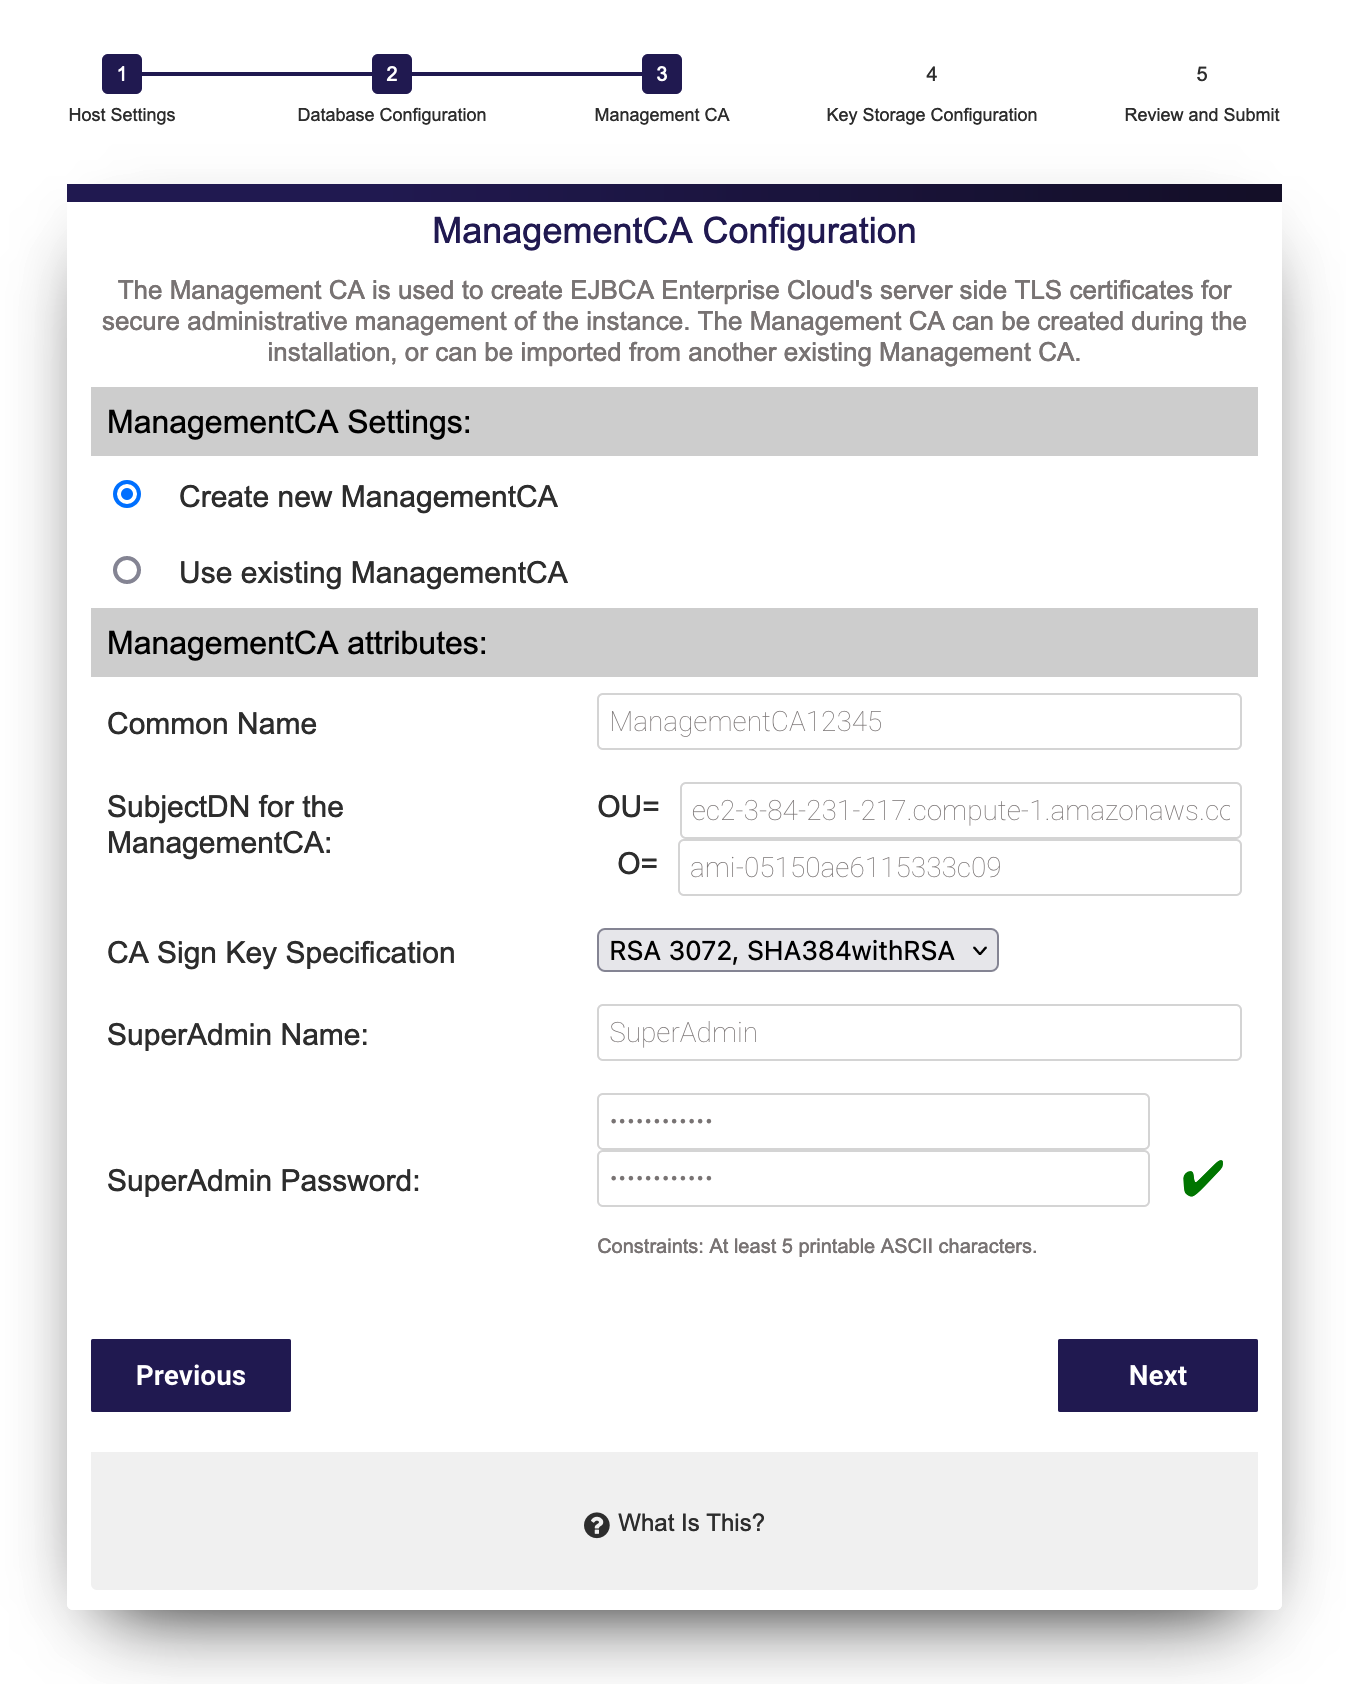
ManagementCA Configuration Fields
The following lists available fields. Note that the only required field on this page is the Superadmin password.
Field | Description |
|---|---|
Create CA Common Name | Common Name of the ManagementCA. This CA is used to generate administrative certificates for the CA. |
Subject fields | OU= and O= can be configured for the ManagentCA DN. Includes the ReservationID, AMI-ID of the instance by default. Certificates are listed in the browser store by O=. |
Key specification | Key specification of the ManagementCAs signing certificate. |
SuperAdmin name | Common Name of the Super administrator certificate to be generated during installation. This will be the default username in the certificate allowed access to the system. |
SuperAdmin password | Password used to both retrieve the keystore from the Public Web after installation as well as the password used to protect the keystore itself. |
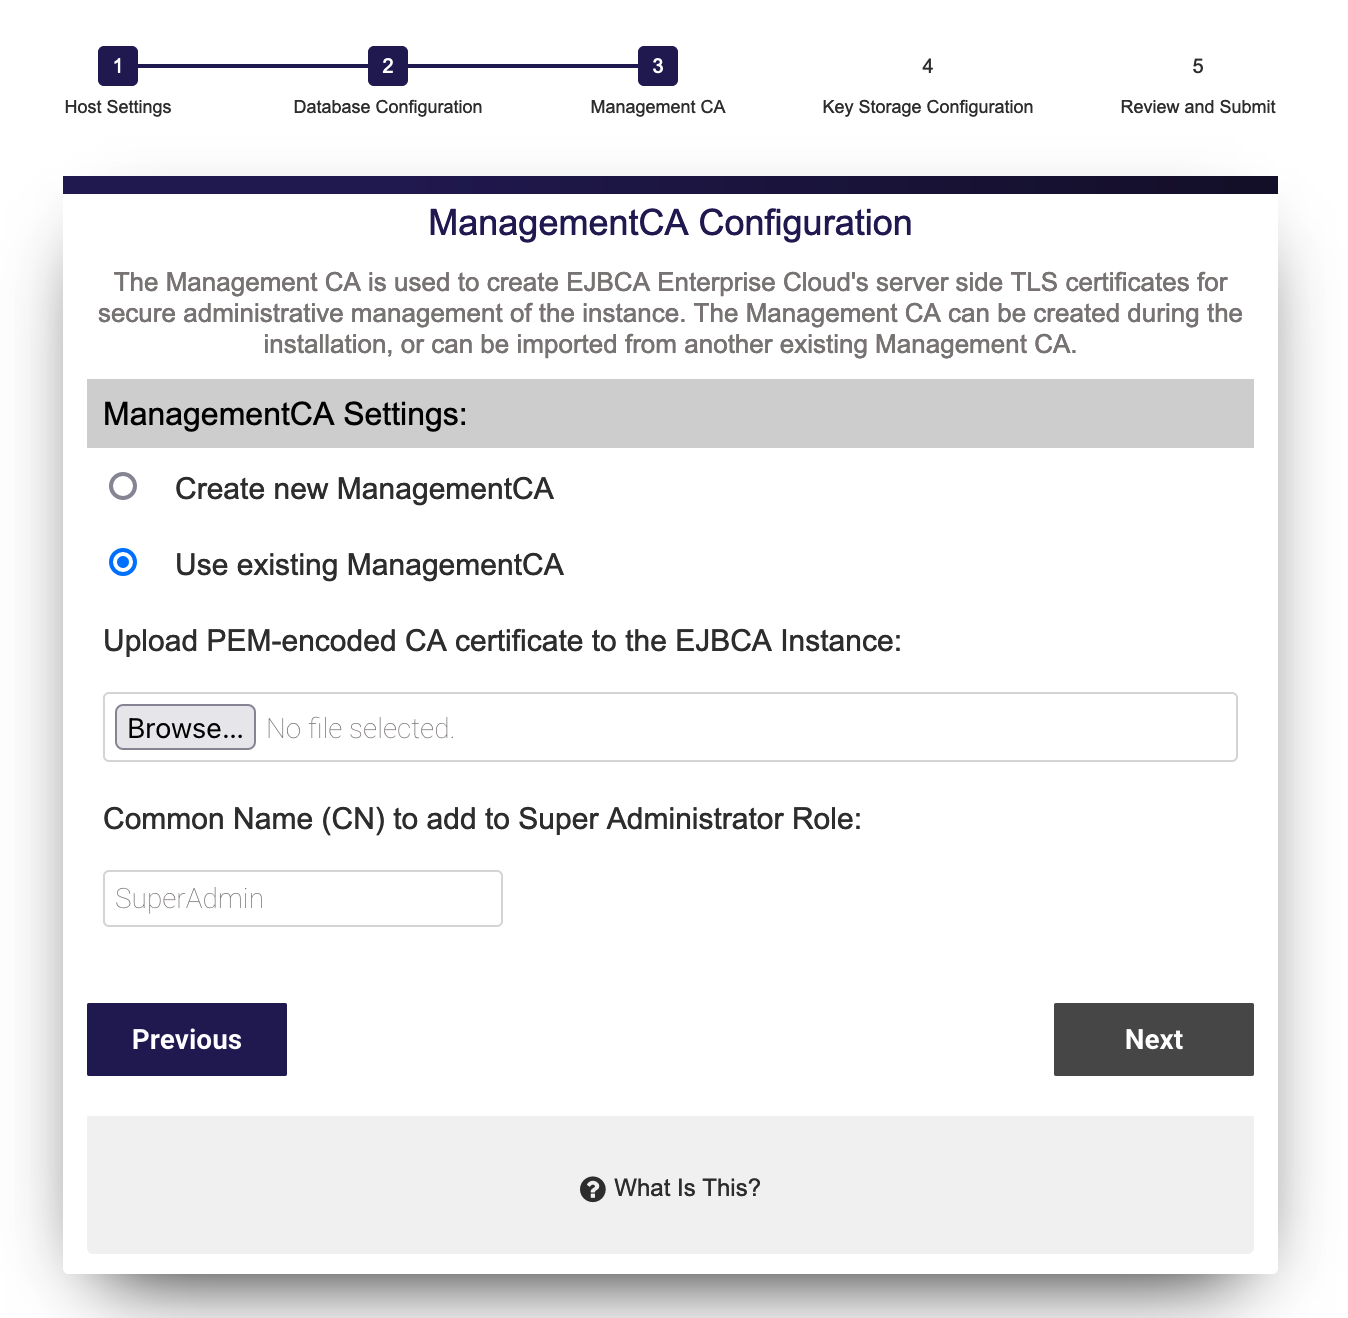
Use Existing (Import) ManagementCA
You can optionally import an existing ManagementCA to the instance and have certificates from that CA be allowed access to this installation.
When importing an external ManagementCA, a role will be added for the supplied, case sensitive, Common Name (CN) provided. For example, if you supply "jsmith" as the username to be added, you must have a keystore issued to "jsmith" from the CA whose public certificate you are providing. The most common use case is an existing ManagementCA from another EJBCA installation and a SuperAdmin certificate to match.
You must have a keypair generated with the Common Name supplied from the CAs public certificate you are uploading to this instance when choosing Import CA.
To use an existing Management CA with this instance, do the following:
- Select Use existing ManagementCA.
- Click Browse and select the public certificate from the existing Certificate Authority.
- Enter the Common Name (CN) for the user for which you have a keystore from this CA.
- Click Next to continue to the Review and Submit page to review a summary of all settings.
Step 4: Azure Key Vault Configuration
The Azure Key Vault Configuration settings are not relevant if you have selected to Use Existing ManagementCA since this means that no CA keys will be created.
The Azure Key Vault Configuration settings are optional. EJBCA will create keys for the ManagementCA in the database by default. Azure Key Vault key generation can be configured now so that the initial ManagementCAs keys are stored and created in Azure Key Vault. If you would like to have those keys created in Azure Key Vault, you can enter the credentials for your vault here.
- You must have completed the Azure Key Vault setup for this feature to work. Using the instructions in the Azure Key Vault Integration Guide, complete through vault creation and have your Application User password, Client ID and Vault name.
- You also must have applied the Firewalls and Virtual Network settings that allow the EJBCA Cloud instance communication to the configured Azure Key Vault.
Testing connectivity to the Azure Key Vault before the installation is not possible. Therefore, if the EJBCA installation fails to connect to the Azure Key Vault with the credentials provided for any reason, the setup will fall back to a soft key pair generation so the EJBCA installation itself does not fail. There may be more details in the log file /var/log/install.log on the EJBCA host as to why installation with Azure Key Vault failed if it does.
To set up your own HSM later, skip this step and click Next to continue to the Review and Submit page to review a summary of all settings.
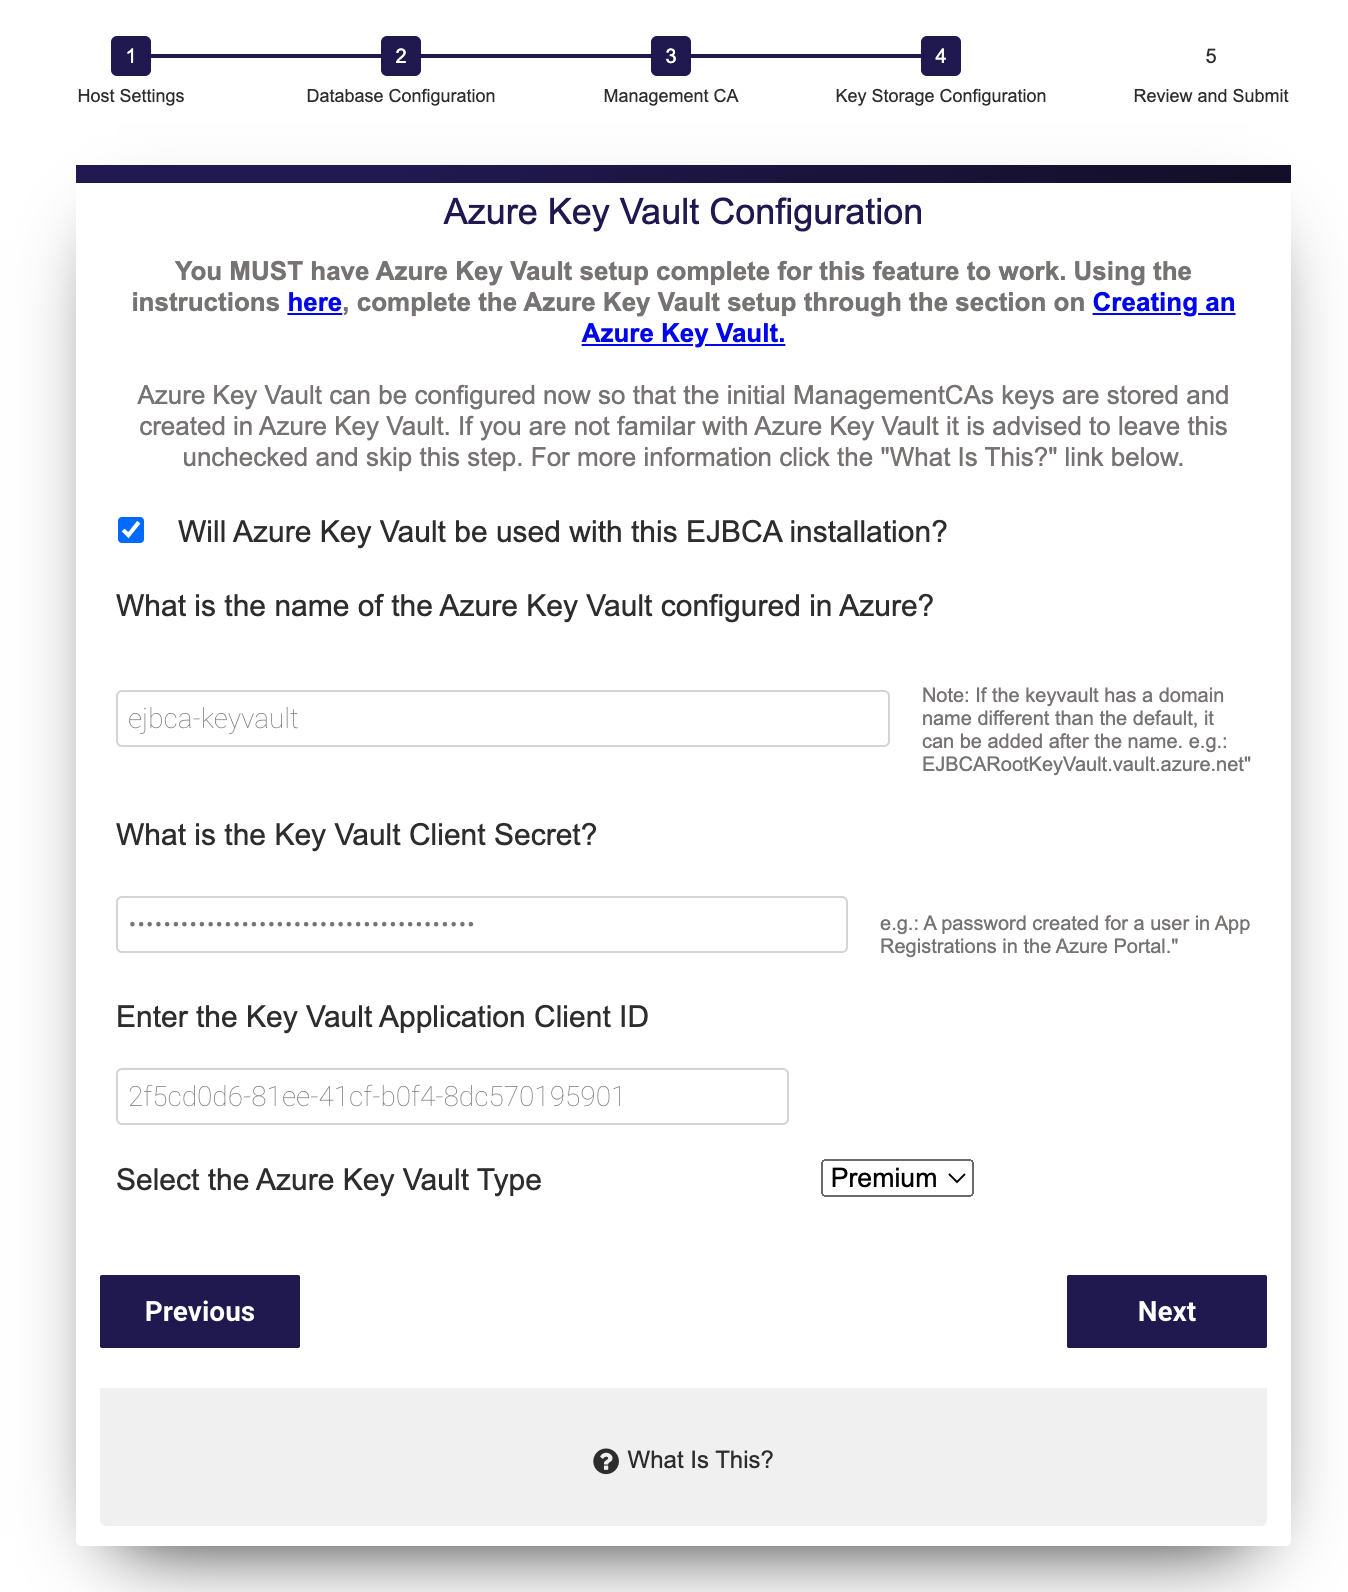
Azure Key Vault Configuration Fields
The following lists available fields.
Field | Description |
|---|---|
| Azure Key Vault Name | Name of the Vault instance to use. |
Key Vault Client Secret | The client secret of the Azure Application User allowed to access the Key Vault. |
Key Vault Application Client ID | The Client-ID of the Azure Application User configured to access the Key Vault. For more information see the EJBCA Cloud Azure Key Vault Integration Guide. |
| Key Vault Type | Either Premium or Standard depending on the type of Key Vault EJBCA Cloud will be configured to connect to. |
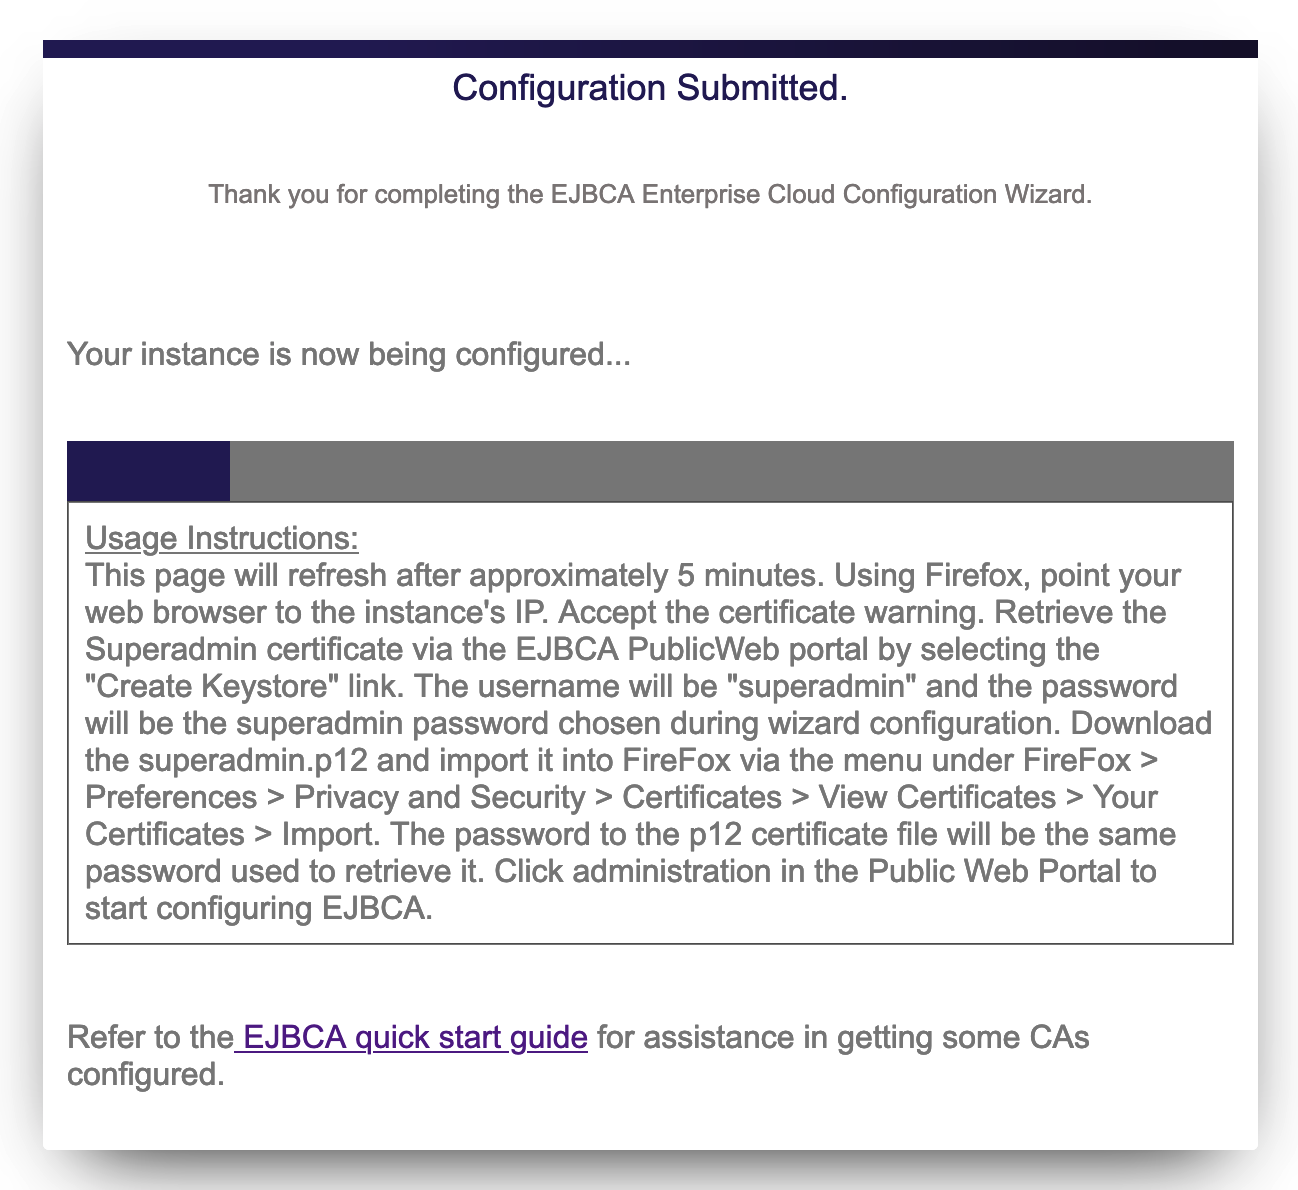
Step 5: Review and Submit
The Review and Submit page provides a summary of all the settings.
Once you have reviewed the settings, click Submit.
If for any reason you need to go back, click Previous and make changes accordingly.
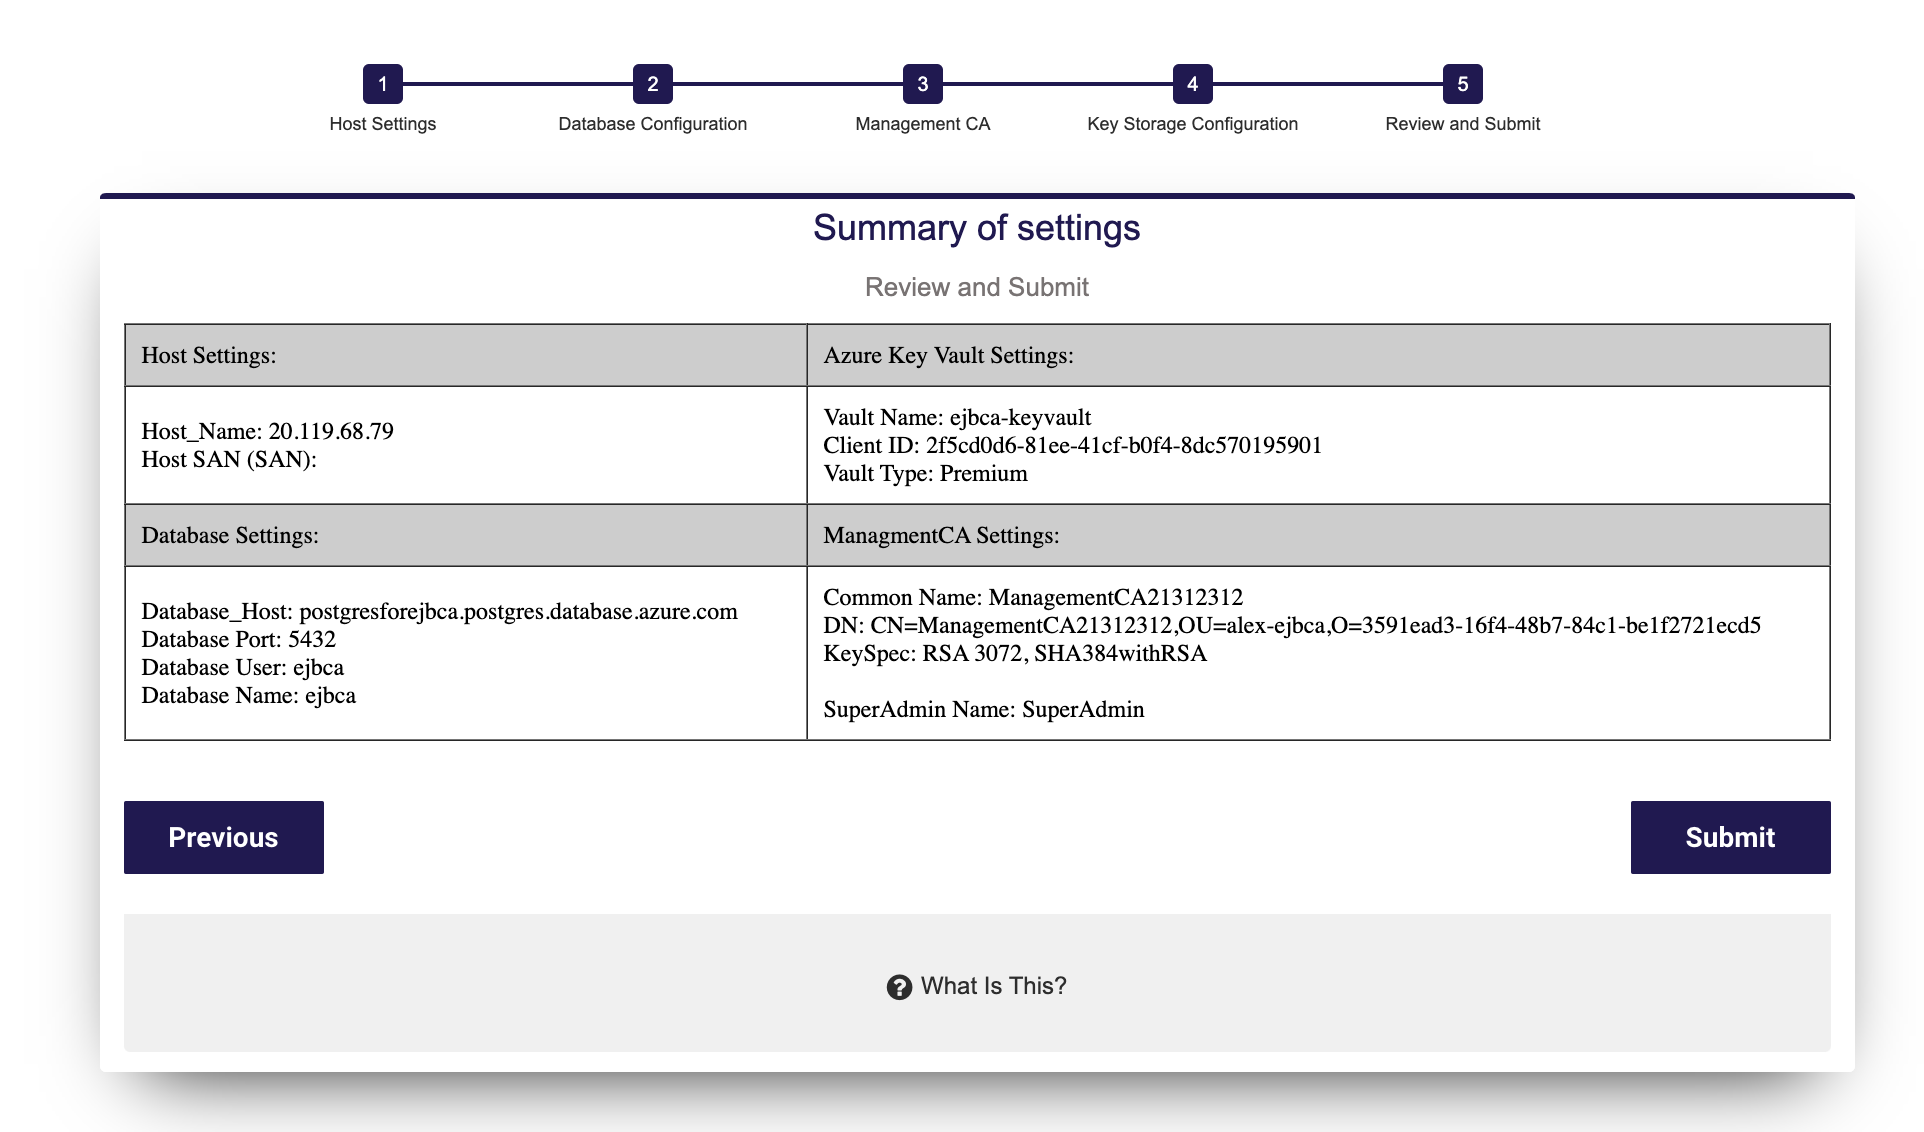
Once you click Submit a timer will begin. At this point, your instance configuration with your chosen settings is starting. The page will automatically refresh and you can proceed to the next section.