-
EJBCA Cloud AWS
- AWS Launch Guide
-
Quick Start Guide
- Create Crypto Tokens
- Create Root CA Certificate Profile
- Create Issuing CA Certificate Profile
- Create Certificate Authorities
- Create User and Workstation Profiles
- Create End Entity Profiles
- Request Certificate
- Create Another Administrator Account
- Import Certificate to Mozilla Firefox
- Configure Health Checks
- Create CRL Updater Service
- AWS Backup Guide
- AWS Restore and Upgrade Guide
- AWS TLS Certificate Generation Guide
- AWS RA Configuration and Administration Guide
- AWS VA Configuration and Administration Guide
- AWS Cluster Configuration Guide
-
AWS CloudHSM Integration Guide
- Multiple Crypto Tokens with AWS CloudHSM
- 1 - Create CloudHSM Cluster
- 2 - Use OpenSSL to Validate the HSM
- 3 - Initialize the CloudHSM
- 4 - Assigning the Security Group to the EJBCA Instance
- 5 - Configure the cloudhsm-client
- 6 - PKCS11 PIN
- 7 - Activate the Cluster
- 8 - Create a CloudHSM Crypto User
- 9 - Create a Keystore in the HSM with clientToolBox
- 10 - Test with EJBCA ClientToolbox
- 11 - Create a CryptoToken in EJBCA
- Appendix A - Restoring an HSM Backup to a New Instance
- Appendix B - Troubleshooting HSM Issues
-
AWS Certificate Manager Integration Guide
- Provisioning an EJBCA Instance and setting up CloudHSM
- Create Root CA Keys
- Create CloudHSM Crypto Token for Root CA
- Create the Root and Issuing CA Certificate Profiles
- Create End Entity Sub CA Profile
- Create Root CA that uses the CloudHSM Crypto Token
- Create AWS ACM Certificate Authority CSR
- Add ACM PCA End Entity
- Generate the ACM PCA Certificate for AWS
- Fulfill the Pending ACM PCA Certificate Request
- AWS S3 Publisher Configuration Guide
- How to Create Support Package
-
EJBCA Cloud Azure
- Azure Launch Guide
- Azure Backup Guide
- Azure Restore and Upgrade Guide
- Azure TLS Certificate Generation Guide
- Azure RA Configuration and Administration Guide
- Azure VA Configuration and Administration Guide
- Azure Cluster Configuration Guide
- Azure Key Vault Integration Guide
- How to Create Azure Support Package
- EJBCA Cloud Release Notes
Creating an App Registration in Active Directory
The following shows you how to add and register an application using App registrations in the Azure portal and then how to generate a secret (password), needed when obtaining tokens.
Registering the App in Active Directory and Generating Secret
- Login and access your Azure portal at https://portal.azure.com.
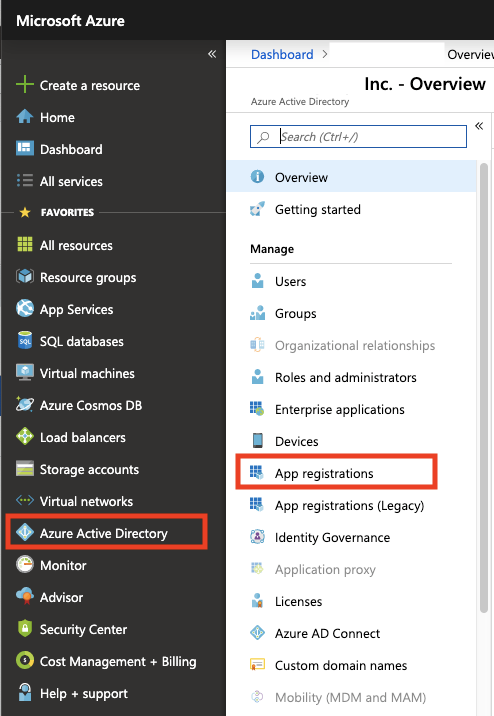
- Select the Azure Active Directory service in the left-hand navigation pane, and then select App registrations > New registration.
Specify an app name (that will be displayed to users of the app), for example "ejbca-vault", and then click Register.
Azure AD assigns a unique application (client) ID to your app and displays your application's Overview page.- On the Overview page, make a note of the Application (client) ID. This value will be required in EJBCA when creating a Crypto Token.
- Click Certificates & secrets to add a secret (password).
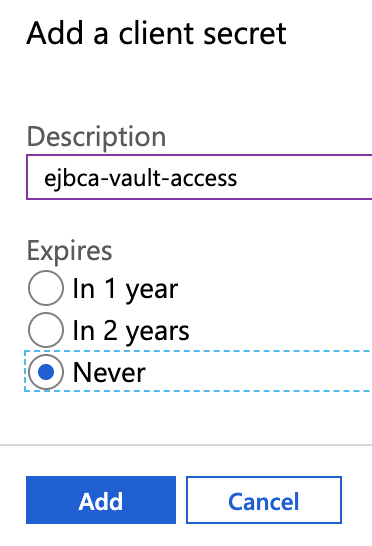
- Click New client secret in the Client secrets section.
- Enter a name for the secret, such as "ejbca-vault-access". Set the expiration if desired. In this example, the expiration is set to Never expire to allow the CA to always have access to the keys in the HSM. Click Add once done.
- A secret is generated and displayed. Note this secret down in a password manager such as Last Pass as it will only be displayed once in the portal. The secret will also be required in EJBCA when creating a Crypto Token in the later step Creating an Azure Key Vault Crypto Token in EJBCA.
Next, continue with Creating the Azure Key Vault.