Cluster
The cluster implementation of the Software Appliance uses Wireguard connections for all cluster communication. This means that the cluster nodes do not need to be physically located close to each other as long as they have good network connectivity. However, this also means that a node cannot distinguish between the failure of another node and an interrupted network connection to the other node. To avoid cluster nodes operating independently and receiving different data sets (a so-called split-brain situation), the cluster nodes coordinate and stop operating if they do not belong to the majority of connected nodes. This ensures that only one data set can be updated at a time. In the event of a temporary network outage, the unconnected nodes can easily synchronize their data with the majority data set and continue to operate.
Definition of Availability
The options on the Software Appliance Cluster page allow you to add cluster nodes, monitor an existing cluster, and manage its cluster nodes. You can find detailed information about the cluster members and their current status. In addition, an easy-to-use locking function prevents editing conflicts.
The availability is defined as the ability to keep the service running with full data integrity for the applications running on the Software Appliance.
Levels of Availability
Stand-alone instance
This is a basic single node installation of the Software Appliance. In case of a node failure, a new Software Appliance needs to be reinstalled from a backup. All data between the time of the last backup and the failure will be lost. If no cold standby a (spare) Software Appliance is available, the time of provisioning the new VM must be taken into account when calculating the acceptable downtime.
Hot standby with manual fail-over
In this configuration, two nodes are connected to form a cluster. The first installed node has a higher quorum vote than the second node.
If the second node fails, the first node continues to operate. The second node is set to the maintenance state. If the first node fails, the second node stops operating and is set into maintenance mode.
To bring the second node back into operation, manual interaction via the Software Appliance‘s administrative interface (WebConf) is required.
Manual intervention is also required to avoid data loss. The second node should only be Forced into Primary if the first node really is dead and cannot be recovered.
High Availability with automatic fail-over
This is a setup with three or more nodes. If one node fails, the remaining nodes can still form a cluster by a majority quorum vote and continue operation. If the Software Appliance that has failed is still switched on it will be set into maintenance.
To ensure that quorum votes never result in a tie, all nodes are assigned a unique quorum voting weight according to their assigned node number (Weight=128−NodeNumber).
In a setup where an even number of nodes N are evenly distributed equally between two sites, the site that is to remain Active when connectivity between the sites fails should have a larger sum of quorum vote weights than the other site.
Since cluster nodes with lower node numbers have a higher weighting, you should deploy nodes 1 to N/2 at the primary site.
Configuring a Cluster
The following covers how to create, configure, and manage a cluster.
HSM and Cluster
- Software Appliance cluster does not support SoftHSM.
- When you add a cluster node, the newly added node is informed about the currently configured HSM type. This HSM type will be predetermined for the node. After that, you need to manually configure the predetermined HSM on the node.
- The use of different HSM types on different cluster nodes is not supported!
Unlock / Lock the Cluster Configuration
To make changes to the cluster configuration - for example, adding or deleting a node - you must first unlock the cluster configuration form. This is a security feature to prevent accidental changes to the cluster or simultaneous changes by different users. Proceed as follows:
- Log in to your Software Appliance and open the Cluster page.
- In the section Cluster Members, click Unlock to make changes.

- You are notified that you have 5 minutes to make your changes. If you need more time, click Extend Lease to get another 5 minutes:

Information about locks is shared among all cluster nodes:
- When you retrieve a lease on Node1, all other nodes are notified that Node1 is holding the lease:

- A user on another node can click Acquire lease to request the lease from you / Node1.
When you grant this, the lease will be held exclusively by that other node. It can only be requested again after it expires.
Add a Cluster Node
Preconditions for Adding Nodes
- You can only add newly set up nodes to which no one has yet logged in.
If you add a node that is not newly deployed, you will see the following error after clicking Fetch TLS Fingerprint:
- If you want to add a new cluster node to an existing cluster, all existing nodes must be connected.
Proceed as follows to create a first cluster node or to add a node to an existing cluster:
- Log in to your Software Appliance and open the Cluster page.
- In the section Cluster Members, click Unlock to make changes.
- Click Add Cluster Node to open the Add Cluster Node dialog:
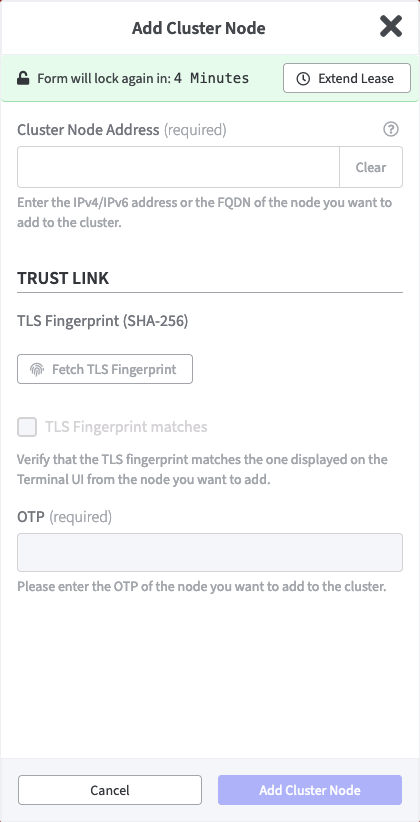
- Enter the Cluster Node Address of the new node as IPv4 or IPv6 address or as FQDN.
- Click Fetch Fingerprint to get the TLS fingerprint of the new node. The TLS Fingerprint will be displayed.
- Compare the indicated TLS fingerprint with the TLS fingerprint shown in the Terminal UI of the new node.
- If the two fingerprints are identical, confirm this by activating the option TLS Fingerprint matches. The field OTP will become editable.
- Enter the OTP for the new node.
- Click Add Cluster Node to confirm your entries and create the new node.
After the new node has been added, the VPN between the nodes will be created and the new node will receive information about the cluster configuration and the HSM type. In the section Cluster Members, the new node appears with the connectivity status Initializing, which changes to Connecting and finally to Connected. At the same time, the LTID of all nodes will converge.
When the new node appears as Connected, the cluster is operational:

Resolving Cluster Node Addresses
When you add a node to a new cluster, we add two entries to the cluster configuration.
The address for the new node and the adjusted address for Node1. The entry for the address of the newly added node is exactly as you specify it. The current network configuration of Node1 is used to decide which of the available addresses of Node1 is selected for the cluster configuration.
The rules for the Node1 address in the cluster configuration are as follows:
- You enter an IPv4 address for the new node → we pick the IPv4 address of Node1.
- You enter an IPv6 address for the new node → we pick the IPv6 address of Node1.
- You enter a hostname for the new node and
- Node1 has a hostname → we pick the hostname of Node1.
- Node1 does not have a hostname and
- The hostname of the new node only resolves to IPv4 → we pick the IPv4 address of Node1.
- The hostname of the new node only resolves to IPv6 → we pick the IPv6 address of Node1.
- The hostname of the new node resolves to IPv4 and IPv6 → we pick the IPv6 address of Node1.
Switch between Cluster Nodes
As soon as a cluster is configured you will find a drop down node selection list in the title bar:

The list offers the following:
- Node1: The name in the title bar is the name of the cluster node you are currently connected to.
- Cluster nodes in list: The list contains all available cluster nodes, excluding the node to which you are currently connected. Click any node to switch to its WebConf.
- Configure cluster: To switch to the Cluster page of the node you are currently connected to, click Configure cluster.
Edit a Cluster Node
If the IP address of a node has changed, you can edit the address via the Cluster page. Proceed as follows:
- Log in to your Software Appliance and open the Cluster page.
- In the section Cluster Members, click Unlock to make changes.
- In the Cluster Members list, find the node you want to edit and click Edit. The Update Cluster Node dialog opens:

- Enter the new Cluster Node Address and click Update Cluster Node.
The change will be transferred to all other connected nodes.
Automatic Address Change
If the following conditions apply, the IP address of a cluster node will be changed automatically:
- The node is reachable
- The IP address is static
- The node's connectivity is Connected or Connecting.
Dynamically configured IP addresses (DHCP) will not be changed automatically.
Check the Cluster
The Cluster page of the Software Appliance provides you with information about the node you are currently on, as well as about all other cluster members.
Cluster Status
Find here information about the cluster from the perspective of the node you are connected to. You will find here details about node and cluster, including information about the status of the cluster and its nodes:
Cluster Members
Find here a list of all cluster nodes that are currently configured. For each node, you will find the IP address, the last transaction ID (LTID), and the current status of the node.
The status of the node can be one of the following:
- Initializing
This is the first status when adding the node to the cluster. It lasts until the node has been fully added to the cluster.
- Connecting
The VPN to the node is established. The database management system has not yet joined the cluster.
- Connected
The node is part of the cluster and ready to receive data.
- Disconnected
The node is currently unreachable. There is no VPN connection with the node.
Delete a Cluster Node
You can delete nodes in a cluster. Proceed as follows:
- Log in to your Software Appliance and open the Cluster page.
- In the section Cluster Members, click Unlock to make changes.
- In the Cluster Members list, find the node you want to delete and click Remove.
In the Remove dialog, activate the confirmation Yes, I want to remove this node and click Remove.

The node will be removed from the cluster. Data on the node will remain untouched by this action.
Dealing with Problems
If the cluster is in a state that makes starting without manual intervention impossible like:
- node keeps showing Connecting
- more than one node shows the Force into Primary function in the Action column active
the Force into Primary option has to be used.
- In the Cluster page, go to the section Cluster Members and click Unlock to make changes.
- Find the node with the highest LTID and click Force into Primary which appears for this node only.
You are prompted to confirm the action. For security reasons and because the data of the other nodes will be destroyed, you have to explicitly type the confirmation: DESTROY ALL DATA

- Click Force into Primary to initiate the following:
- In the event that the the Connectivity status of a node is showing Disconnected, the node will be removed from the cluster configuration.
- If the Connectivity status of a node shows Connecting, the node will be reconnected to the cluster configuration.
- Data on all other connected nodes will be deleted.
- Data from the current node will be transferred to all other connected nodes.
Updating a Cluster regarding Setups that use DHCP
To update the cluster, regardless of whether it is 2 or 3 nodes, it is recommended to start from the last node.
- If it is a 2-node cluster:
start the update of Node2 and then repeat the same update process for Node1. - If it is a 3-node cluster:
start the update of Node3, then repeat the same update process for Node2 and then for Node1.
Follow the update process that we link for each of the nodes, depending on which hypervisor you are using.
Prerequisite: 2 or 3 VMs with the latest Software Appliance version must be available.
Copy the firmware of the individual VMs with the latest Software Appliance version and place them in a directory. This is used to update the version of the old VMs.

Important!
Note or make a note of the path to which the new firmware are copied.Follow the documentation on the Software Appliance update process for your hypervisor. See Update Hypervisor Process.
Click here for Update Process with ESXi
Click here for Update Process with Hyper-V
Click here for Update Process with KVM based Hypervisors