In Microsoft Azure, the instances already have the Azure Crypto Token enabled and ready for use. If installing EJBCA in Microsoft Azure using the Enterprise Software, edit the web.properties file and uncomment the following property:
keyvault.cryptotoken.enabled=true
BASH
Perform an ant deploy.
If the EJBCA Cloud instance was launched from the Azure Marketplace, proceed with the steps below.
To create an Azure Key Vault Crypto Token in EJBCA, do the following:
- In the EJBCA Admin Interface, click Crypto Tokens. For detailed information on CryptoTokens, refer the EJBCA Documentation Crypto Token Overview.
- Click Create new and specify the following:
- Enter a Name for the Crypto Token. In this example we will create a Crypto Token for a Root CA and use the value EJBCA Root Crypto Token.
- For Type, select Azure Key Vault.
- For the Authentication Code, use the value displayed when creating the secret in the Active Directory App Registration. This should have been stored in a password vault.
- Since you are creating a Root CA Crypto Token, do not enable Auto-activation. If creating a Issuing CA Crypto Token, then select Auto-activation.
- Under Key Vault Type, choose Premium.
- Enter the Key Vault Name as chosen when creating the Azure Key Vault. In this example, our Key Vault name is EJBCARootKeyVault. If the keyvault to be added has a domain name that is different than the default, it can be added to this field after the name. For example EJBCARootKeyVault.vault.azure.net.
- Enter the Key Vault Client ID as noted when creating the App Registration (under the Overview details).
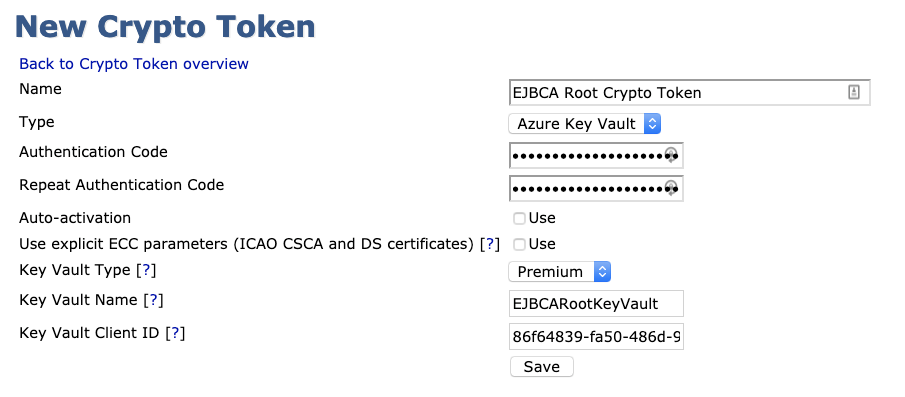
- Click Save and confirm that a notification about the successfully created crypto token is displayed.

NOTE Azure limits the keys to the following types:
| Key Algorithm | Key Specification |
|---|
| RSA | 2048 |
| RSA | 3072 |
| RSA | 4096 |
| ECC | P-256 / prime256v1 / secp256r1 |
| ECC | P-384 / secp384r1 |
| ECC | P-521 / secp521r1 |