Configure EJBCA SaaS in Azure
The following describes how to configure EJBCA in EJBCA SaaS.
Before You Begin
Review the following recommendations before you begin.
Firefox Recommendations
When configuring a PKI it is recommended to use Firefox with a new profile. This can avoid things getting populated with common features such as auto-complete.
To set up a dedicated profile to manage a PKI, type “about:profiles” in the address bar and create a new profile that holds the certificate that is only used to access PKI resources.
Firefox also has a separate certificate store away from the OS store. It will not be needed to use the MMC snap-in on Windows or the Keychain on macOS to use the certificate for EJBCA. It will also not prompt repeatedly to use it, only the first time which is a very common Mac issue.
IP Whitelisting
If whitelisting the IP addresses within your organization's firewalls are desired, use the following IP addresses as they are the outbound IPs for EJBCA SaaS in Azure. The following lists three gateways for three availability zones in each region:
- US Region: 20.84.213.69
- AP Region: 20.210.84.246
- EU Region: 20.250.56.89
Step 1 - Configure Keys in Azure Key Vault (AKV)
The following describes how to configure keys in Azure Key Vault (AKV) for the Root CA and the Issuing CA.
The keys are generated using pre-configured crypto tokens. Within EJBCA, Crypto Tokens store the keys that the CA uses to perform its duties. For more information, refer to the EJBCA Documentation on Crypto Tokens Overview as well as Managing Crypto Tokens.
Configure Keys in AKV for Root CA
To configure keys in AKV for the Root CA, do the following:
- In the PrimeKey SaaS portal, access the Root CA by selecting the Root CA tab. If needed, start the Root CA by clicking the Start Root CA button.
- Click the Root CA link once running to access the Root CA Admin interface.
- Accept the certificate prompt to authenticate to the EJBCA Root CA.
- Once in the EJBCA Admin interface, click Crypto Tokens under CA Functions.
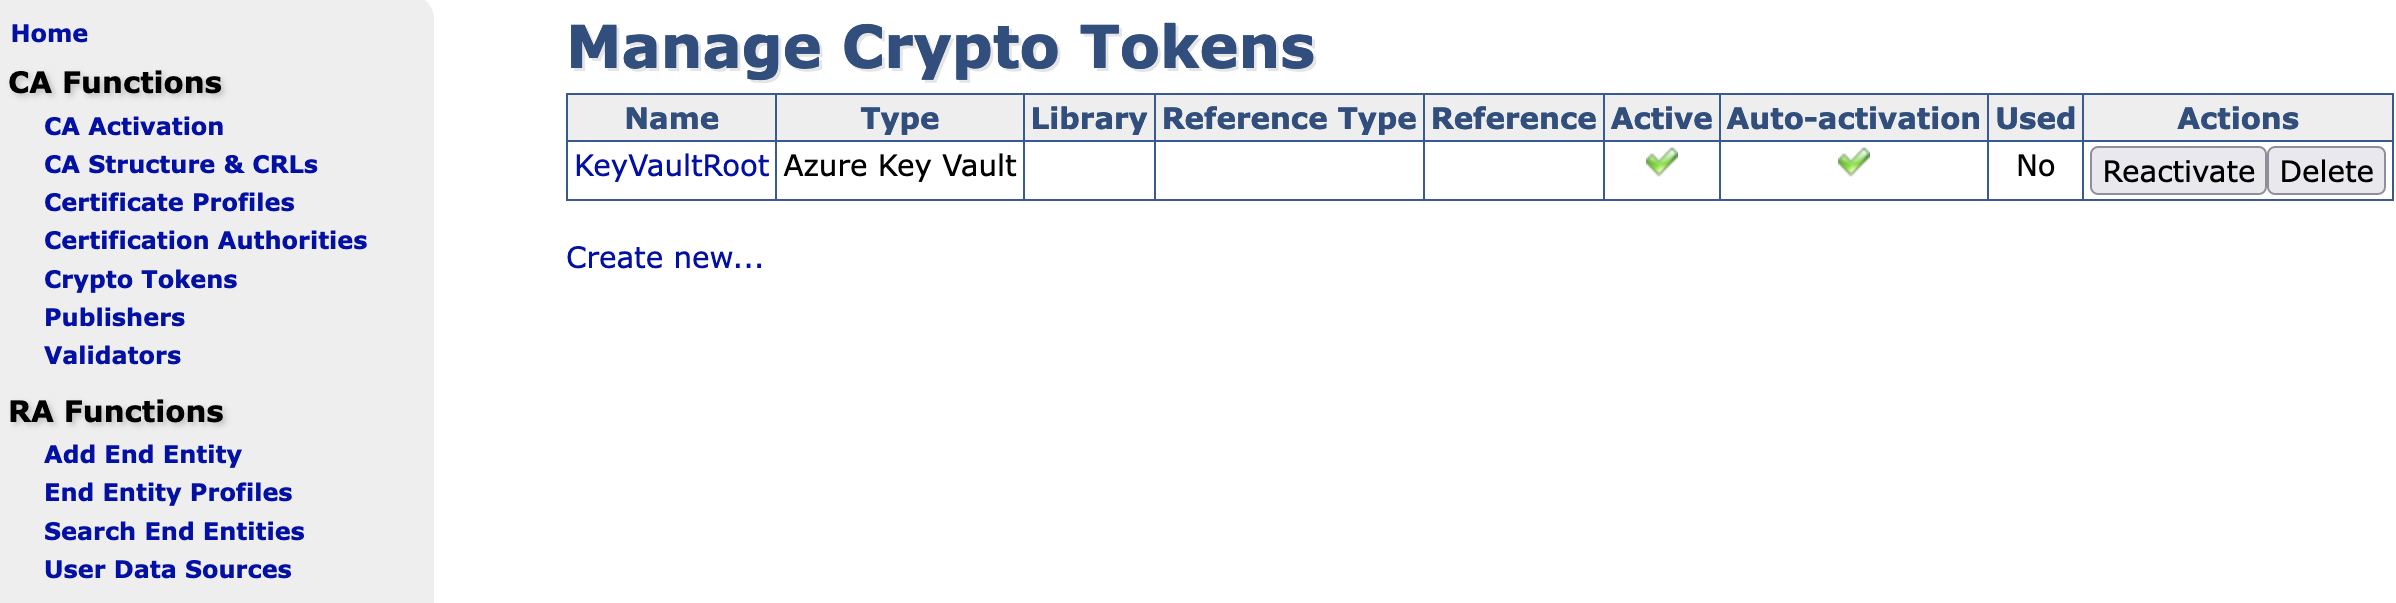
- Click the pre-configured crypto token KeyVaultRoot.
- A testKey (testKey001) has been created for you. This test key is used for the EJBCA health check. Two additional keys will need to be created for an EJBCA CA:
- signKey001 (signKeys are used for CA, CRL. and certificate signing)
- defaultKey001 (defaultKeys are used as a key wrapping key for key recovery)
For more information on Crypto Tokens, refer to the EJBCA Documentation on Crypto Tokens Overview and Managing Crypto Tokens.
- Enter the key name that you wish to use for the sign key, for example signKey001. Select the Key Algorithm you require such as RSA 4096, and then click Generate new key pair.
- Enter the key name that you wish to use for the default key, for example defaultKey001. Select the Key Algorithm you require such as RSA 2048, and then click Generate new key pair.

- For instructions on creating the Root CA, see Create and Configure Root CA.
Configure Keys in AKV for Issuing CA
To configure keys in AKV for the Issuing CA, do the following:
- In the PrimeKey SaaS portal, access the Issuing CA by selecting the EJBCA Links tab.
- Click the EJBCA Admin interface link under the section EJBCA Issuing CA Cluster to open the new tab to the Issuing CA.
- Accept the certificate prompt to authenticate to the EJBCA Root CA.
- Once in the EJBCA Admin interface, click Crypto Tokens under CA Functions.
- There are two crypto tokens, one for the Issuing CA and one for the Management CA. Select the KeyVaultIssuing crypto token.
- A testKey has been created for you. This test key is used for the EJBCA health check. Two additional keys will need to be created for an EJBCA CA:
- signKey001 (signKeys are used for CA, CRL. and certificate signing)
- defaultKey001 (defaultKeys are used as a key wrapping key for key recovery)
For more information on Crypto Tokens, refer to the EJBCA Documentation on Crypto Tokens Overview as well as Managing Crypto Tokens.
- signKey001 (signKeys are used for CA, CRL. and certificate signing)
- Enter the key name that you wish to use for the sign key, for example signKey001. If you plan on having more than one issuing CA, it is advisable to be more descriptive on the key names, for example "signKeyEnterpriseIssuingCA001". Select the Key Algorithm you require such as RSA 4096, and then click Generate new key pair.
- Enter the key name that you wish to use for the default key, for example defaultKey001. If you plan on having more than one issuing CA, it is advisable to be more descriptive on the key names, for example "defaultKeyEnterpriseIssuingCA001". Select the Key Algorithm you require such as RSA 2048, and then click Generate new key pair.
For instructions on creating the Issuing CA, see Create and Configure Issuing CA.
Since the Root CA is a dedicated offline root CA, external to the issuing CA cluster, use the instructions for Signing an External CA which involves creating an end entity on the Root CA and signing the CSR from the issuing CA in the public web of the root.
Step 2 - Create and Configure Root CA
The following describes how to create and configure the Root CA and certificate profile. For more information on creating Certificate Authorities (CAs), refer to the EJBCA Documentation on Managing CAs.
Create Root CA Certificate Profile
Certificate Profiles model how your CAs look with regards to the different types of certificates, DN contents, extensions, and so on.
To create a Root CA profile:
- In the PrimeKey SaaS portal, access the Root CA by selecting the Root CA tab. If needed, start the Root CA by clicking the Start Root CA button.
- Click the Root CA link once running to access the Root CA Admin interface.
- If prompted, accept the certificate prompt to authenticate to the EJBCA Root CA.
- Click the menu option Certificate Profiles under CA Functions.
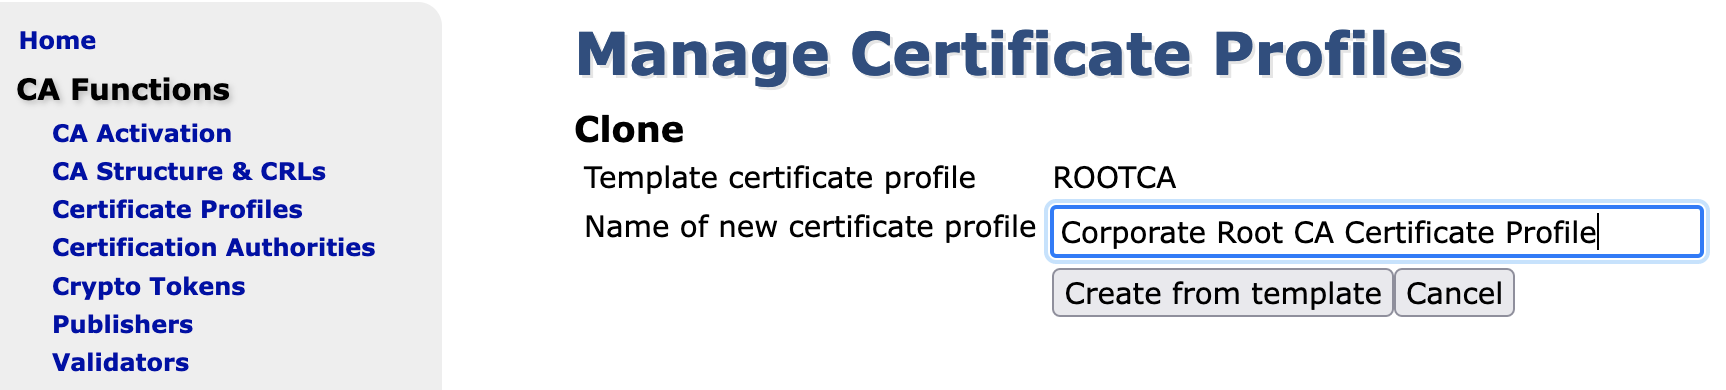
- Clone the ROOTCA profile to create your own for the Root CA you are going to create:
- Click Clone next to the ROOTCA profile.
- Specify a name for the Root CA Profile. For example, "Corporate Root CA Certificate Profile" and click Create from template in Name of new certificate profile.
- Click Edit on the Corporate Root CA Certificate Profile and specify the following:
- Available key algorithms: Select desired key algorithm, for example, RSA.
- Available bit lengths: Select desired bit lengths, for example, 2048-4096.
- Signature Algorithm: Select desired algorithm, for example; SHA384WithRSA
- Validity or end date of the certificate: Keep the validity at the default 25y7d.
- Clear LDAP DN order (to get X509 DN ordering) for greater compatibility with systems that use certificates.
- Click Save to save the Root CA Profile.
Create Root CA
To create a Root CA:
- Click the menu option Certification Authorities under CA Functions.
- In the Add CA field, enter a name for the Root CA such as "Corporate Root CA G1" and click Create.
- On the Create CA page, select KeyVaultRoot in the Crypto Token list.
- Ensure that all keys are populated appropriately. The keys you configured in step Configure Keys in AKV and named defaultKey001, signKey001, and testKey001 should be populated automatically with the rest as "- Default key".
- In the CA Certificate Data section, specify the following:
- Subject DN: Enter a common name for the CA. For example, CN=Corporate Root CA G1,O=ACME Corporation,C=US.
- Signed by: Select Self Signed since this is the Root CA.
- Certificate Profile: Select Corporate Root CA Certificate Profile or the equivalent profile named in the previous step.
- Validity: Specify 25y or the desired validity period.
- LDAP DN order: Clear Use.
- Under the CRL Specific Data section:
Change the CRL Expire Period to a desired value. Best practices recommend 1y for CRL validity of 1 year.
 It is not required to put a URL into the Root CA CDP. The Root CA CDP gets added to the Issuing CA's certificate.
Download and save a local copy of the Root CA public Certificate from the CA Structure & CRLs page of the EJBCA Administration interface of the Root CA.
Step 3 - Create and Configure Issuing CA
The following describes how to create and configure the Issuing CA
Create Profiles on Root CA for Issuing CA
Creating a custom certificate profile has the advantage of more flexibility and better management features. When creating a CA, to get the CDP defined in its public certificate it has to be added to the Certificate Profile when created. Adding a CDP to the CA itself is a field used by Certificate Profile that leverages the setting . If a Certificate Authority is created with a default profile, either delete the CA and create a new one or contact support to fix this.
CDP and AIA extensions are populated based on what is in the Certificate Profile at the time the CA is created. Revocation is always checked from the issuer of the certificate being used. For a device, this is the issuing CA. When checking revocation, the revocation status is checked with the issuer who issued that certificate. The Issuing CA certificate's validity is checked from its issuer, the Root CA. End Entity certificates are issued from the Issuing CA, which means those certificates need to have the issuing CAs CDP in them. Since the Root CA is a self-signed certificate, adding the CDP for itself creates a loop since it would be checking revocation with itself. If the extension is added to a Root CA certificate it should be added as a non-critical extension. Again, it should not be added there.
To create an Issuing CA Certificate Profile:
- In the PrimeKey SaaS portal, access the Root CA by selecting the Root CA tab. If needed, start the Root CA by clicking the Start Root CA button.
- Click the Root CA link once running to access the Root CA Admin interface.
- If prompted, accept the certificate prompt to authenticate to the EJBCA Root CA.
- Click the menu option Certificate Profiles under CA Functions.
- Clone the SUBCA profile to create your own for the Issuing CA you are going to create:
- Click Clone next to the SUBCA profile.
- Specify a name for the Issuing CA Profile. For example, "Corporate Issuing CA Certificate Profile" and click Create from template in Name of new certificate profile.
- Click Edit on the Corporate Issuing CA Certificate Profile and specify the following:
- Available key algorithms: Select desired key algorithm, for example, RSA.
- Available bit lengths: Select desired bit lengths, for example, 2048-4096.
- Signature Algorithm: Select desired algorithm, for example; SHA384WithRSA
- Validity or end date of the certificate: Change the validity to 15y7d.
- Clear LDAP DN order (to get X509 DN ordering) for greater compatibility with systems that use certificates.
- In the X.509v3 extensions section, specify the following:
: Select Use if you would like to use CRL based revocation checks.
Add the Root CA Cached CRL URL (obtained from the EJBCA Links Page in the PrimeKey SaaS Portal) in the CRL Distribution Point URI field. Ensure the link starts with http and not https.
 This value can be obtained from EJBCA by navigating the SaaS portal to the EJBCA Links page under the section CRLs and OCSP. Clicking the link provided shows you the SKIDHash for the RootCA. Get the link from the Download link.
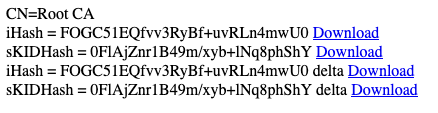
For example: https://root.corporation.us.prod.saas.primekey.com/ejbca/publicweb/crls/search.cgi?iHash=ABCDEFGzZab1cdEF4VAJRz2z8Ab1c
The default value entered here is added by EJBCA. Using the standard URL, EJBCA generates causes client look ups for a CRL to have EJBCA generate a new CRL and delivers it to the requestor. This offers less performance. Approximately 3-4 per second per node can be generated this way. The cached CRL URL above is far more efficient. A check is done to see if the CRL being delivered is the most recent. If so, it hands it to the requestor from its already cached version. This can net 60-70 a second per node.
- CRL Issuer: Clear this field or enter the full DN of the Root CA. For example, CN=Corporate Root CA G1,O=ACME Corporation,C=US
Authority Information Access: Select Use if you would like to use OCSP based revocation checks.
If OCSP revocation checking is desired, enter the OCSP URL (obtained from the EJBCA Links Page in the EJBCA SaaS Portal) in the OCSP service Default URI field. Add the OCSP URL (obtained from the EJBCA Links Page in the EJBCA SaaS Portal) in the OCSP Service Locator URI" field. Ensure the link starts with http and not https.
- Clear LDAP DN order (to get X509 DN ordering) for greater compatibility with systems that use certificates.
- Under Available CAs select the Root CA.
- Click Save to save the Issuing/SubCA Profile.
Create Issuing CA CSR on the Issuing CA Cluster
To create an Issuing CA:
- In the PrimeKey SaaS portal, access the Issuing CA by selecting the EJBCA Links tab.
- Click the EJBCA Admin interface link under the section, EJBCA Issuing CA Cluster to open the new tab to the Issuing CA.
- If prompted, accept the certificate prompt to authenticate to the EJBCA Issuing CA.
- Click the menu option Certification Authorities under CA Functions.
- In the Add CA field, enter a name for the Issuing CA such as "Corporate Issuing CA G1" and click Create.
- On the Create CA page, select KeyVaultIssuing in the Crypto Token list.
- Ensure that all keys are populated appropriately. The keys you configured in step Configure Keys in AKV and named defaultKey001, signKey001, and testKey001 should be populated automatically with the rest as "- Default key". Make corrections as needed.
- In the CA Certificate Data section, specify the following:
- Subject DN: Enter a common name for the CA. For example, CN=Corporate Issuing CA G1,O=ACME Corporation,C=US.
- Signed by: Select External CA since this is the Issuing CA that will be signed by our external RootCA created in the previous steps.
LDAP DN order: Clear Use.
- In the CRL Specific Data section, specify the following:
- CRL Expire Period: Specify the interval for the CRL file to expire and no longer be valid. The default value 1 day (1d) can be changed to for example 3 days (3d).
CRL Issue Interval and CRL Overlap Time: Either can be used. To issue CRLs every day, change Issue Interval to "1d" and Overlap Time to "0m". To issue CRLs each 3 days, 10 minutes before the old one expires, change Issue Interval to "0m" and Overlap Time to "10m". It is recommended to issue each day with a 3 day validity.
- Leave the CDP and AIA values empty since those values are added later.
In the Other Data section, Monitor if CA active (healthcheck): Select Activate as this CA should be up all the time issuing certificates and should therefore be monitored by health checks.
- Browse to the Root CA certificate downloaded earlier. Click Choose File under CA chain certificates and select this certificate.
- To save the CA values and create a CSR, click Make Certificate Request.
- Save the CSR to your local computer in PEM format.
Create the End Entity Profile on the Root CA for the Issuing CA
To create a certificate profile and an end entity profile on your Root CA node, do the following:
- Select the End Entity Profiles menu option in the Root CA Admin interface.
- Create a new end entity profile by entering a name for the profile, for example "Issuing CA End Entity Profile", and then click Add Profile.
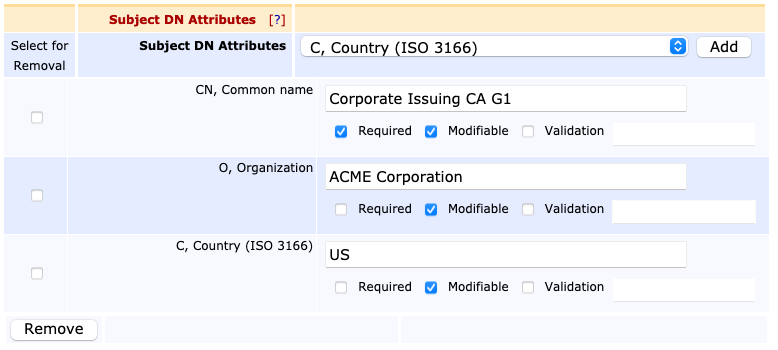
- On the End Entity Profile page, under the section Subject DN Attributes, add the Subject DN attributes from the list that were used in the DN name above when creating the Issuing CA In the example of CN=Corporate Issuing CA G1,O=ACME Corporation,C=US, the values O, Organization and C, Country (ISO 3166) would be added.
- Additional settings to select are:
- Default Certificate Profile: Pick the previously created Issuing CA certificate profile.
- Available Certificate Profile: Pick the previously created Issuing CA certificate profile.
- Default CA: The Root CA that is going to sign the CSR.
- Available CAs: The Root CA that is going to sign the CSR.
- Default Token: Select User Generated.
- Available Token: Select User Generated.
- Default Certificate Profile: Pick the previously created Issuing CA certificate profile.
- Make additional adjustments as required and save the end entity profile.
Add the Issuing CA End Entity on the Root CA
To add the Issuing CA End Entity on the Root CA, do the following:
- Navigate to the Root CA Node and access the EJBCA Admin interface if not already done.
- Click the RA Functions > Add End Entity menu option.
- Add a new end entity using the end entity profile you created in the previous step.
- Complete the end entity values for:
- Username: End Entity Name such as "IssuingCA".
- Password: Used to submit the CSR for signing.
- Common Name: Needs to match the values entered above when creating the CAs CSR on the Issuing CA.
- Certificate Profile: Issuing CA Certificate profile created previously.
- CA: Root CA.
- Token Type: User Generated (CSR).
- Click Add.
Step 4 - Sign CSR
To sign the CSR and issue the CA certificate using the Root CA on your Root CA instance, do the following:
- Go to the Public Web on your Root CA instance. There is a link at the bottom left navigation of the Admin UI. This link can also be obtained from the EJBCA Links Page in the EJBCA SaaS Portal.
- Select Fetch CA Certificates.
- Select the Download as PEM link under the Root CA performing the Issuing CA signing. Save this file to your local computer.
- Select the Create Certificate from CSR menu option.
- Enroll using the username and enrollment code you specified when adding the end entity in the Create Issuing CA section.
- Upload or copy the CSR to the page.
- Save the certificate to your local computer.
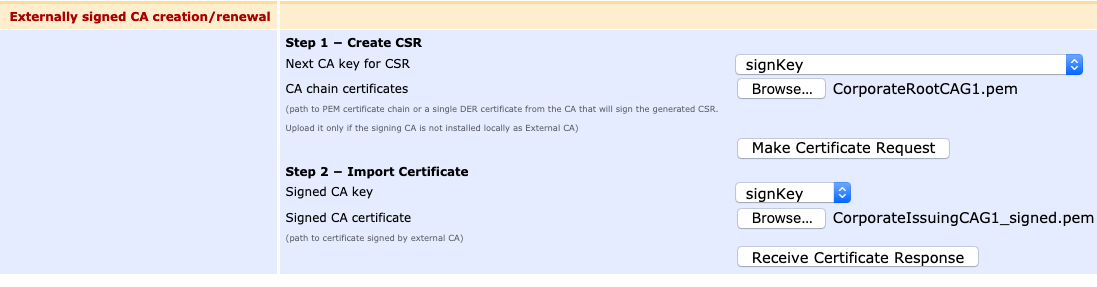
Step 5 - Import Signed CA Certificate
To import the CA certificate on the Issuing CA instance, perform the following steps:
- On the Issuing CA instance, go to the Admin interface, select the menu option CA Functions > Certificate Authorities, and click Edit CA of the CA you created in the Create Issuing CA section. It will be identified by "Waiting for Certificate Response".
- Scroll to the bottom of the CA properties page.
- In the section Externally signed CA creation/renewal:
- In section Step 2 - Import Certificate, browse to the signed certificate file generated from the Root CA.
- Click Receive Certificate Response to import the externally signed CA certificate and activate the CA.
You have now configured the Root CA and Issuing CA and created a dedicated certificate profile and an end entity profile for the external CA on your Root CA node.
Step 6 - Change CRL and CDP Values for the Issuing CA
CRL URL (CDP) and OCSP URLs (AIA) for revocation checks to the Issuing CA get added to End Entity certificates generated from the issuing CA. The CDP and AIA extensions added to the End Entity certificates are added from the End Entity Certificate profile using a setting called “Use CA defined CDP”. This prevents misconfiguration from having a CDP entered into each Certificate Profile used.
To configure a CDP and AIA in the CA for certificate profiles to use perform the following steps:
- In the PrimeKey SaaS portal, access the Issuing CA by selecting the EJBCA Links tab.
- Click the EJBCA Admin interface link under the section, EJBCA Issuing CA Cluster to open the new tab to the Issuing CA.
- If prompted, accept the certificate prompt to authenticate to the EJBCA Issuing CA.
- Click the menu option Certification Authorities under CA Functions.
- Select the Issuing CA previously created and click Edit CA.
- Scroll down to locate the section Default CA defined validation data.
For Default CRL Distribution Point enter the Cached URL to the issuing CA. This URL is obtained from the EJBCA Links Page in the EJBCA SaaS Portal). Ensure the link starts with http and not https.
This value can be obtained from EJBCA by navigating the SaaS portal to the EJBCA Links page under the section CRLs and OCSP. Clicking the link provided shows you the SKIDHash for the Issuing CA. Get the link from the Download link.
For example: For example: https://issuing.corporation.us.prod.saas.primekey.com/ejbca/publicweb/crls/search.cgi?iHash=ABCDEFGzZab1cdEF4VAJRz2z8Ab1cA new CA will have been added to the cached CRLs page.

- For OCSP service Default URI enter the OCSP URL. This URL is obtained from the EJBCA Links Page in the EJBCA SaaS Portal). Ensure the link starts with http and not https.
- Click Save.
- Click the menu option Certificate Profiles under CA Functions on the main screen of the EJBCA Administrative Interface of the Issuing CA.
- Clone the SERVER or USER profile to create your own for the End Entity to issue certificates to:
- Click Clone next to the SERVER or USER profile.
- Specify a name for the device profile. For example, "TLS WebServer Certificate Profile" and click Create from template in Name of new certificate profile.
- Click Edit on the newly created Certificate Profile and specify the following:
- Available key algorithms: Select desired key algorithm, for example, RSA.
- Available bit lengths: Select desired bit lengths, for example, 2048-4096.
- Signature Algorithm: Select desired algorithm, for example; SHA384WithRSA
- Clear LDAP DN order (to get X509 DN ordering) for greater compatibility with systems that use certificates.
- In the "X.509v3 extensions" section, specify the following:
- : Select Use if you are going to use CRL based revocation checks.
- : Select Use.
- CRL Issuer: Clear this field or enter the full DN of the Issuing CA. For example, CN=Corporate Issuing CA G1,O=ACME Corporation,C=US
- Authority Information Access: Select Use if you would like to use OCSP based revocation checks.
- Clear LDAP DN order.
- Click Save.
Checking Revocation of a CRL
To check revocation of a CRL:
With OpenSSL, check the content of a certificate with:
openssl x509 -in certificate.pem -text -nooutBASHDo this for the Root, Issuing and device issued certificates to make sure they look correct.
To check the revocation status of an issued cert, get the CRL from the Public Web of the Issuing CA (in PEM format) as well as the public Issuing CA certs and chain. Cat the chain and the PEM CRL into a single file:
cat chain.pem crl.pem > crl_chain.pemBASHUse OpenSSL to verify the CRL.
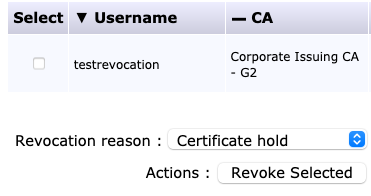
openssl verify -crl_check -CAfile crl_chain.pem device_cert.pemBASHThe certificate can then be temporarily revoked. Search for the End Entity of the device certificate in Search End Entities under RA Functions (status = all is easiest), and select the box next to the End Entity with the certificate to be revoked.
- Select a revocation reason (Certificate Hold is the only reversible option), and then click Revoke Selected.
- Ensure the status is revoked:

- Then go to the CA Structure and CRLs, click Create CRL under the CA that issued the cert. Download a new CRL from the Public Web in PEM format chain them together again and check revocation with the new CRL.
Checking Revocation with OCSP
To check revocation with OCSP:
- To check the status of an OCSP server certificate, generate a certificate with the profiles configured correctly.
Check the initial revocation status with OCSP using the following command:
openssl ocsp -issuer CorporateIssuingCAG2.cacert.pem -cert testrevocation.pem -url https://issuing.corporation.us.prod.saas.primekey.com/ejbca/publicweb/status/ocsp -no_nonce -CAfile CorporateIssuingCAG2-chain.pemCODECorporateIssuingCAG2.cacert.pem = The issuing CA certificate.
testrevocation.pem = The device certificate from the issuing CA.
https://issuing.corporation.us.prod.saas.primekey.com/ejbca/publicweb/status/ocsp = The OCSP URL of your SaaS deployment.
CorporateIssuingCAG2-chain.pem = The full Root CA and Issuing CA Certificate chain.The return value for a properly checked certificate is:
Response verify OK testrevocation.pem: good This Update: Mar 17 23:41:04 2021 GMTCODEThe certificate can then be temporarily revoked. Search for the End Entity of the device certificate in Search End Entities under RA Functions (status = all is easiest), select the box next to the End Entity with the certificate to be revoked.
- Select a revocation reason (Certificate hold is the only reversible option), click Revoke Selected.

- Ensure the status is revoked:
Run the OpenSSL command in step 2 again to display the revoked status:
Response verify OK
testrevocation.pem: revoked
	This Update: Mar 17 23:56:07 2021 GMT
	Reason: certificateHold
	Revocation Time: Mar 17 23:54:52 2021 GMT
CODE
Next - Enable Syslog Log Streaming
Next, continue to Enable Syslog Log Streaming.