Setup Steps Overview (recommended)
The following provides some example initial setup steps, recommended for setting up the Software Appliance.
After logging into the Software Appliance for the first time, we recommend the following setup steps.
Step 1 - Add a new user account
Create a user account, by adding either a client certificate user account or an OAuth user account.
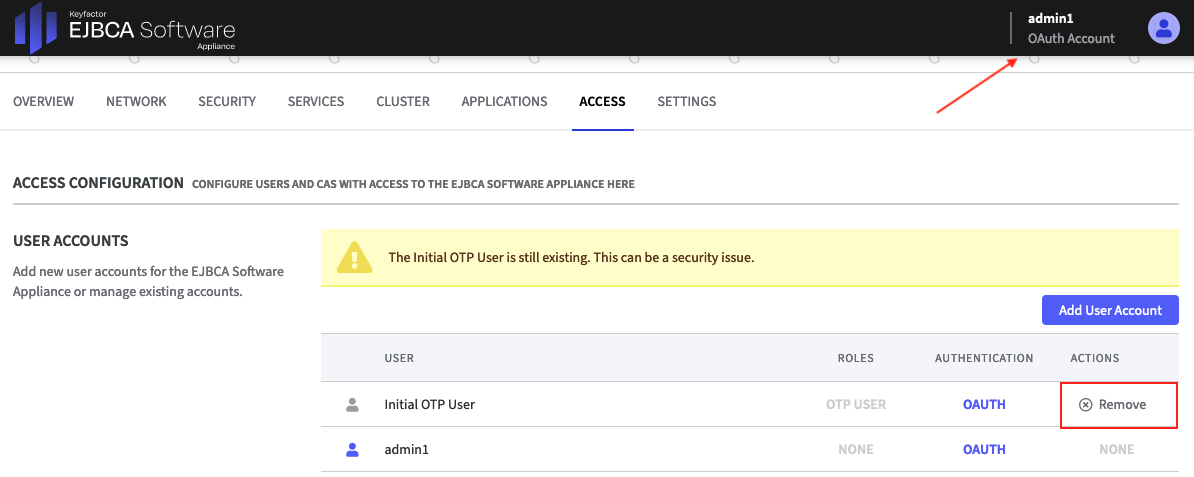
Step 2 - Remove the OTP User
The person who manages the virtual machines and thus can see the OTP/TTY is, in many cases, not the person who manages the Software Appliance. Therefore, you should remove the Initial OTP User to avoid security issues.
After the new User Account is added, log in again with the new User Account. Now you can delete the Initial OTP User.
In the Actions column of the User Accounts table, click Remove:
When prompted, click Remove to confirm the action.
Step 3 - Configure a Hardware Security Module (HSM)
You can configure a Hardware Security Module (HSM) to store and protect your cryptographic keys. Optionally, you can use the software-based SoftHSM implementation for demonstration or testing purposes.
Attention!
Configuring an HSM for the Software Appliance is irrevocable. To change an HSM configuration, you need to reset the Software Appliance.
For instructions on how to configure the HSM, see:
- Configuring a TrustWay Proteccio netHSM
- Configuring a Thales DPoD HSM
- Configuring a Luna Network HSM
- Configuring an Entrust nShield Connect HSM
- Security: Configuring a Securosys Primus HSM
- Configuring an Utimaco CryptoServer LAN
Step 4 - Configure the EJBCA Application
Next, create a Certificate Authority (CA) and Crypto Token in EJBCA. Within EJBCA, Crypto Tokens store the keys that the CA uses to perform its duties. For more information, refer to the EJBCA Documentation Crypto Tokens Overview and Managing CAs. The following provides some example steps for creating a Crypto Token and CA in EJBCA.
Create Crypto Token and Keys
Follow the example steps below to create a Crypto Token and keys in EJBCA. For more information, refer to the EJBCA Documentation Crypto Tokens Overview and Managing Crypto Tokens.
To create a Crypto Token and keys in EJBCA, do the following.
- On the EJBCA Software Appliance Overview page, click Admin Web for EJBCA listed in the Application Overview.
- In EJBCA, click Crypto Tokens under CA Functions.
- On the Manage Crypto Tokens page, click Create new.
- On the New Crypto Token page, specify the following:
- Name: Specify a name for the new crypto token.
- Authentication Code: Specify the password to be used to activate the slot.
- Type: Select PKCS#11.
- PKCS#11: Reference Type: How to reference your PKCS#11 slot, by number, index or label.
- PKCS#11: Reference: The slot number, index or label of the slot you want to connect to.
- Click Save to create the crypto token.
The new Crypto Token is displayed on the Crypto Token page. Next, create keys for the crypto token.
- Create two key pairs within the Crypto Token according to the following example::
- Specify an alias, for example, otherKey, select key specification RSA 3072 bit, and then click Generate new key pair. This key will be used for everything not signing.
- Specify an alias, for example, signKey, select key specification RSA 3072 bit, and then click Generate new key pair. This key will be used for certificate signing.
The new keys are available and listed on the page.
Create CA
Follow the example steps below to create a Certificate Authority (CA) in EJBCA. For more information on Certificate Authorities (CAs) and available fields, refer to the EJBCA Documentation Certificate Authority Overview and for information on adding an external Management CA, refer to Importing an External CA.
To create a CA in EJBCA, do the following.
- Click Certificate Authorities under CA Functions.
- In the Add CA field, enter a name for the CA and click Create.
- On the Create CA page, specify the following and then click Create:
- Crypto Token: Select the Crypto Token created in the earlier step.
- Signing Algorithm: SHA256WithRSA.
- The keys previously created and named otherKey and signKey (in section Create Crypto Token and Keys) should be populated automatically with the rest as "- Default key".
- defaultKey: Verify that the key pair created earlier is selected, in this example: otherkey.
- certSignKey: Verify that the key pair created earlier is selected, in this example: signkey.
- keyEncrypKey: Select -Default key.
- testKey: Select -Default key.
- Signed By: Self Signed.
- Certificate Profile: Root CA.
- Validity: 5y.
- Click Create to list the newly created CA on the Manage Certification Authorities page.
You have now created a CA and Crypto Token and keys.
Step 5 - Renew the TLS certificate
This may be necessary to comply with your company's security regulations, for example, to remove the security warning in the browser address bar. For instructions on how to renew the TLS certificate, see Managing TLS Certificates.